Creating a Macro
On the Macros page, you can create new custom macros that will be available to all users of your organization. Macros can include any part of a search query, such as a field list or where clause, and do not need to be a complete query. Each macro within the Anomali platform requires a unique name and the AQL definition. The description and arguments are optional.
Note: Macros support both the eventlog and OCSF Version 1.2 schema fields with dotted notation. For OCSF schema fields, array indexes are 1-indexed, that is, they start at array[1] and not array[0]. See OCSF Schema Overview for more information on the OCSF fields and naming conventions.
To create a macro:
(Click the image to enlarge it.)
-
Navigate to Manage > Macros.
-
Click New.
-
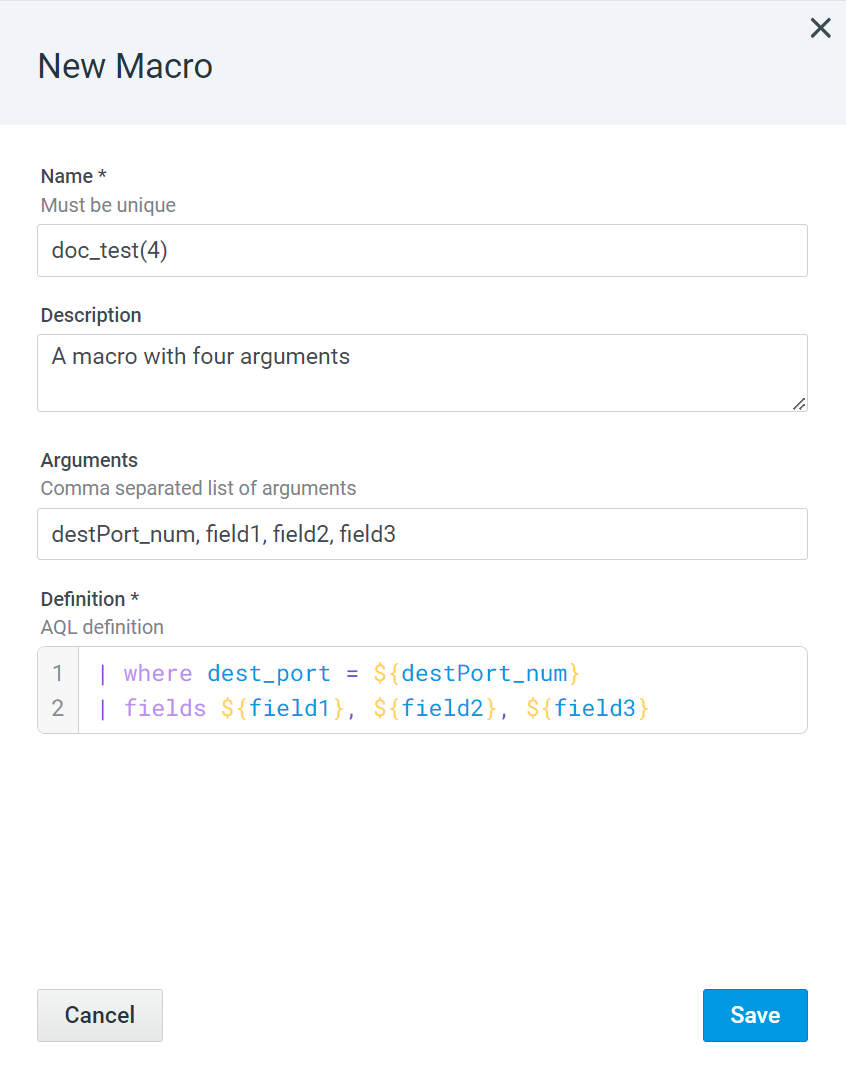
In the New Macro dialog box that opens, provide the following information:
-
Name: Enter a unique name for the macro. To be used in Search, only the following characters are accepted in macro names: letters, numbers, underscores (_), hyphens (-), and dots (.). However, the first character of a macro name must be a letter.
Note: If a macro includes arguments, add the number of arguments in parenthesis after the macro name. For example,test_macro(3), where(3)is the number of arguments in the macro. -
(Optional) Description: Enter a description of what the macro can accomplish in Search.
-
(Optional) Arguments: Add macro arguments when you need to change or control the output of the macro. Arguments are the actual values that are passed to the macro when it is executed. For example, to search for event traffic going to destination port 443, the search query will be the following:
|where dest_port = 443. However, using an argument instead of443allows any port number to be inserted into the query. -
(Optional) In the Tags field:
-
Enter or select one or more resource tags to apply to the macro. The auto-complete suggestion shows tags you own and tags shared to your organization. Private tags associated with other users are not shown, except to organization administrators.
-
To create a new tag, type a name containing up to 50 characters and click Customize tag color to select a color. See Creating a Resource Tag to learn all the ways in which you can create resource tags. A new tag is added to the shared tag list immediately, even if you abandon the tag creation.
-
To apply an existing tag, type in the field and select it from the auto-complete suggestion results.
-
Click Manage Resource Tags to view existing or newly created tags.
-
-
Definition: Enter the AQL search query that will be executed when the macro is inserted in Search. Arguments must be wrapped in
${ }in the macro definition. Here is an example snippet:Copy| where dest_port = ${destPort_num}
| fields ${field1}, ${field2}, ${field3}
-
-
Click Save.
-
Configure User Sharing and Permissions.
Note: Newly created tags default to Everyone in my Organization (Read). Only tag owners and users with write permission can add or remove tags. See Resource Tagging Permissions for more information.
The newly created macro is added to the list of custom macros.
To learn how to use macros with arguments in Search, refer to Using Custom Macros in Search.