Views
Search Views allow you to view the default mapping between the event fields of a specific source type and a selected schema, enabling out-of-box content dashboards for a particular sourcetype or OCSF category.
Views support both the Eventlog (standard) schema and the OCSF Schema Overview. With support for creating aliases for fields and directly referencing them in Search queries, views let you perform schema-on-the-fly field extractions for easier searching and data filtering.
Eventlog and OCSF views are subject to their respective eventlog and OCSF data access filters defined in user roles. See Role-Based Access Control for Schemas for more information.
When Schema RBAC is active for your organization, the schema filters in your assigned roles determine which data this feature returns. An eventlog filter limits your results to only the eventlog data your role permits, and an OCSF filter limits your results to only the OCSF data your role permits. If a query runs against a schema for which your role has no filter assigned, the query returns a forbidden error. For details, see Role-Based Access Control for Schemas.
Benefits
Views offer the following benefits:
-
Field Recasting: Recast fields as per the naming convention of a log source you are familiar with, making it easier for you to understand, adapt, and use your data effectively while using Anomali Search.
-
Schema Compatibility: Use alias fields in search queries as well as filter conditions, as if they were parsed schema fields.
-
Example: The most common AQL syntax is
<alias_field>=<value>.
-
-
OCSF-Compliant Vendor-Neutral Field Access: OCSF views bind to an event category rather than a specific log source. A single OCSF view for a category such as Network Activity applies across all OCSF-compliant data sources that produce events in that category, regardless of vendor or format. For example, network events from multiple firewall vendors are all normalized to the same OCSF Version 1.2 fields, allowing you to apply field aliases present in one OCSF view consistently across all of them. By contrast, eventlog views bind to a specific sourcetype, so each vendor or log format requires its own view.
-
Dynamic Dashboarding: Create out-of-the-box dynamic dashboards for a sourcetype or OCSF category through a default view.
-
Reduced Data Reprocessing: Use new fields even against old data, eliminating the need to reprocess old data.
-
Reduced Data Volume: Leverage the full Common Information Model standard without creating or expanding your existing schema, reducing the data volume.
-
Simplified Usage: Provide schema-field notation without additional programmatic syntax, simplifying large search queries and improving the overall user experience.
-
MSSP Support: Views are supported for the Managed Security Service Providers feature.
Overview
To access all views available, navigate to Search > Manage > Views.
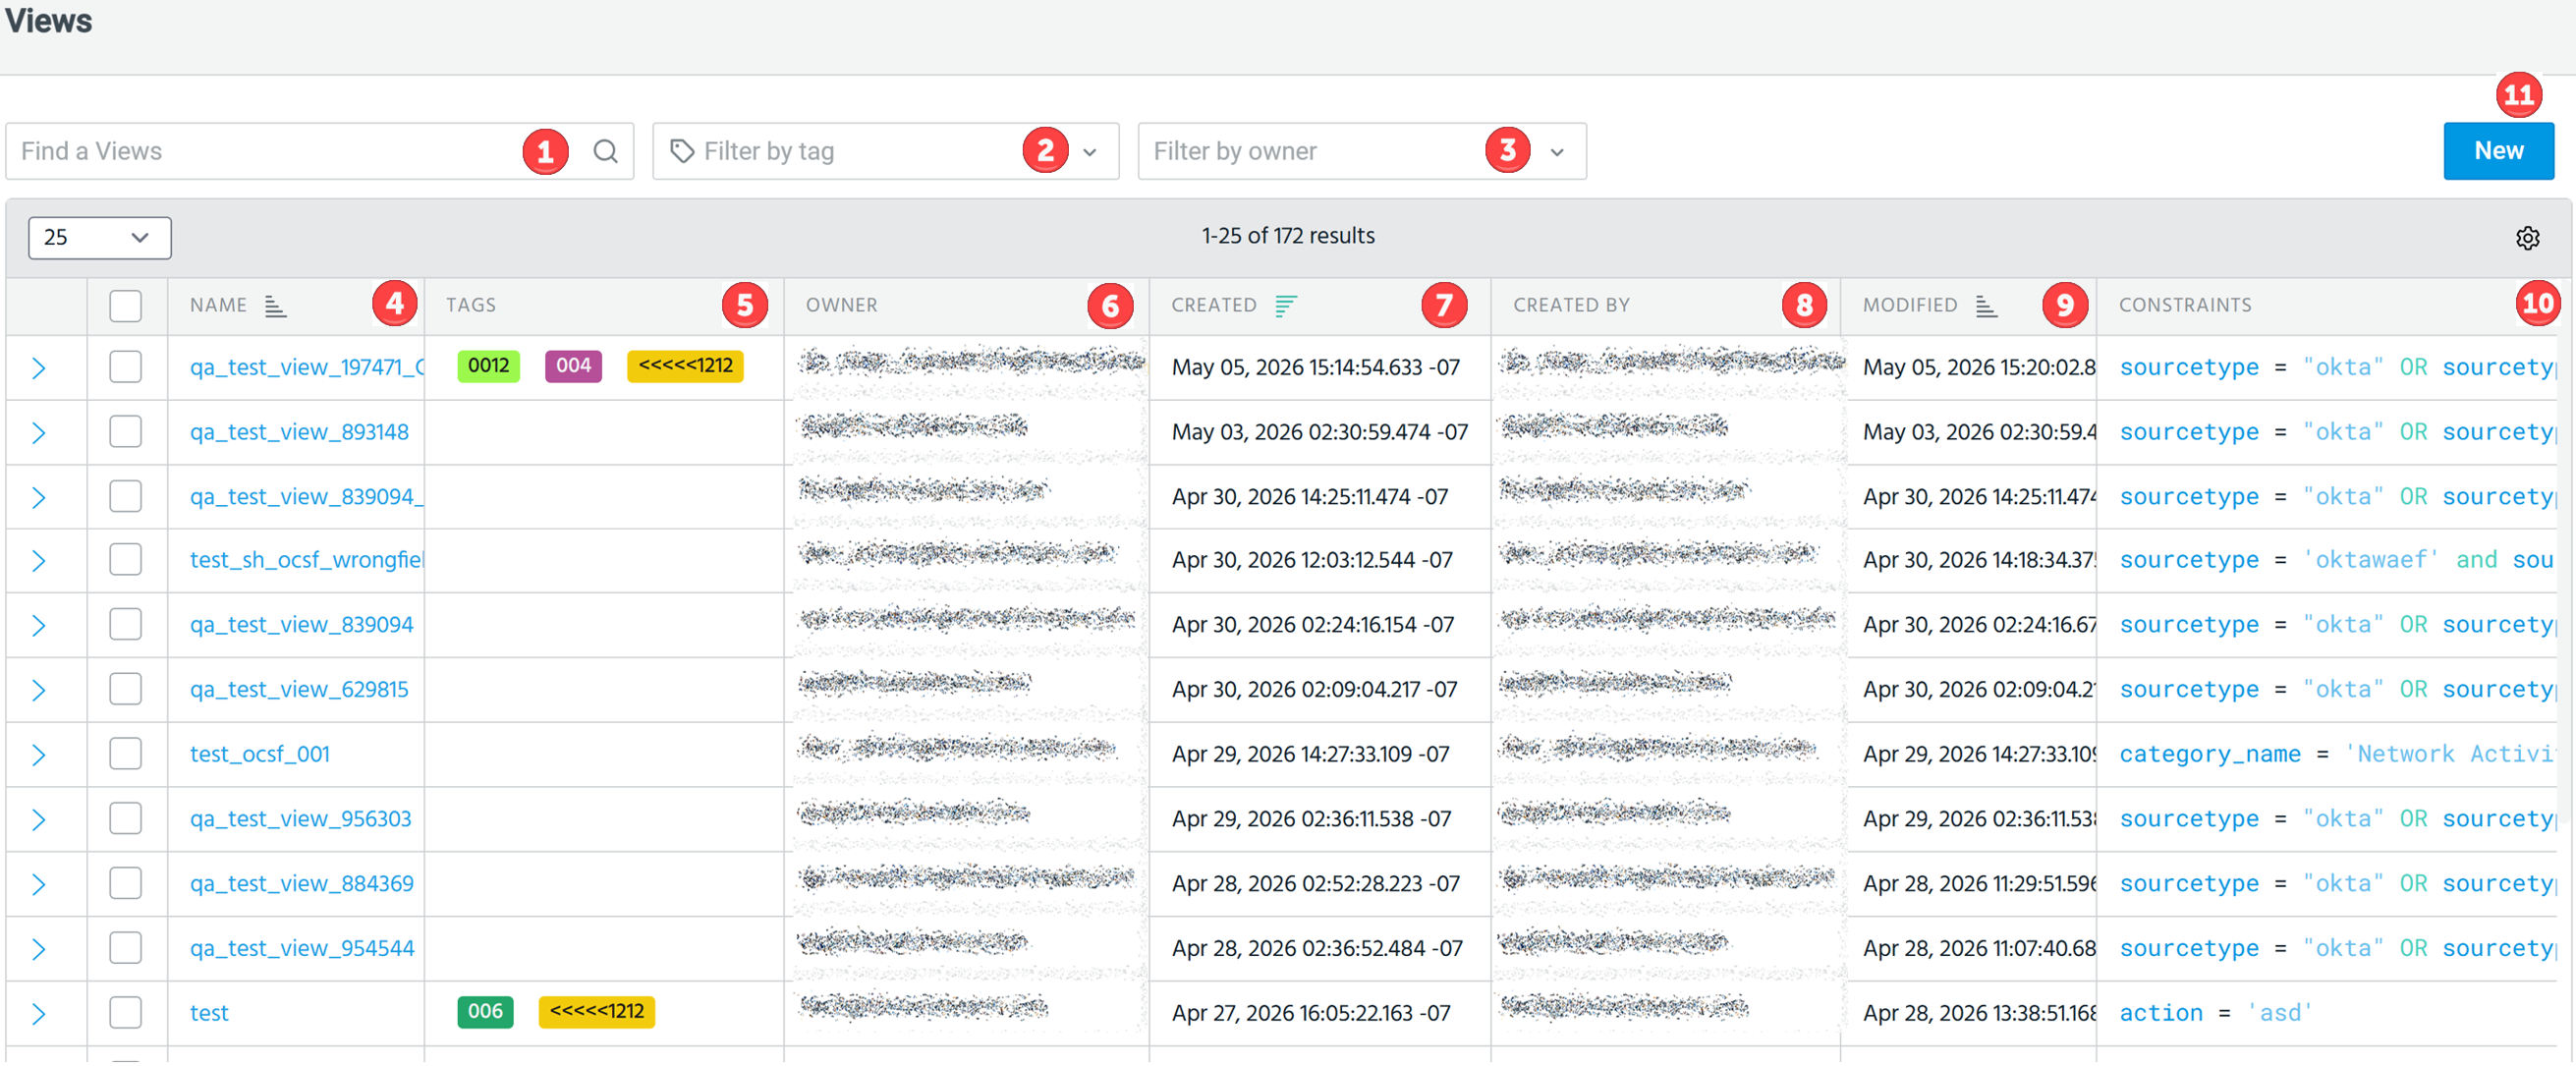

|
Search View: Enter the name of the view you want to find. You can also search by name, description, created by, or owner, with the search being incremental, that is, results update as you type. |

|
Filter by tag: Filter the view list by one or more resource tags.
See Filtering Views by Resource Tag for details. |

|
Filter by owner: You can filter views by owner. Possible values include:
|

|
Name: Name of the view. |

|
Tags: Apply one or more resource tags to the view.
Note: Users with read-only permission on a view can view applied tags but cannot add or remove them. Only tag owners and users with write permission can add or remove tags. See Resource Tagging Permissions for more information.
|

|
Owner: The user or role that currently owns and manages the view. |

|
Created: The date and time when the view was initially created. |

|
Created by: Indicates the owner of the view. By default, the creating user is the owner and is private (not shared). The owner can:
|

|
Modified: The date and time when the view was last updated. |

|
Constraints: The constraint expression that allows you to specify one or more fields to create the view. Constraint fields depend on the schema selected:
|

|
Description: A brief explanation of the purpose or functionality of the view. |

|
New: Create a new view. Refer to Create a View for details. |
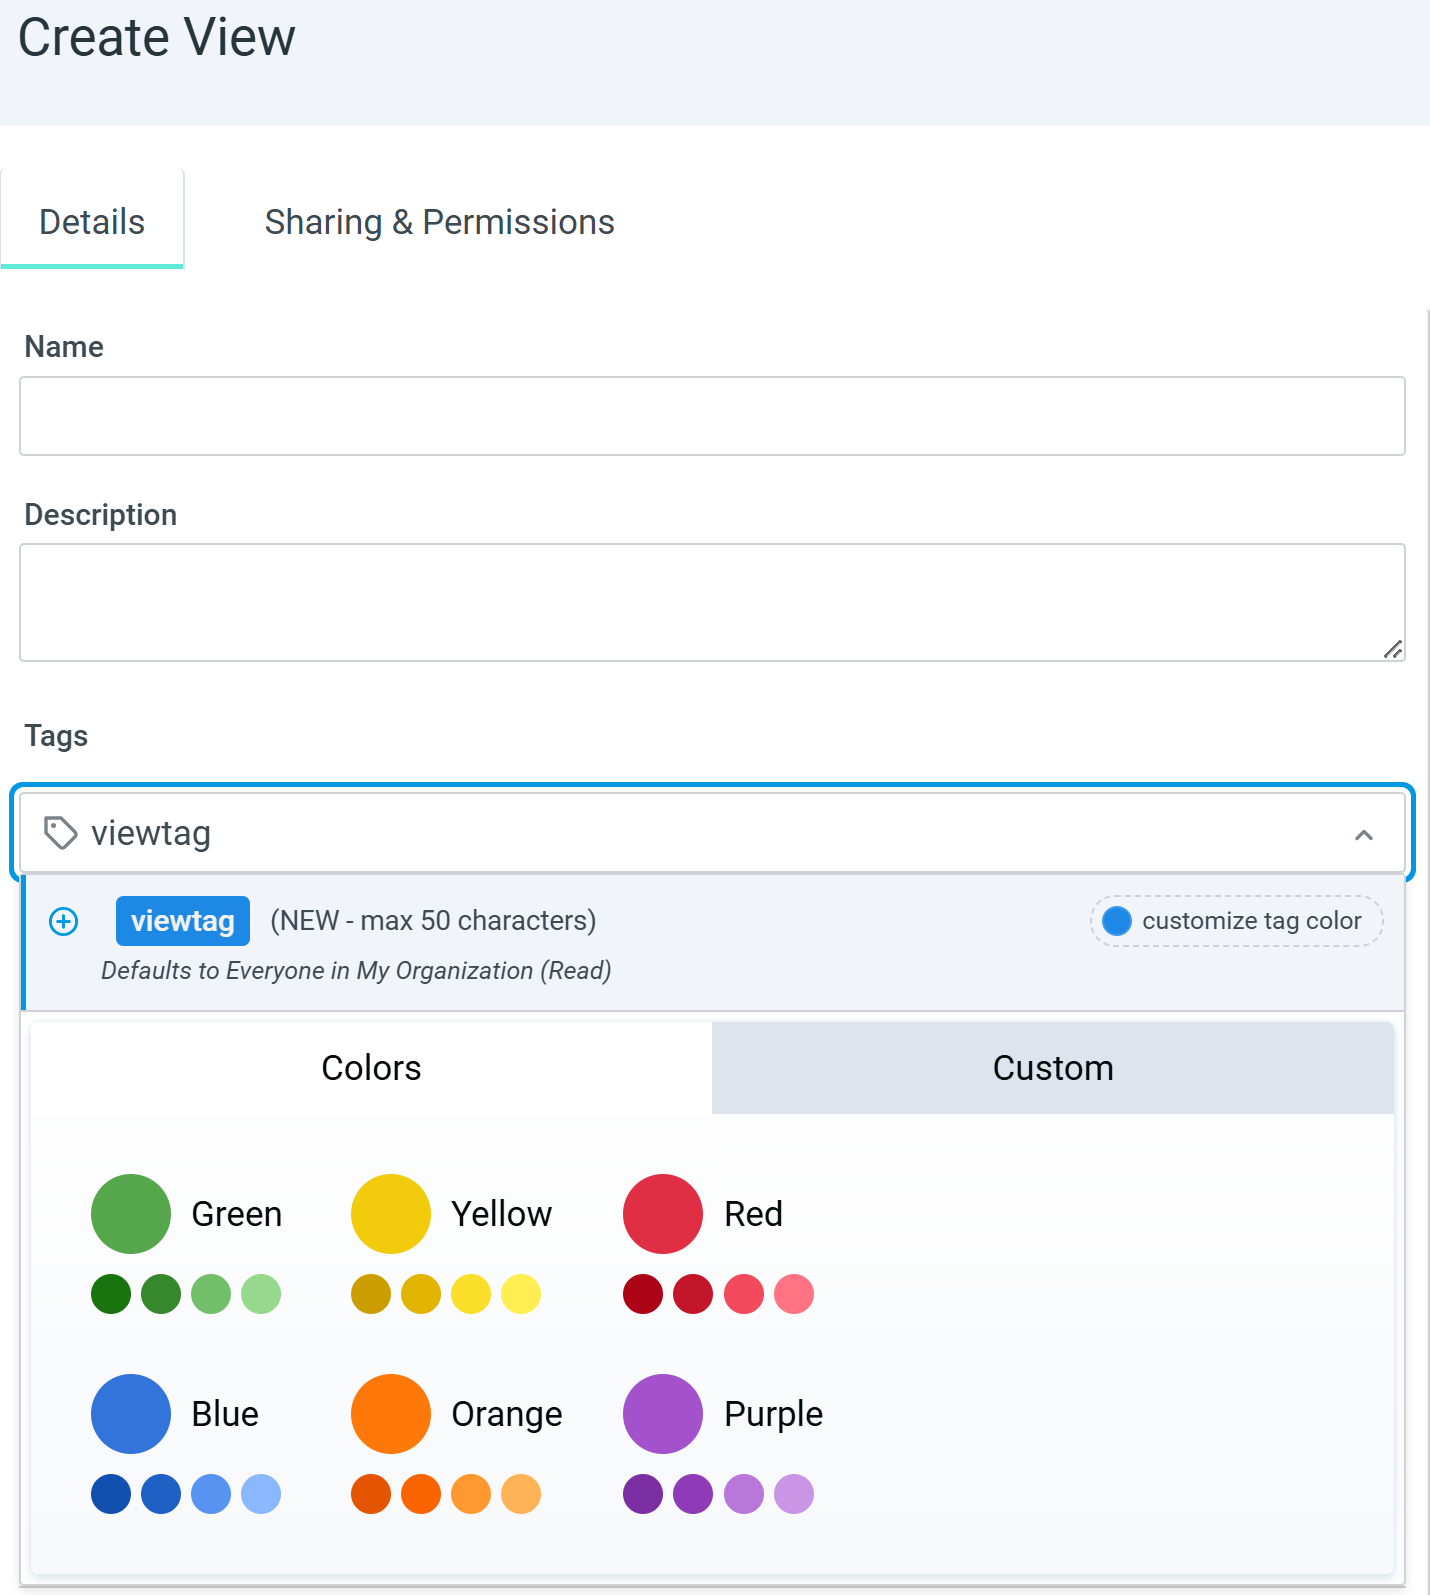
 ) to add the tag to the view as well as the shared tag catalog. A new tag is added to the shared tag list immediately, even if you abandon creating or editing the view.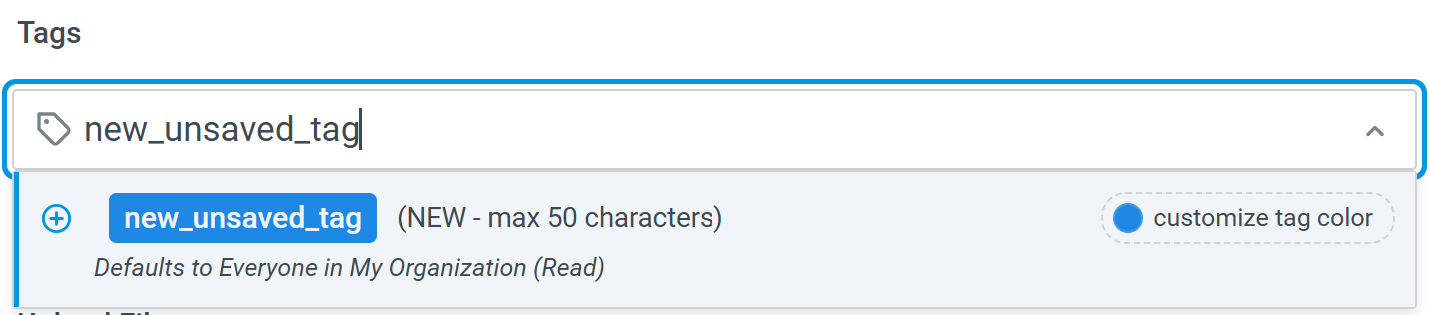
Create a View
To create a view:
-
On the left navigation pane, navigate to Search > Manage > Views.
-
Click New to create a view.
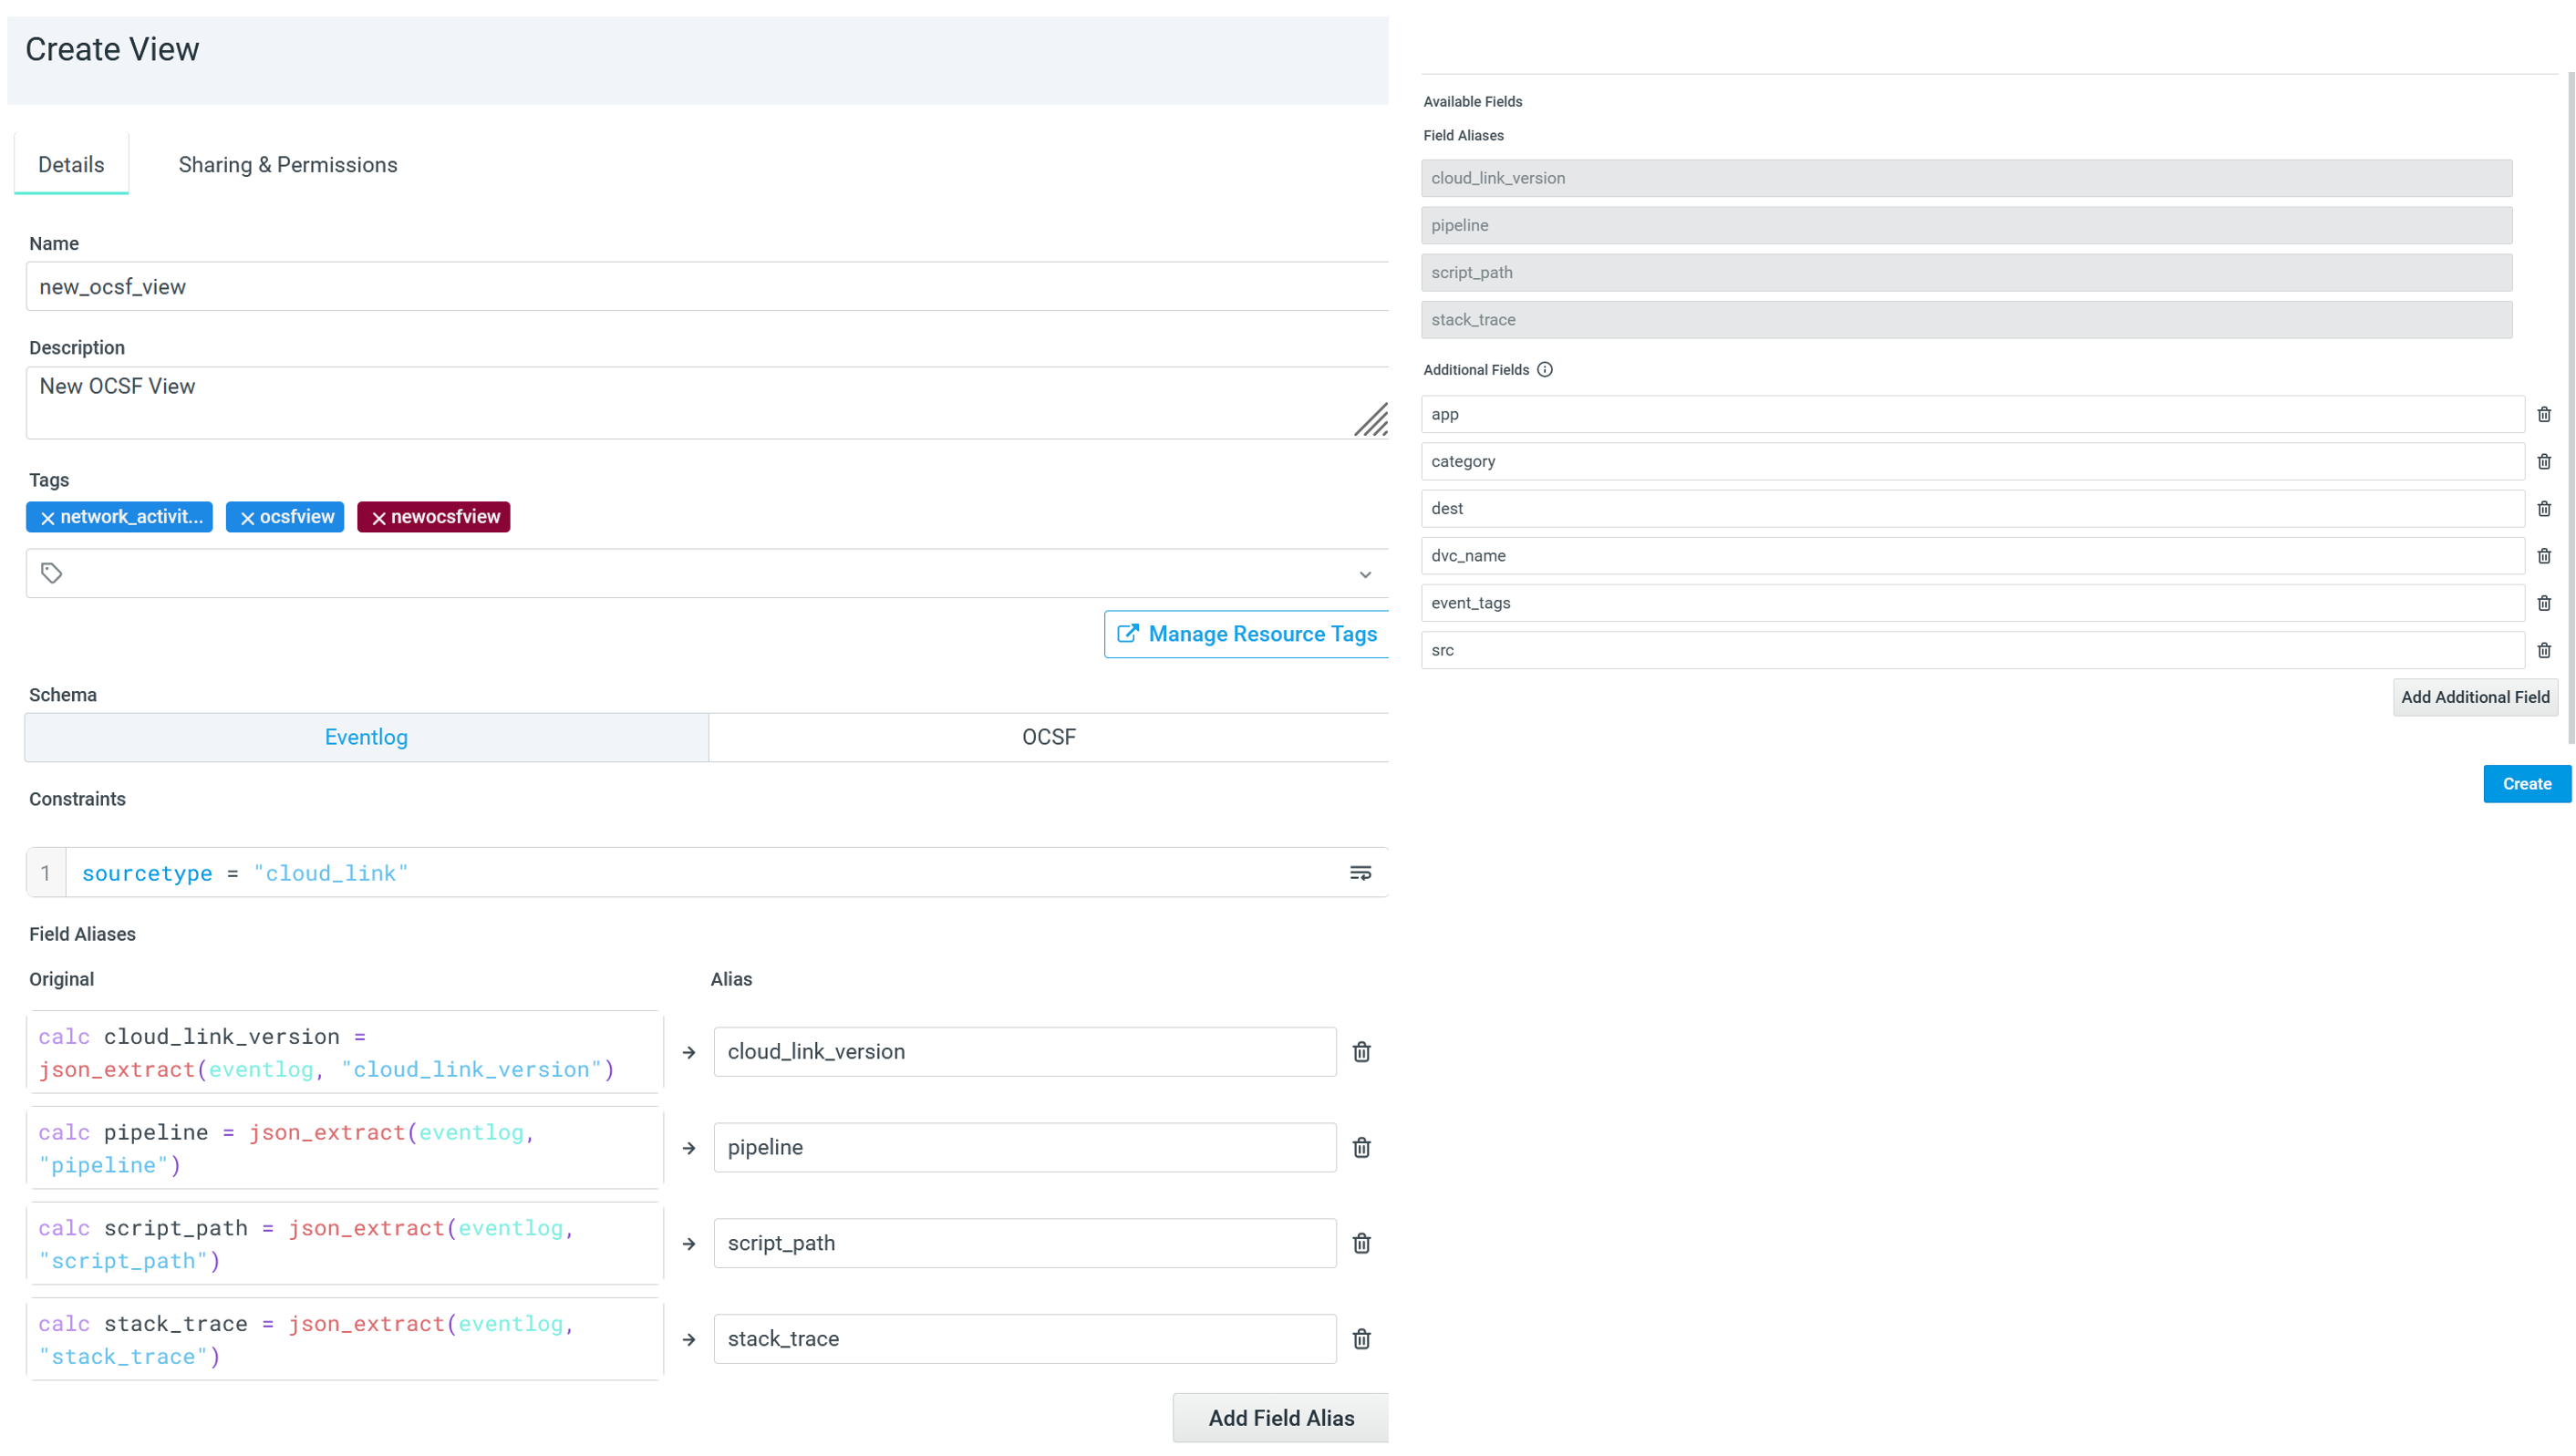
|
Name: Required. Enter a unique name for the view. No two views can have the same name. |
| (Optional) Description: Enter a description that describes the view. |
|
(Optional) Tags: Enter or select one or more resource tags to apply to the view.
|
|
Schema: Select the schema for the view. |
|
Constraints: Required. Provide one or more constraints that apply to the view. The available constraint fields depend on the schema selected.
For the list of supported OCSF categories, see Supported OCSF Categories. An error is displayed if you attempt to save a view without a constraint. Note:
|
|
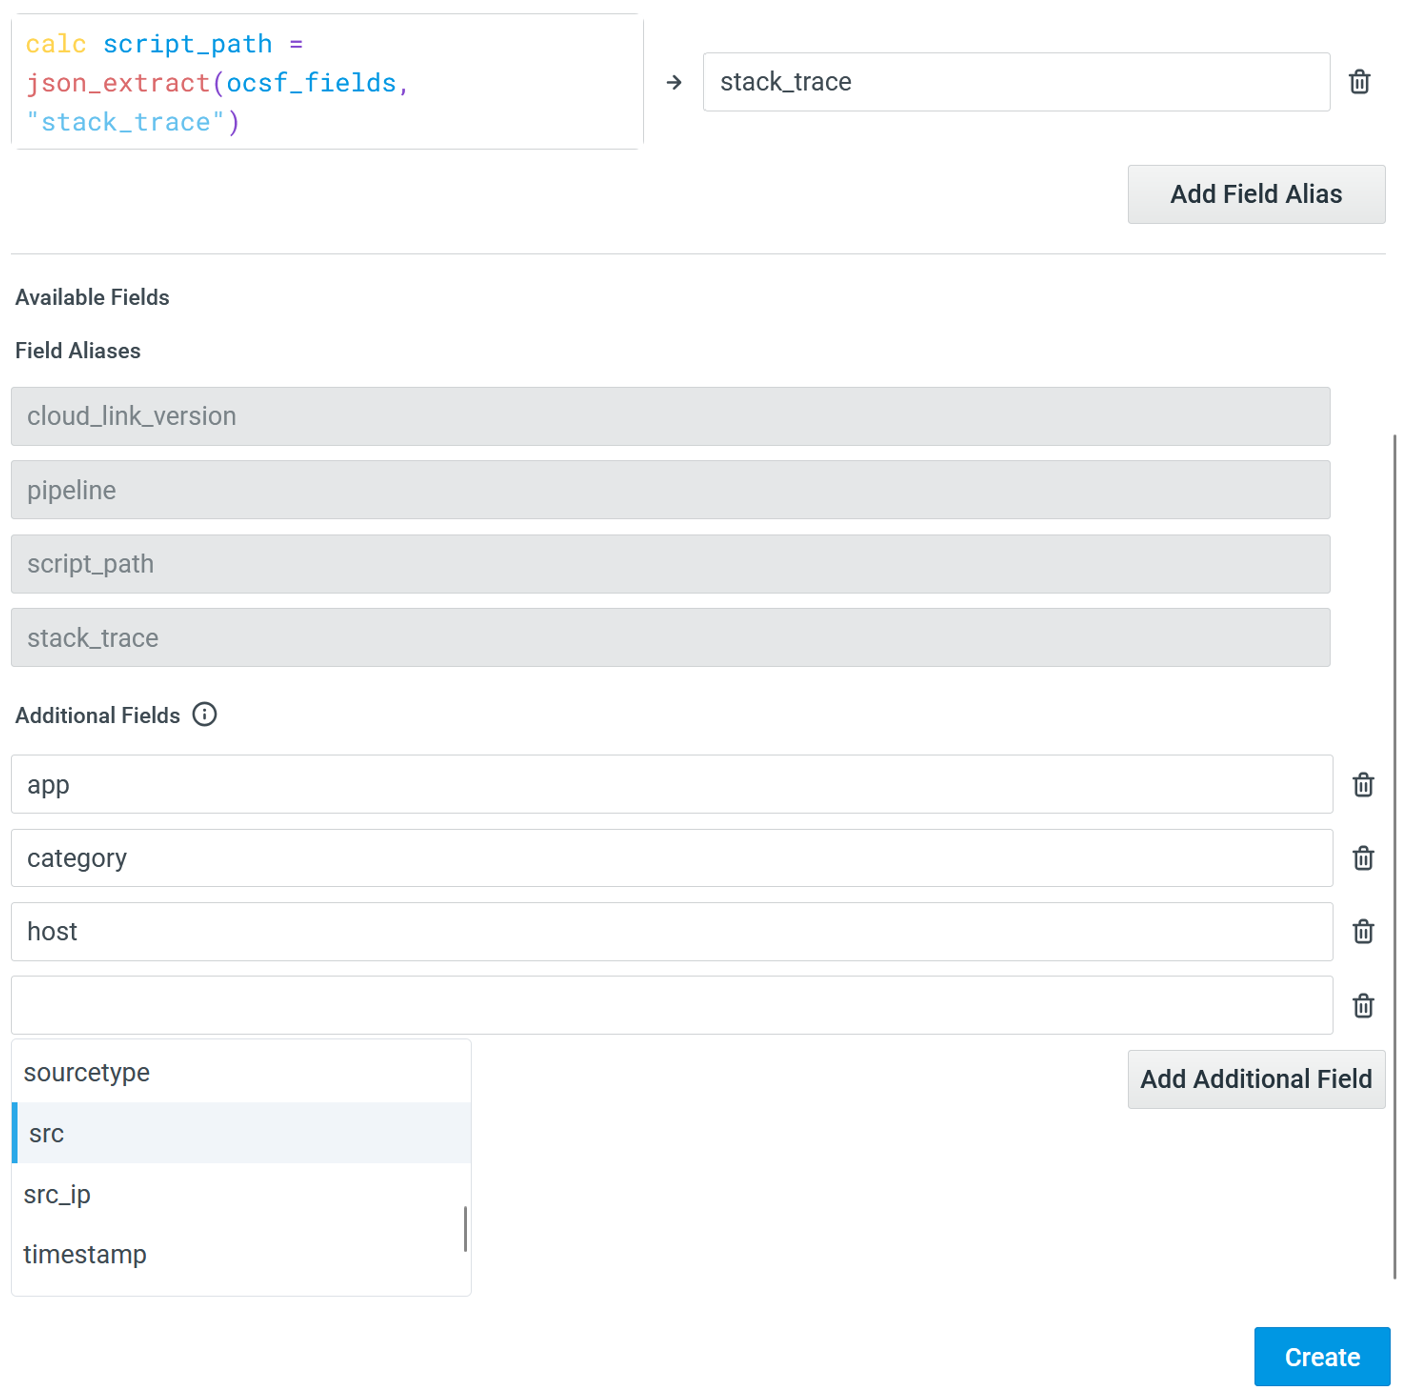
Field Aliases: Required. Enter the name of a field that you would like to alias, the help of auto-complete suggestions. Then, enter its equivalent alias.
Note: With respect to a view, aliases must be unique. The same alias can be used across multiple views. For example, View A can only have 1 alias |
|
Available Fields: The list of field aliases you added, that will be part of the result set when you are Running a View. |
|
(Optional) Additional Fields: Based on the sourcetype you select, you can add any other existing standard eventlog field from a dropdown list, besides the Available Fields, without creating aliases.
|
|
|
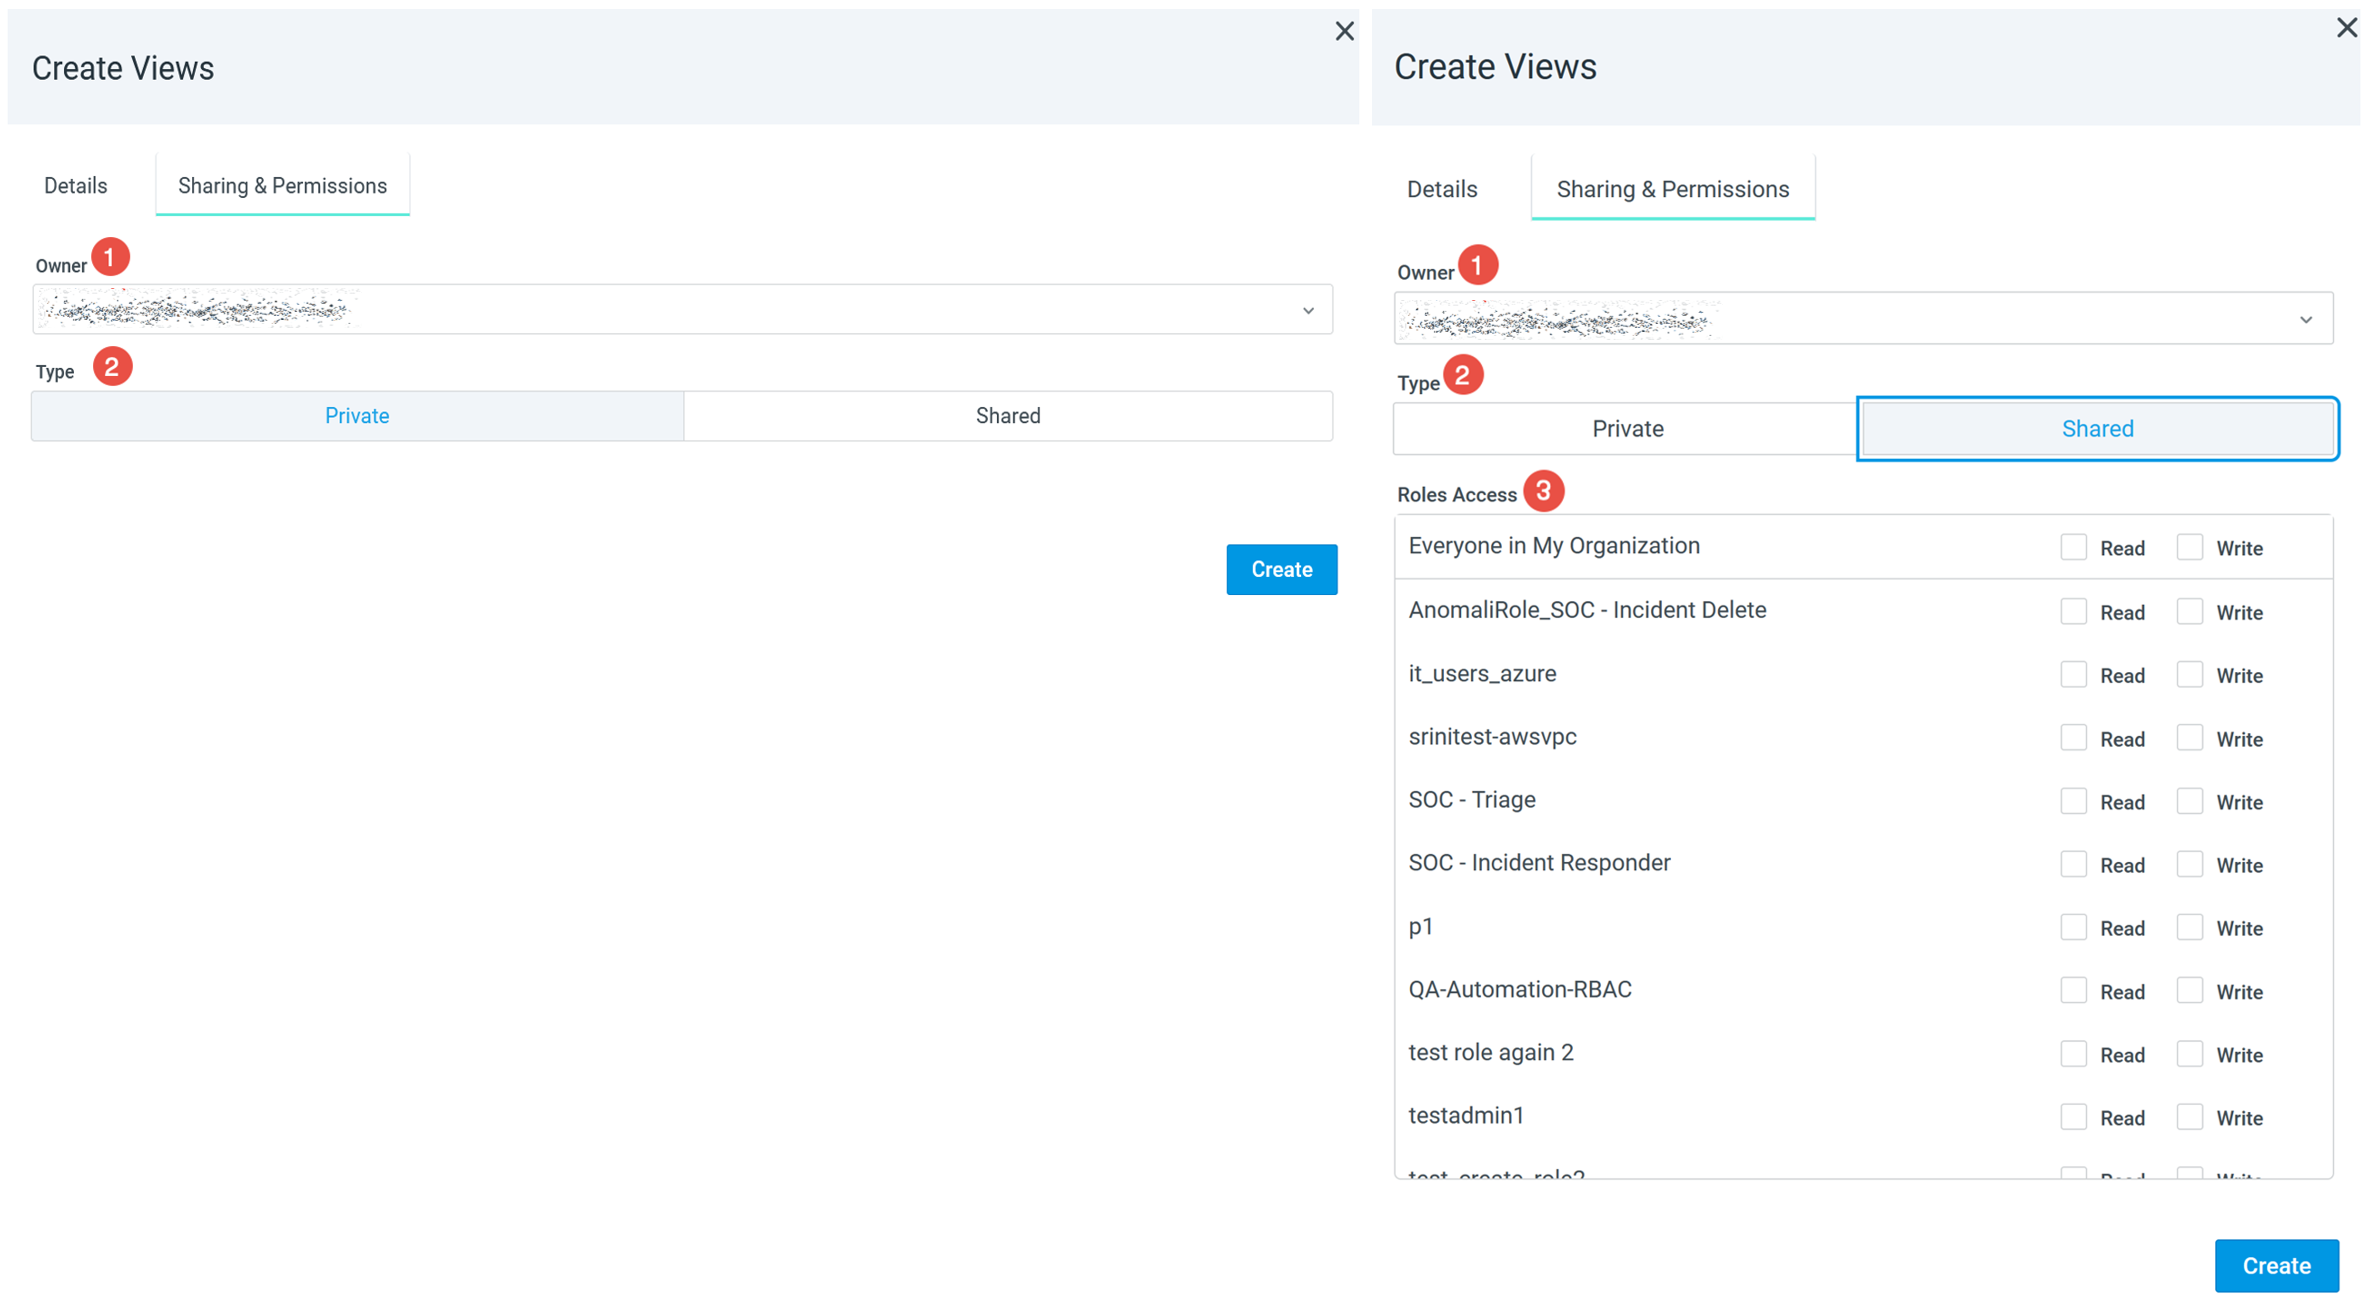
Owner: Select an owner of the view from the list of users. This is the email address of the owner. |
|
|
Type: Select the type of permission assigned to the view:
Note: Newly created tags default to Everyone in my Organization (Read). Only tag owners and users with write permission can add or remove tags. See Resource Tagging Permissions for more information.
|
Running a View
Once you Create a View, click the view to run it. Once the view runs, it displays all the different fields as defined in the view.

In the example screenshot above:
-
Results of running the
okta_extendedview contains the user-defined aliasesresult,server,src_city, andsrc_country, in addition to other fields. -
Available Fields:
-
Map to Selected Fields in the left pane.
-
Allow you to perform all AQL actions, just like you can on any regular
eventlogfields.
-
-
The left pane also contains Additional Fields that you added when you created the view. For example,
event_time,sourcetype, andsrc_ipare in the Selected Fields section because they were added as Additional Fields during the view creation.
Additionally, you can run standard AQL queries on the alias fields.
Running an OCSF View
OCSF views run against the OCSF table and return results using OCSF schema fields. The Selected Fields pane on the left reflects the OCSF field aliases you defined when creating the view.

In the example above, the test_ocsf_view view is constrained to category_name = "Network Activity" and aliases the OCSF field src_endpoint.ip to src_ip_addr. Running this view returns results with the alias field src_ip_addr alongside standard OCSF fields such as category_uid and event_time in the Selected Fields in the left pane.
When a non-administrator user with an OCSF role runs an OCSF view, Anomali Search automatically appends the OCSF Filter filter to the AQL query of the view in the backend.
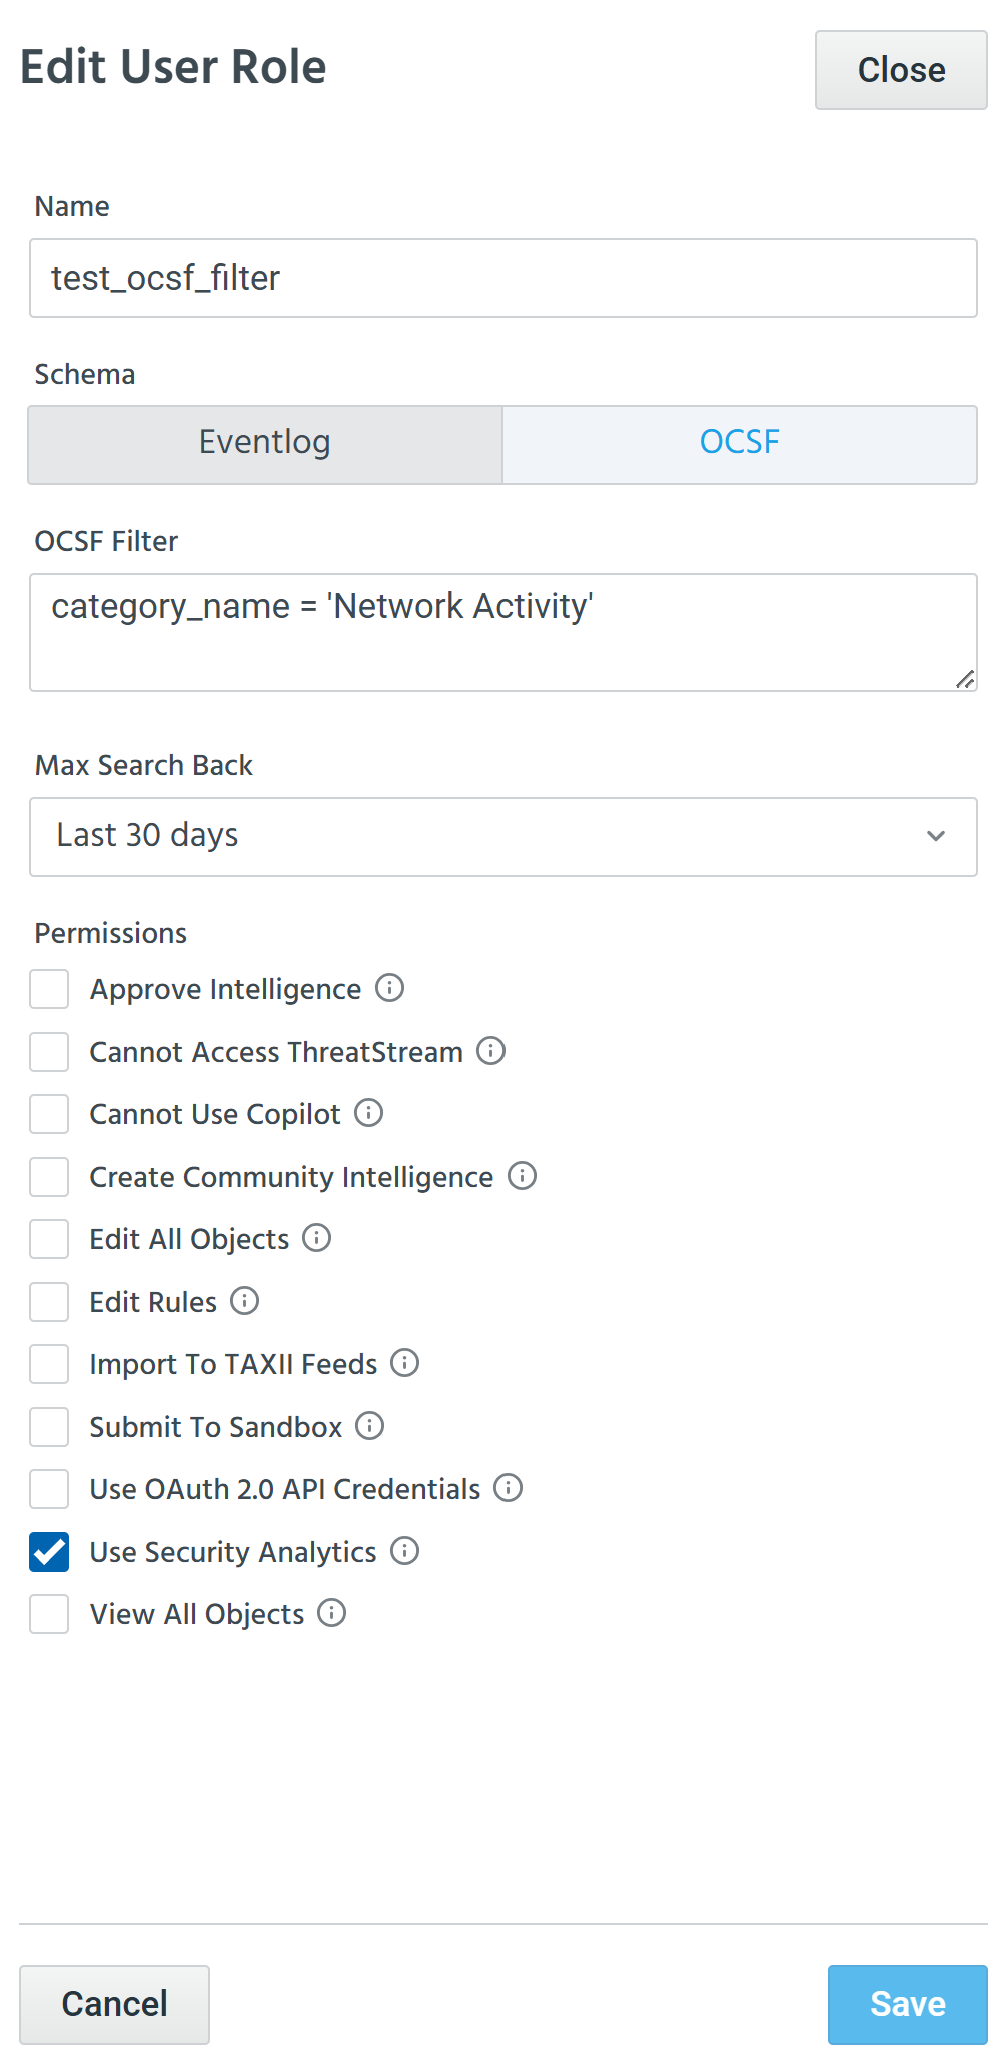
The user does not need to add the filter manually, that is, the view returns only the OCSF categories the role permits.
For example, if the role filter is defined as follows
category_name = 'Network Activity'Search internally runs the view as if | where category_name = 'Network Activity' were part of the view constraint, in addition to the constraint the user specifies. See Role-Based Access Control for Schemas for more information.
If a user's role grants access to OCSF data but not eventlog data, running a view built on the eventlog schema returns a forbidden error. The underlying AQL for an eventlog view queries the eventlog table, which the OCSF-only role does not permit. Users who need to run both eventlog and OCSF views must have appropriate filters configured for each schema in their assigned roles.
Update a View
To update a view:
-
On the left navigation pane, navigate to Search > Manage > Views.
-
Click on the name of the view to make changes either on the:
-
Details tab: Edit the name, description, constraints, field aliases, available fields, and tags.
-
Sharing & Permissions tab: Edit the owner and the read-write permissions associated with a role mapped to different users.
Note:
-
When you edit an existing OCSF view, the Schema field pre-selects OCSF automatically.
-
The schema of an existing view cannot be changed after the view is created.
-
-
(Optional) In the Tags field:
-
Enter or select resource tags to apply to the view. The auto-complete suggestion shows tags you own and tags shared to your organization. Private tags associated with other users are not shown, except to organization administrators.
-
To create a new tag inline, type a name containing up to 50 characters and click Customize tag color to select a color. A new tag is added to the shared tag list immediately, even if you abandon updating the view.
-
To apply an existing tag, type in the field and select it from the auto-complete suggestion results.
-
Click Manage Resource Tags to view existing or newly created tags.
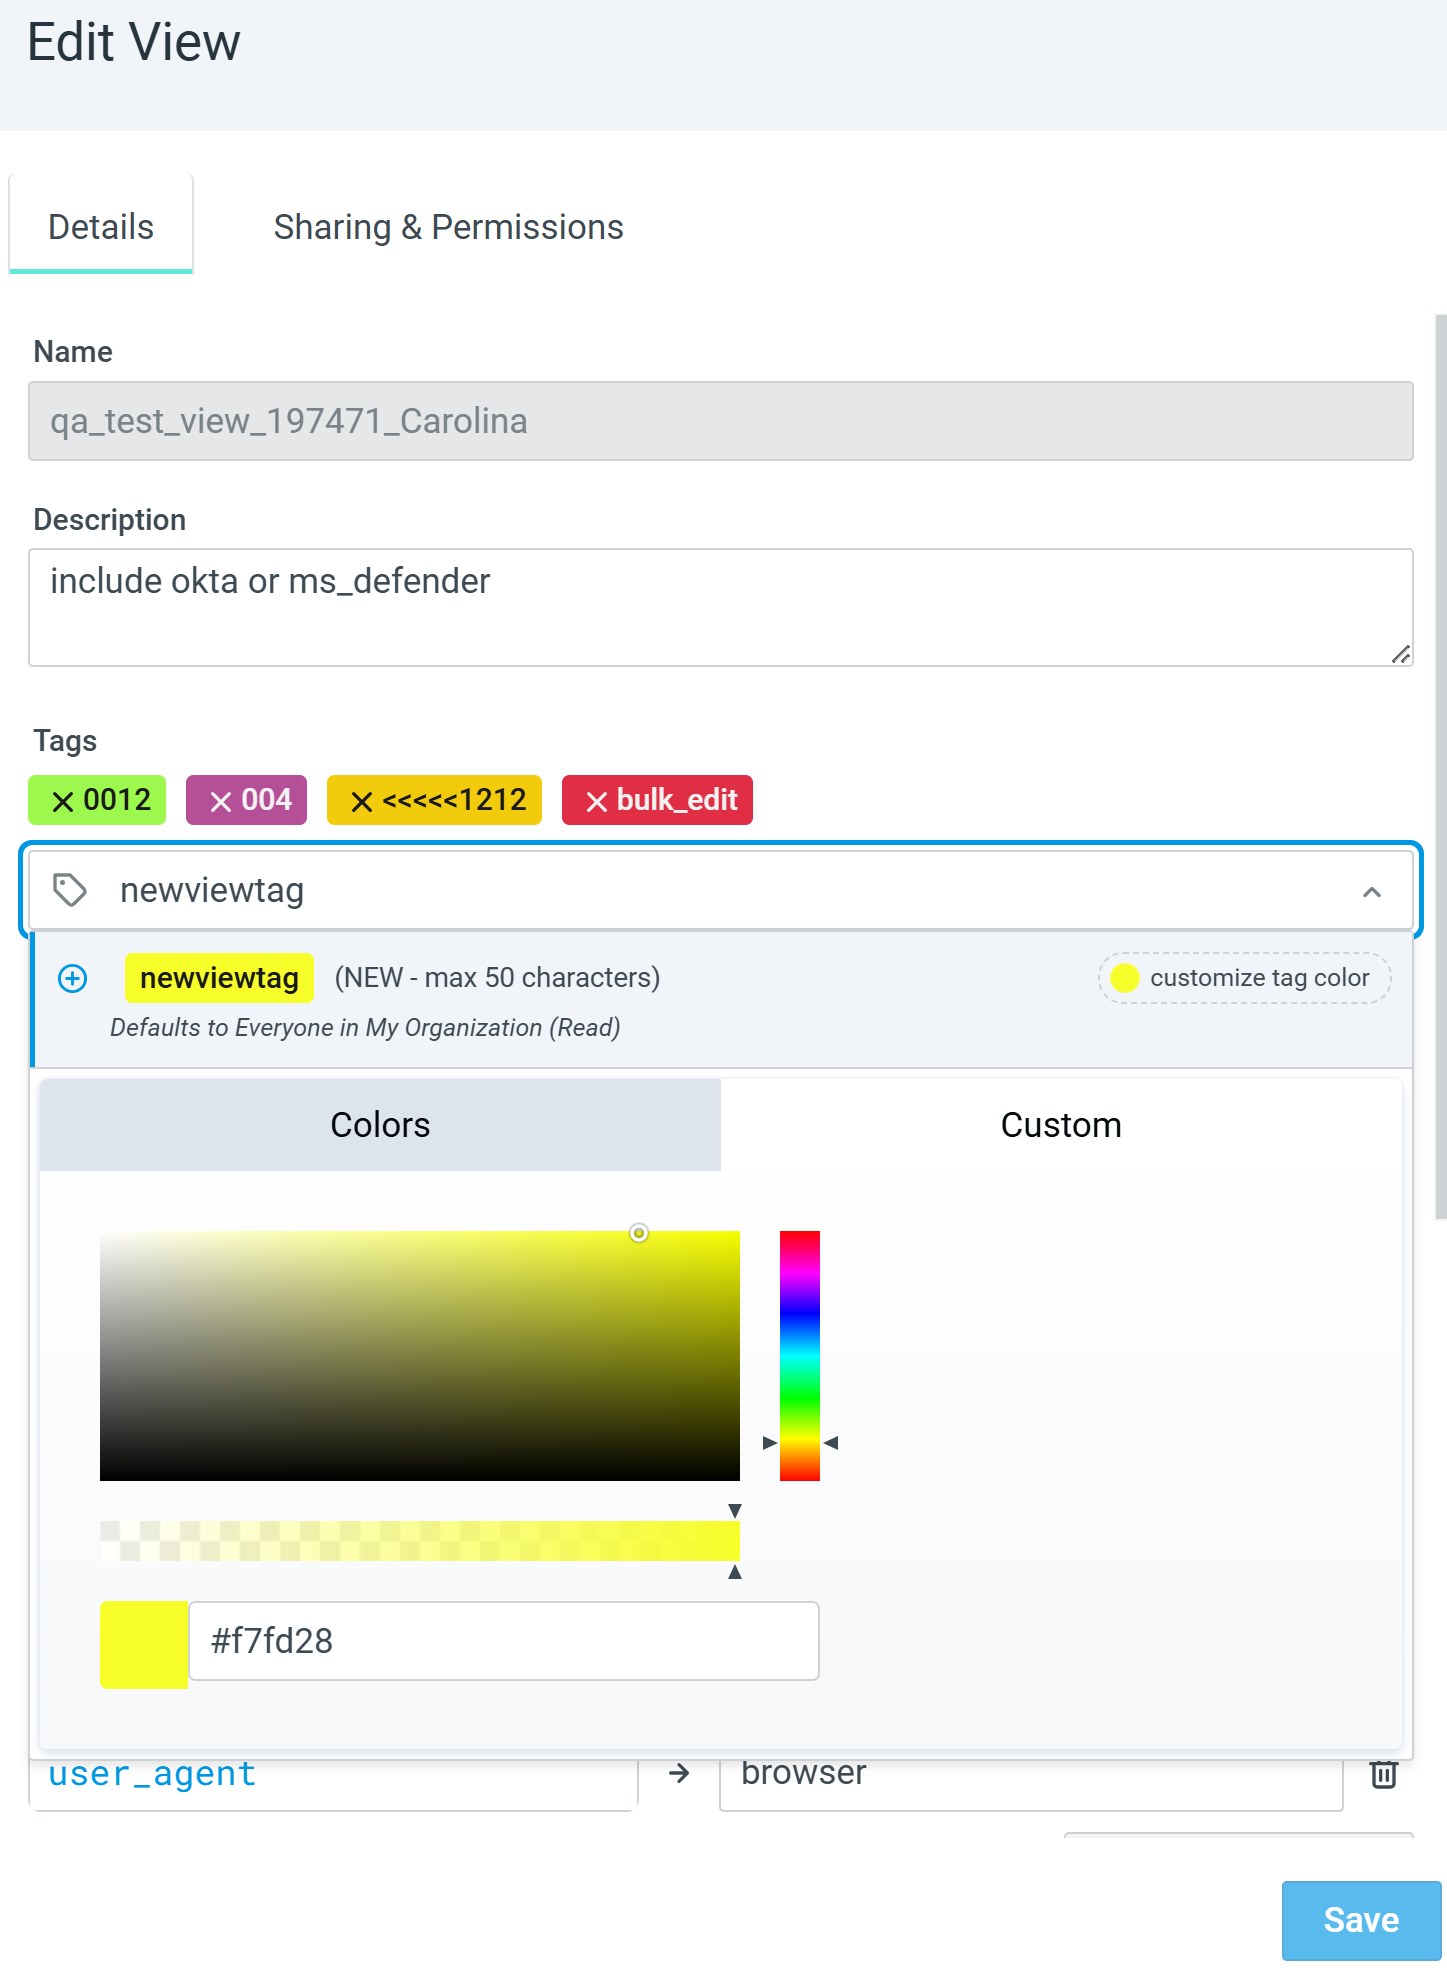 Note: Newly created tags default to Everyone in my Organization (Read). Only tag owners and users with write permission can add or remove tags. See Resource Tagging Permissions for more information.
 -
3. Click Save.
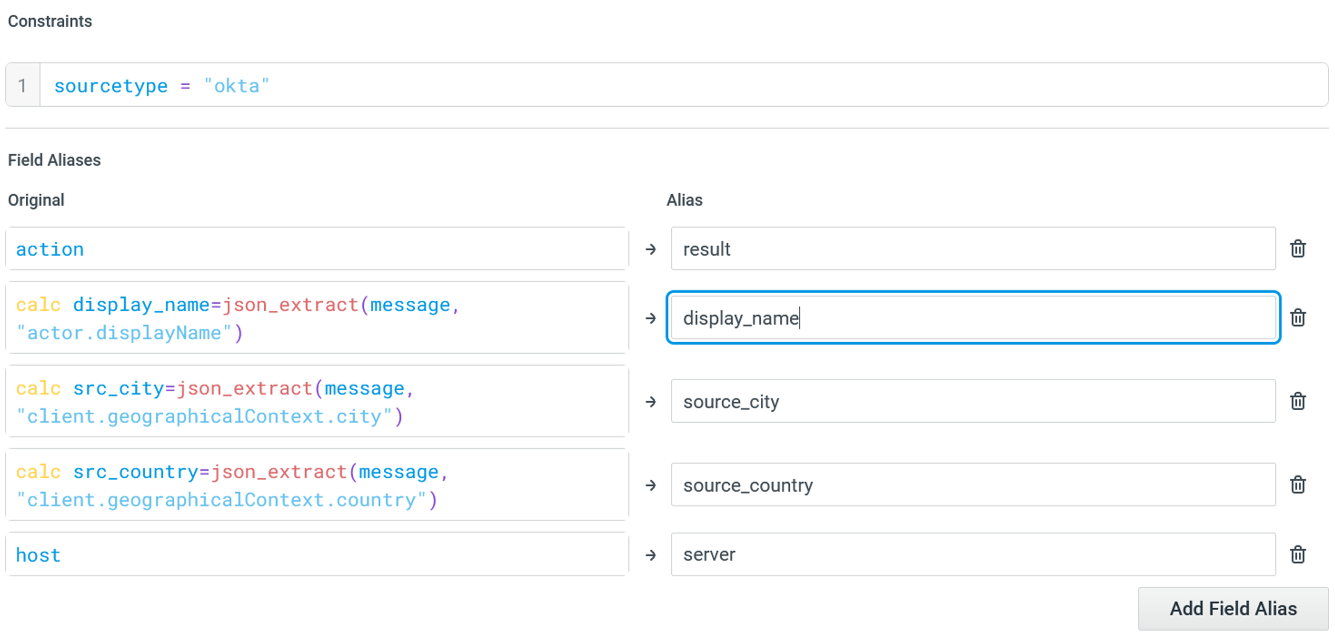
In the example screenshot above, the Field Aliases section shows how you can update one or more aliases either by using AQL queries or recasting eventlog fields, as follows:
-
result: recasted from eventlog fieldaction. -
display_name: defined by the custom AQL query ->calc display_name=json_extract(message, "actor.displayName"). -
source_city: updated alias defined by a custom AQL query ->calc src_city=json_extract(message, "client.geographicalContext.city"). -
source_country: updated alias defined by a custom AQL query ->calc src_country=json_extract(message, "client.geographicalContext.country"). -
server: recasted from the eventlog fieldhost.
Filtering Views by Resource Tag
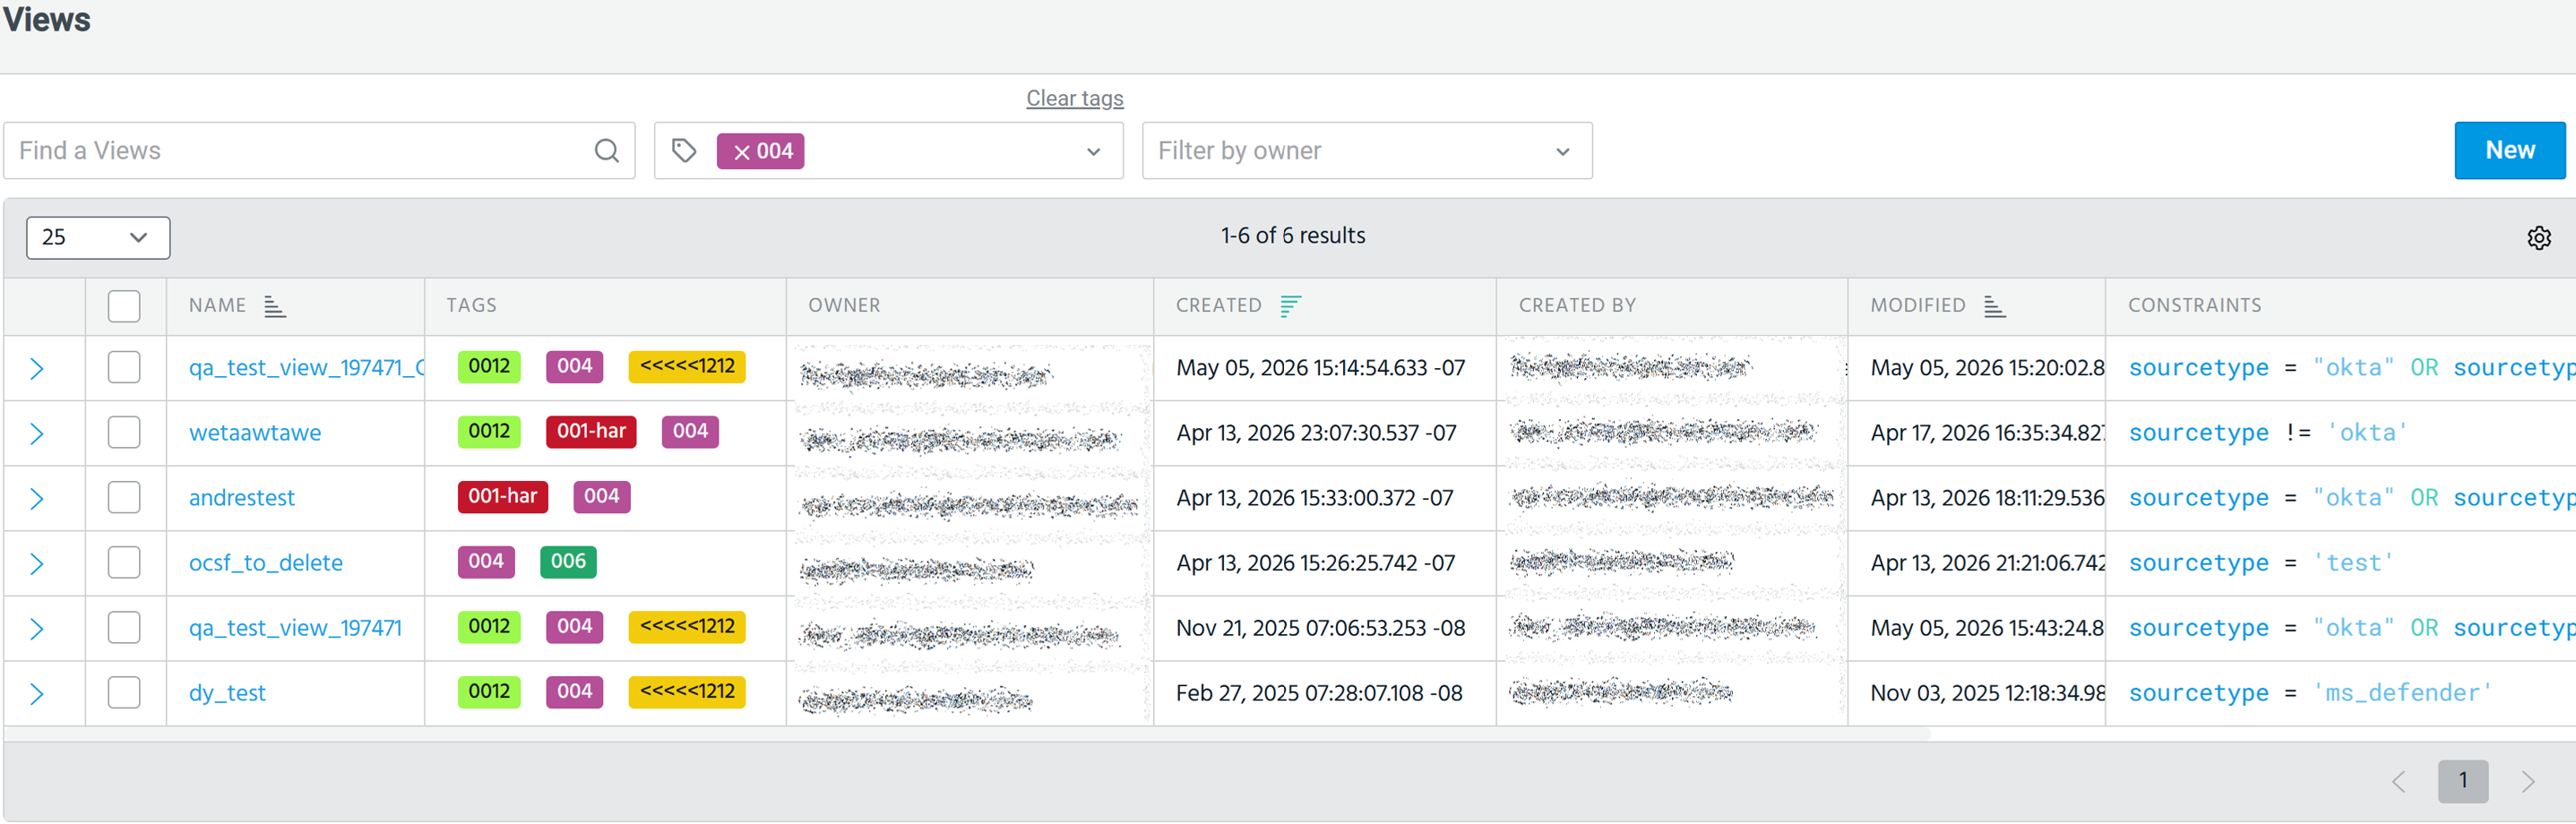
You can filter the view list by one or more resource tags. When you select multiple tags, only views that have all selected tags applied are returned.
To filter views by resource tag:
-
Navigate to Search > Manage > Views.
-
Click the Filter by tag drop-down and select one or more tags. The count displayed next to each tag reflects usage for views only, not the total across all the supported resource types. A tag used across multiple resource types will show a different count on each resource page, depending on the resource you are viewing. The list updates to show only views that have all selected tags applied.
-
Click Clear tags to clear the filter.
Bulk Editing Tags and Permissions for Views
You can add resource tags and update sharing permissions across multiple views at once.
Required Permissions
-
Details tab: Requires write permission or ownership on each selected view. The tag drop-down shows only tags you own or that are shared to your organization. Organization administrators also see private tags owned by other users.
-
Sharing & Permissions tab: Available to view owners and organization administrators only. Users with write-only permission cannot modify sharing settings.
To bulk edit tags and permissions for views:
-
Navigate to Search > Manage > Views.
-
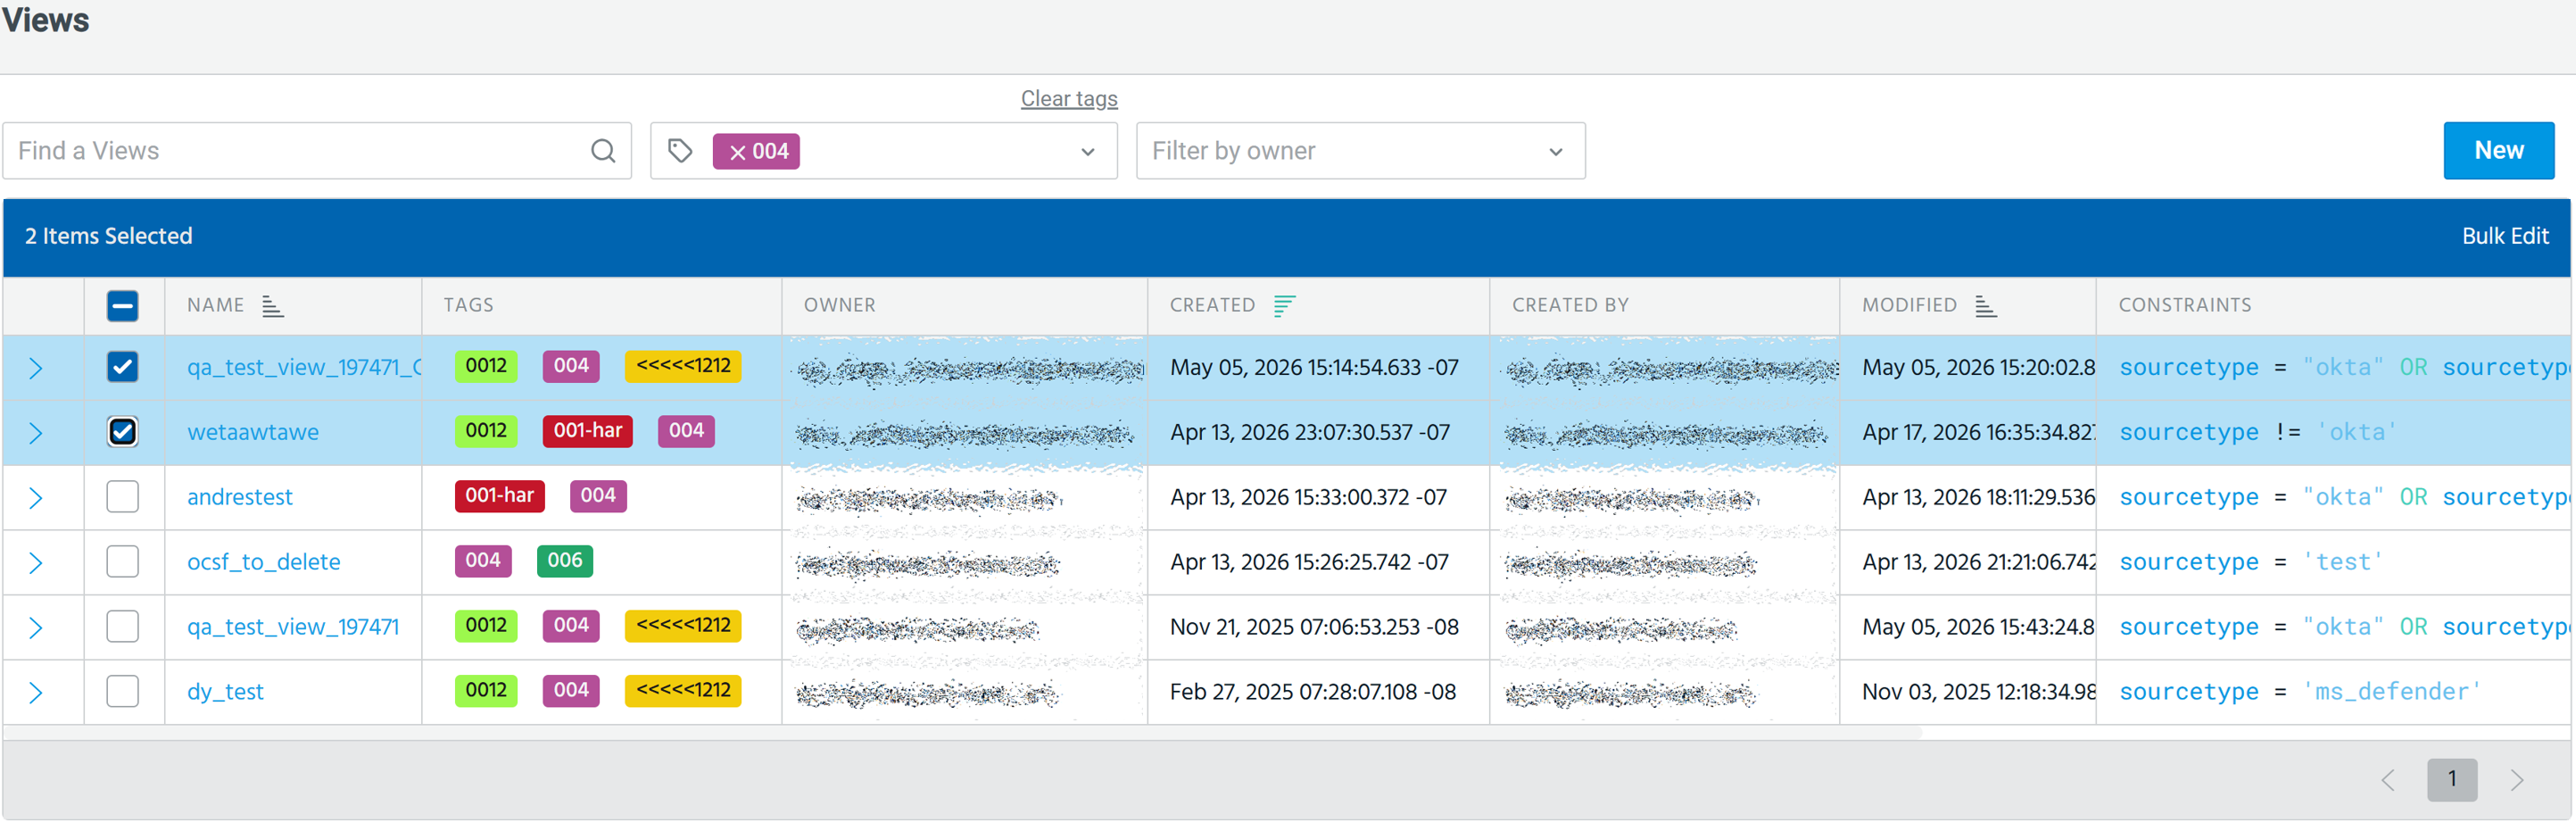
Select the views you want to update.
-
Click Bulk edit.
-
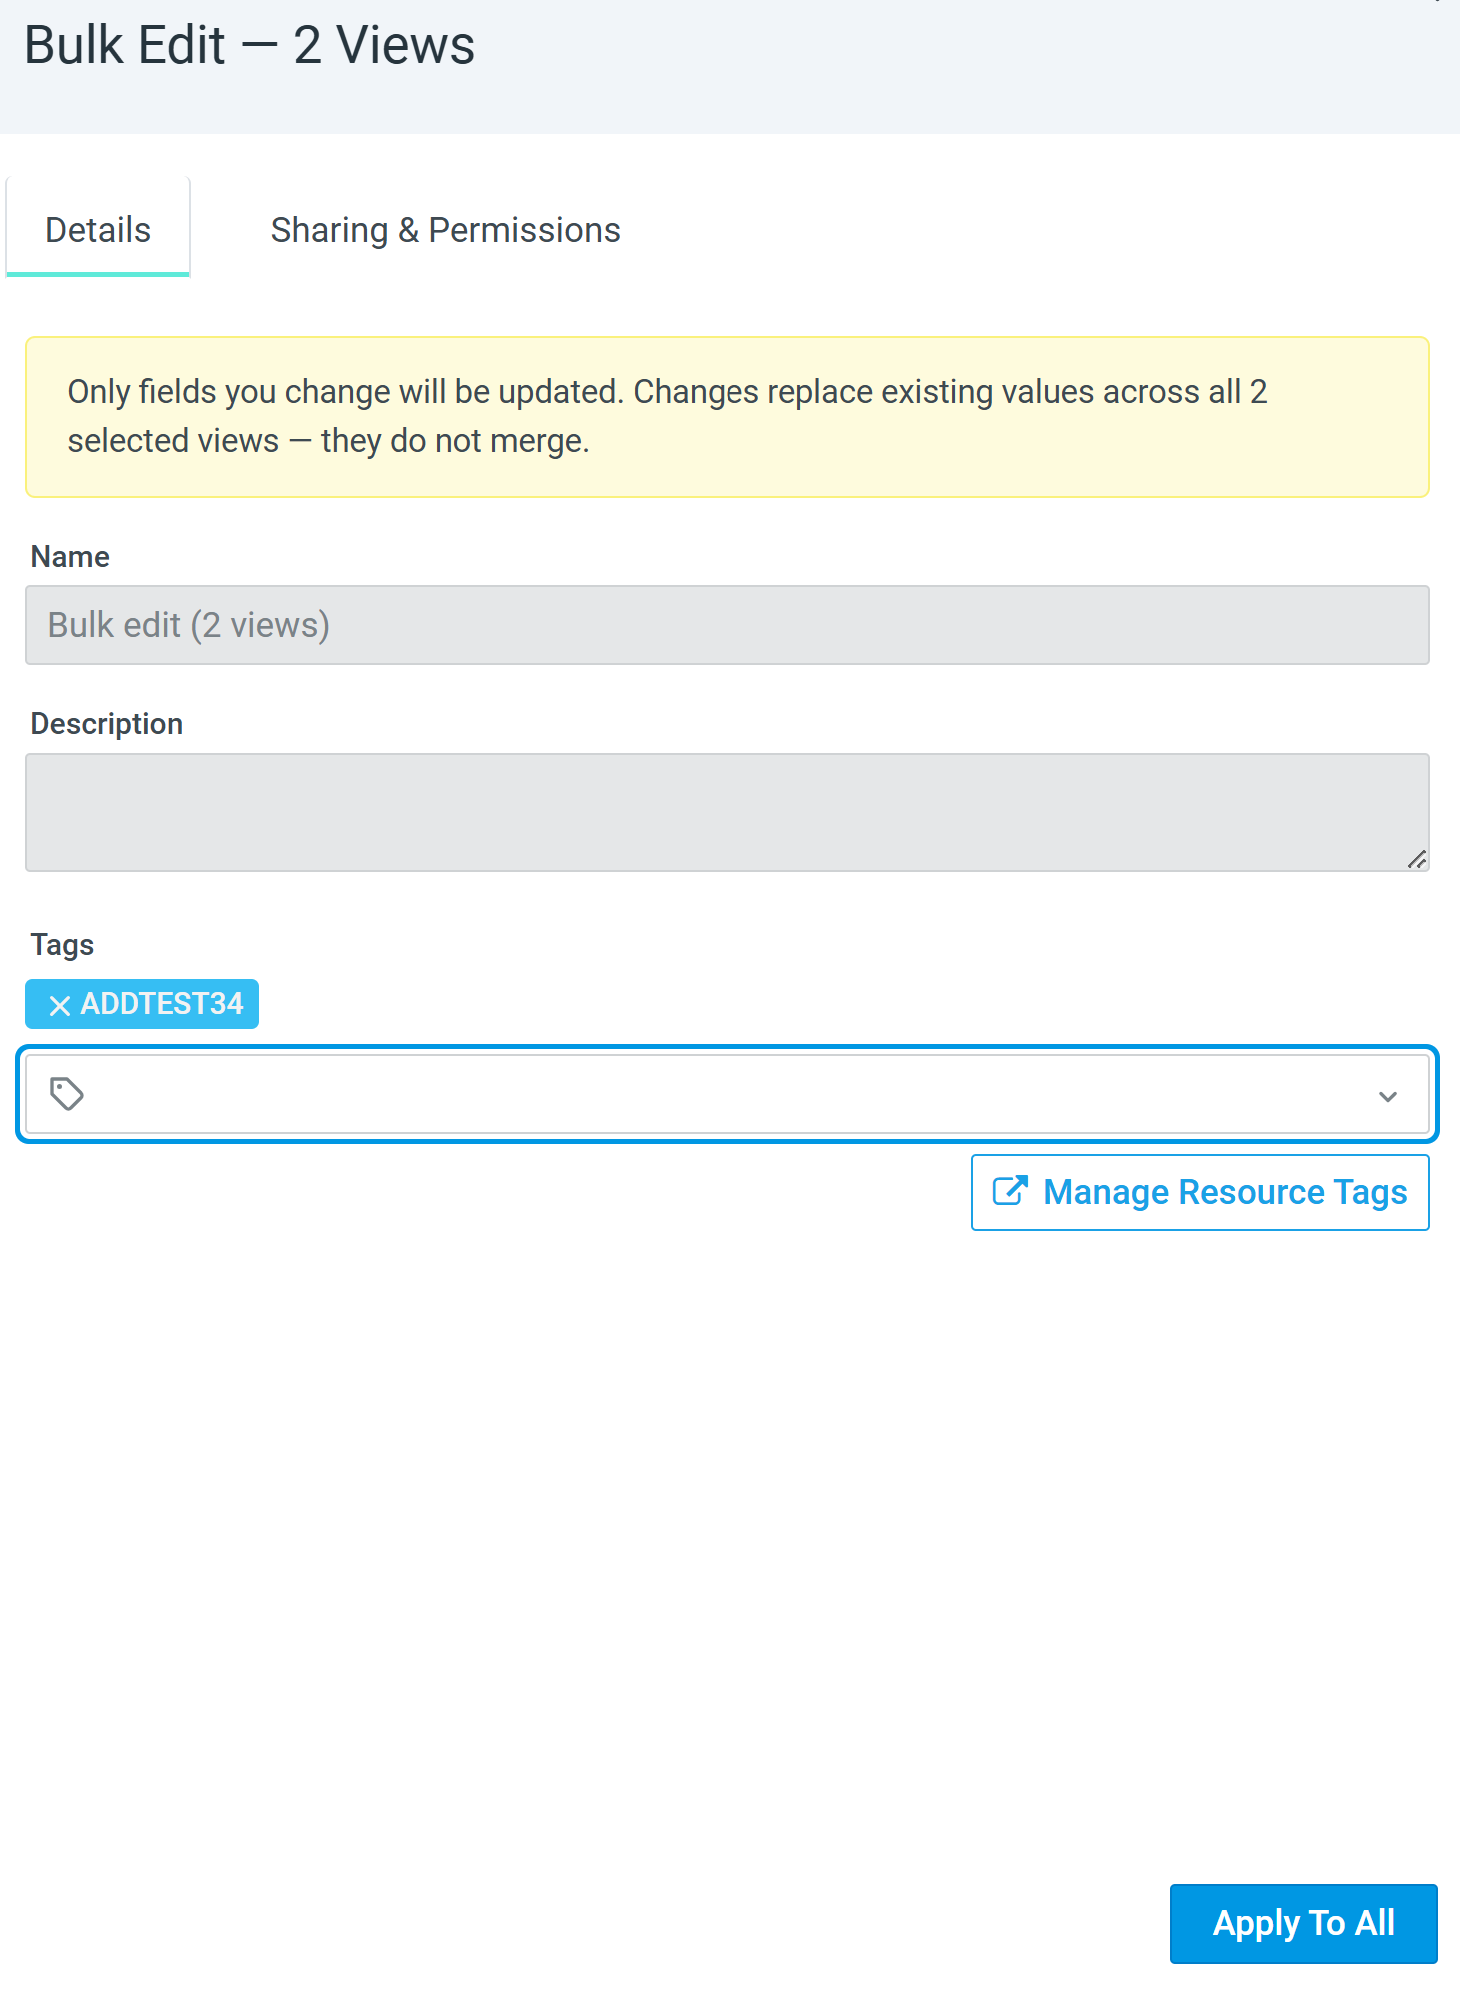
Click the Details tab and enter or select tags in the Tags field.
-
Enter or select resource tags to apply to the view. The auto-complete suggestion shows tags you own and tags shared to your organization. Private tags associated with other users are not shown, except to organization administrators.
-
To create a new tag inline, type a name containing up to 50 characters and click Customize tag color to select a color. A new tag is added to the shared tag list immediately, even if you abandon updating the view.
-
To apply an existing tag, type in the field and select it from the auto-complete suggestion results.
-
(Optional) Click the Sharing & Permissions tab to update sharing settings for the selected views. See Resource Tagging Permissions for more information.
-
Click Apply to All.
The tags and permissions are updated for all selected views.
Clone a View
To clone a view:
-
On the left navigation pane, navigate to Search > Manage > Views.
-
Hover your mouse over the view you would like to clone. Doing so displays the clone icon, as follows:

-
The cloned view name contains the "
_copy" suffix added to the name of the original view, as follows: -
Fill the form to Create a View.
-
Click Create to finish cloning.
Delete a View
To delete a view:
-
On the left navigation pane, navigate to Search > Manage > Views.
-
Hover your mouse over the view you would like to clone. Doing so displays the delete icon, as follows:

-
Click the delete icon. Then, click Delete to confirm the deletion.
-
The view is now deleted.