Creating Custom Lookup Tables 
You can add a lookup table to your AQL Search environment by uploading a file in CSV, .gz, or .tar formats. Additionally, you can add values to existing lookup tables.
CSV Import Guidelines
To successfully upload a lookup table, follow these file upload guidelines:
-
The upload file must have a heading row with the lookup table field names.
-
Avoid using the same field names as the eventlog schema.
-
In searches, field name is case sensitive, so use capitalization conventions that are easy for search users to follow. For example, all lowercase.
-
Enclose values that have spaces in straight quotation marks (").
-
File formats must be CSV, .gz, or .tar.
Note: If a column in your CSV file contains IP addresses in CIDR notation (for example,
10.0.0.0/24), the platform automatically adds two additional columns for each such column in the CSV to the lookup table :<column_name>_startand<column_name>_end.For example, if
IPV4_addressis the column name in your CSV file, the platform adds the following columns:IPV4_address_startandIPV4_address_end.These columns are used internally to optimize lookup performance and are generated automatically. You can safely ignore them.
-
The upload file can be a maximum of 100 MB.
Note: If your CSV file is larger than 100 MB, use the following guidelines to upload your data:
-
Compress the file to reduce its size.
-
Split the content into multiple smaller files. After that, upload the first file to create a lookup table and append the remaining files to this table. See Appending to an Existing Lookup Table for more information.
-
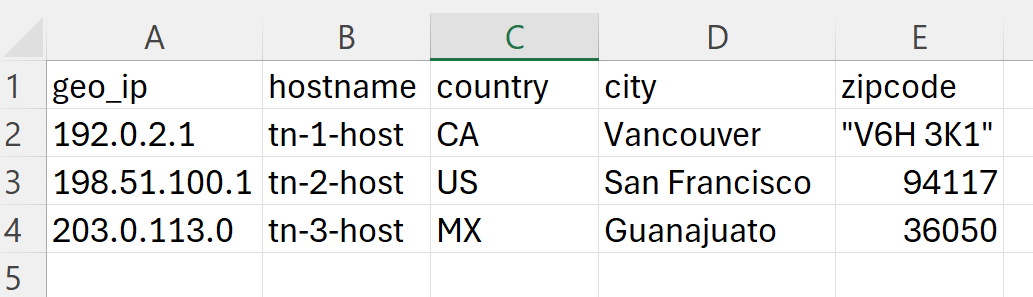
The following is an example of a lookup table:
To upload a lookup table:
-
Create a CSV file that contains the required values, as described above.
-
Navigate to Manage > Lookup Tables.
-
Click New.
-
Enter a table name in the Name field.
Note:
-
This is the lookup table name that users can reference in AQL Search.
-
The name may contain only alphanumeric characters and underscores.
-
The name cannot begin with a number.
-
Do not name the table the same name as an event field or lookup table field.
-
On the lookup table homepage, you can also search for the lookup table by name.
-
-
(Optionally) Select Append to existing table if you want to add the rows to an existing lookup table. See Appending to an Existing Lookup Table for details.
-
(Optionally) Select Updatable table if you want to be able to make updates to the table. See Updating Lookup Tables for details.
Note: System tables and lookup tables created using the
yieldtableoperator cannot be updated. -
(Optionally) Enter a description of the lookup table in the Description box.
(Optional) In the Tags field:
-
Enter or select one or more resource tags to apply to the lookup table. The auto-complete suggestion shows tags you own and tags shared to your organization. Private tags associated with other users are not shown, except to organization administrators.
-
To create a new tag, type a name containing up to 50 characters and click Customize tag color to select a color. See Creating a Resource Tag to learn all the ways in which you can create resource tags. A new tag is added to the shared tag list immediately, even if you abandon the tag creation.
-
To apply an existing tag, type in the field and select it from the auto-complete suggestion results.
-
Click Manage Resource Tags to view existing or newly created tags.
-
-
Use the file controls to browse and select your CSV file.
-
Configure User Sharing and Permissions.
Note: Newly created tags default to Everyone in my Organization (Read). Only tag owners and users with write permission can add or remove tags. See Resource Tagging Permissions for more information.
-
Click Create.
The lookup table is added to the list of lookup tables on the Lookup Tables homepage.