Related topics:
Incidents
The Incidents page is where you track and manage security incidents throughout their lifecycle, from initial assignment and investigation through review, escalation, resolution, and closure. Incidents can be created manually by users or promoted from alerts by the Alert Triage Agent as part of the agentic workflow.
From this page, you can:
-
View and organize incidents in either the tile view (grouped by lifecycle status) or a list view
-
Search and filter incidents
-
Create new incidents manually when an issue needs to be tracked outside the automated agentic workflow
-
Track progress and update status of incidents
-
Take action on incidents
To access incidents created in your organization, navigate to ThreatStream Next Gen > Security Operations > Incidents.
The Incidents page defaults to the tile view. Use the tile and list view icons ( ) in the top right corner to toggle between views.
(Click the image to enlarge it.)
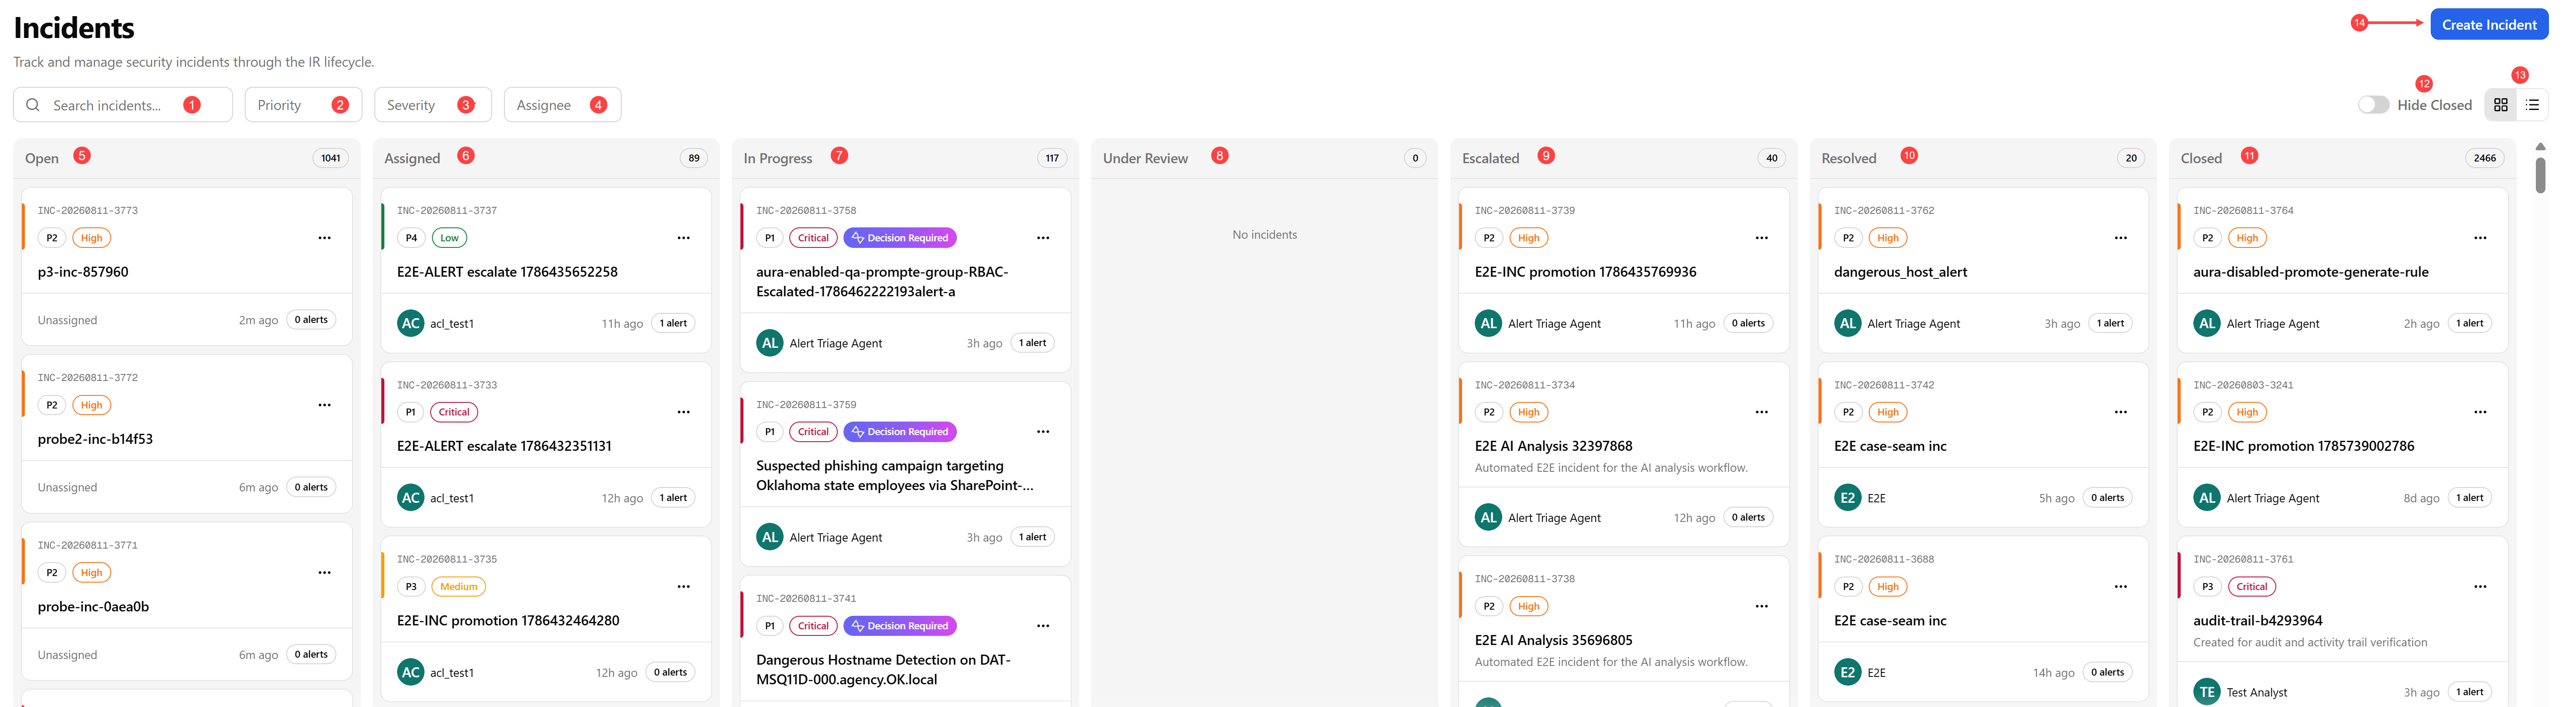
The columns on the tile view correspond to incident lifecycle states:
 Search: Search across incident titles and descriptions.
 Priority: Filter incidents by their priorities—P1, P2, P3, or P4.
 Severity: Filter incidents by their severity—Critical, High, Medium, or Low.
 Assignee: Filter incidents by their assignee.
 Open: Unassigned incidents with no active owner. These are manually created incidents that are ready to be picked up by an assignee for investigation.
 Assigned: Incidents with an analyst assigned but the investigation has not started. At this stage, assignees can either start an investigation and move the incident to In Progress, or close it.
 In Progress: Incidents which are actively being investigated. Incidents created by the Alert Triage Agent land in this column and require your decision to either escalate them to a case, move them to the Under Review column, or close.
 Under Review: Incidents under review. Incidents in this status remain open while a human evaluates the findings, recommendations, or proposed disposition.
 Escalated: Incidents that have been escalated to a case by a human or agent for broader case management and response. You can either add them to cases or move them back to the In Progress status for further investigation.
 Resolved: Incidents that have been fully investigated and resolved. You can either add them to cases or close.
 Closed: Resolved and closed incidents. This column is hidden by default when Hide Closed is on.
 Hide Closed: Use this toggle to show or hide the Closed column without changing underlying data.
 Tile view or list view of the incidents. Click the view you prefer.
 Create Incident: Click Create Incident to manually create a new incident. See Creating Incidents for details.
Additionally, each incident tile displays the following:
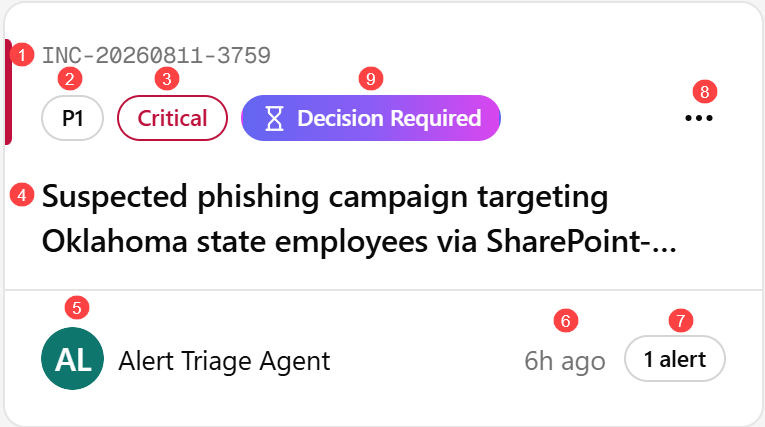
Priority left-border color (P1-red, P2-orange, P3-yellow, P4-green)
Priority badge
Severity badge
Incident title that you can click to open the Incident Detail panel
Assignee avatar and name
Relative timestamp
Alert count badge
More options menu (...) to access the following actions:
-
View Details: Opens the Incident Details slide-over panel. See Viewing Incident Details for details.
-
Open Incident Page: Opens the incident in a dedicated full-page view. See Opening the Full Incident Page for details.
-
Add to Case: Links the incident to an existing case or creates a new one. See Managing Incidents for details.
Note: An incident can only be linked to one case. Incidents that are already linked to a case do not show the Add to Case option. -
Assign To: Assigns the incident to an analyst. See Assigning Incidents for details.
-
Move to: Changes the incident lifecycle status. See Changing Incident Status for details.
-
Close: Closes the incident directly from the tile. See Managing Incidents for details.
Decision Required: Incidents created by the agent that require your decision.
Additionally, you can change the lifecycle status of an incident by directly dragging a card to a different column.