Managing Roles
Roles define user permissions, access to event log and OCSF data (for Security Analytics users only), and the time range available for searches. When a user logs in to the Anomali platform, their effective permissions are determined by the roles assigned to them. A user’s effective permissions are the union of all permissions granted by each assigned role. If at least one role grants a permission, the user receives it. If none of the roles grant a specific permission, the user does not receive it.
On the Roles tab of the User & Role Management page, Organization Administrators can create, modify, or delete custom roles.
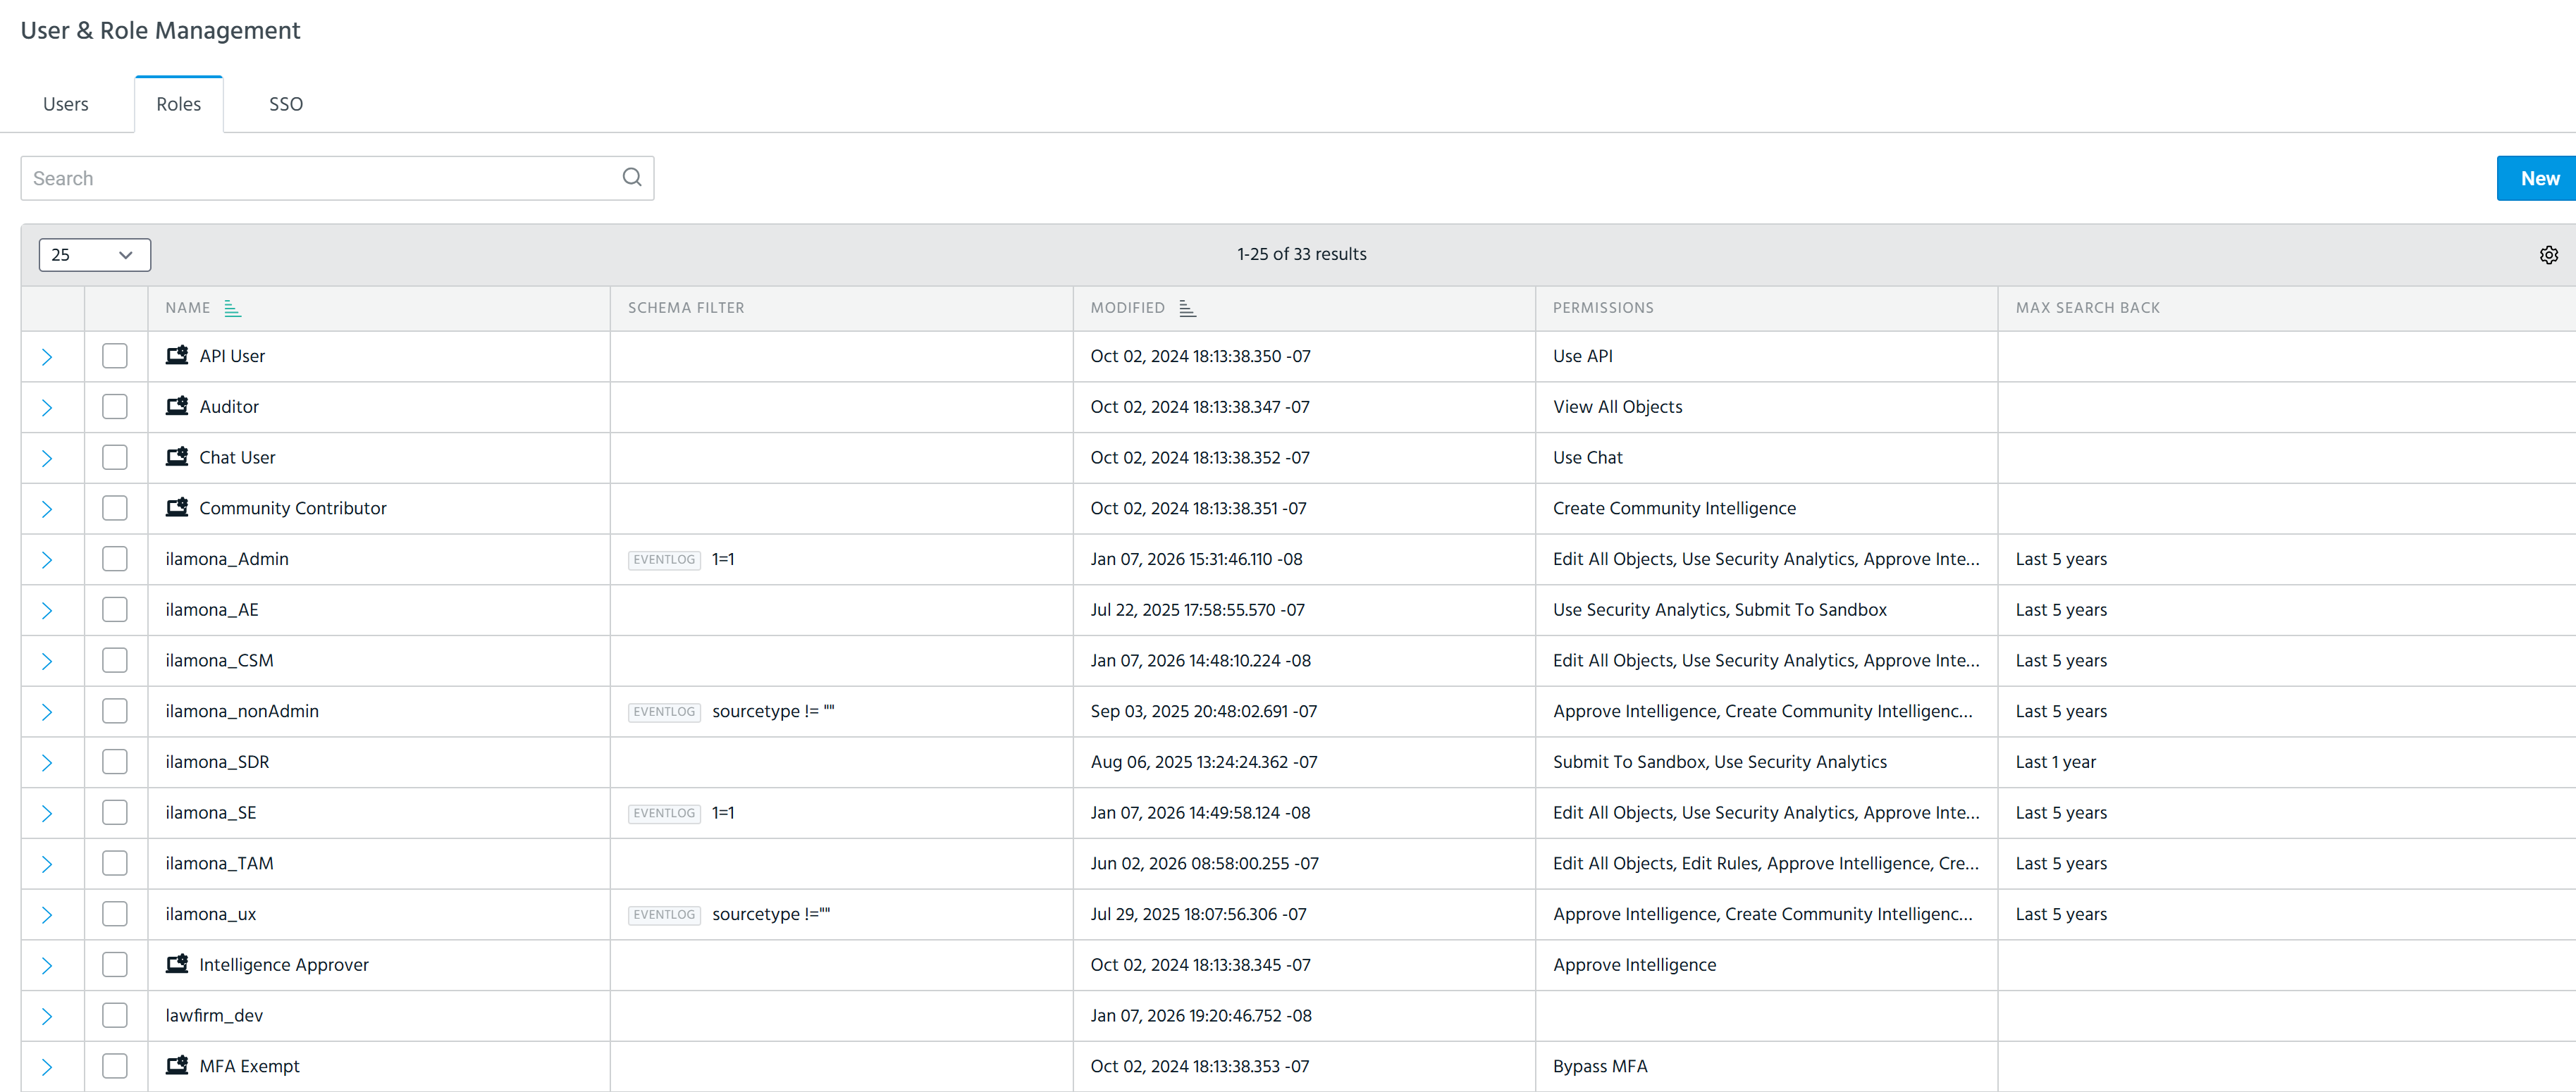
For details on custom role management, refer to these sections:
Creating a Role
Organization Administrators can create custom roles by selecting out-of-the-box permissions and creating eventlog or OCSF filters associated with these roles.
To create a new role:
-
In the bottom-left corner of the side navigation panel, click Settings (
 ) > User & Role Management.
 -
Click the Roles tab.
-
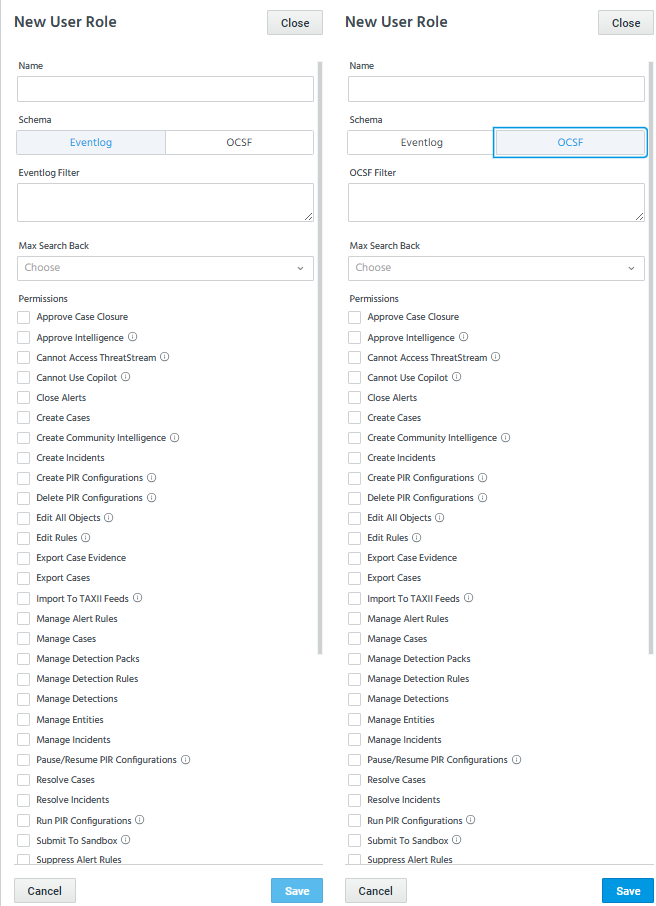
Click New to display the New User Role dialog box.
-
(Required) Enter a role name.
-
(Optional) Select the filter type for this role:
-
Eventlog—to specify an eventlog filter that grants visibility of the eventlog and associated lookup tables. Log source filters can be based on the following fields:
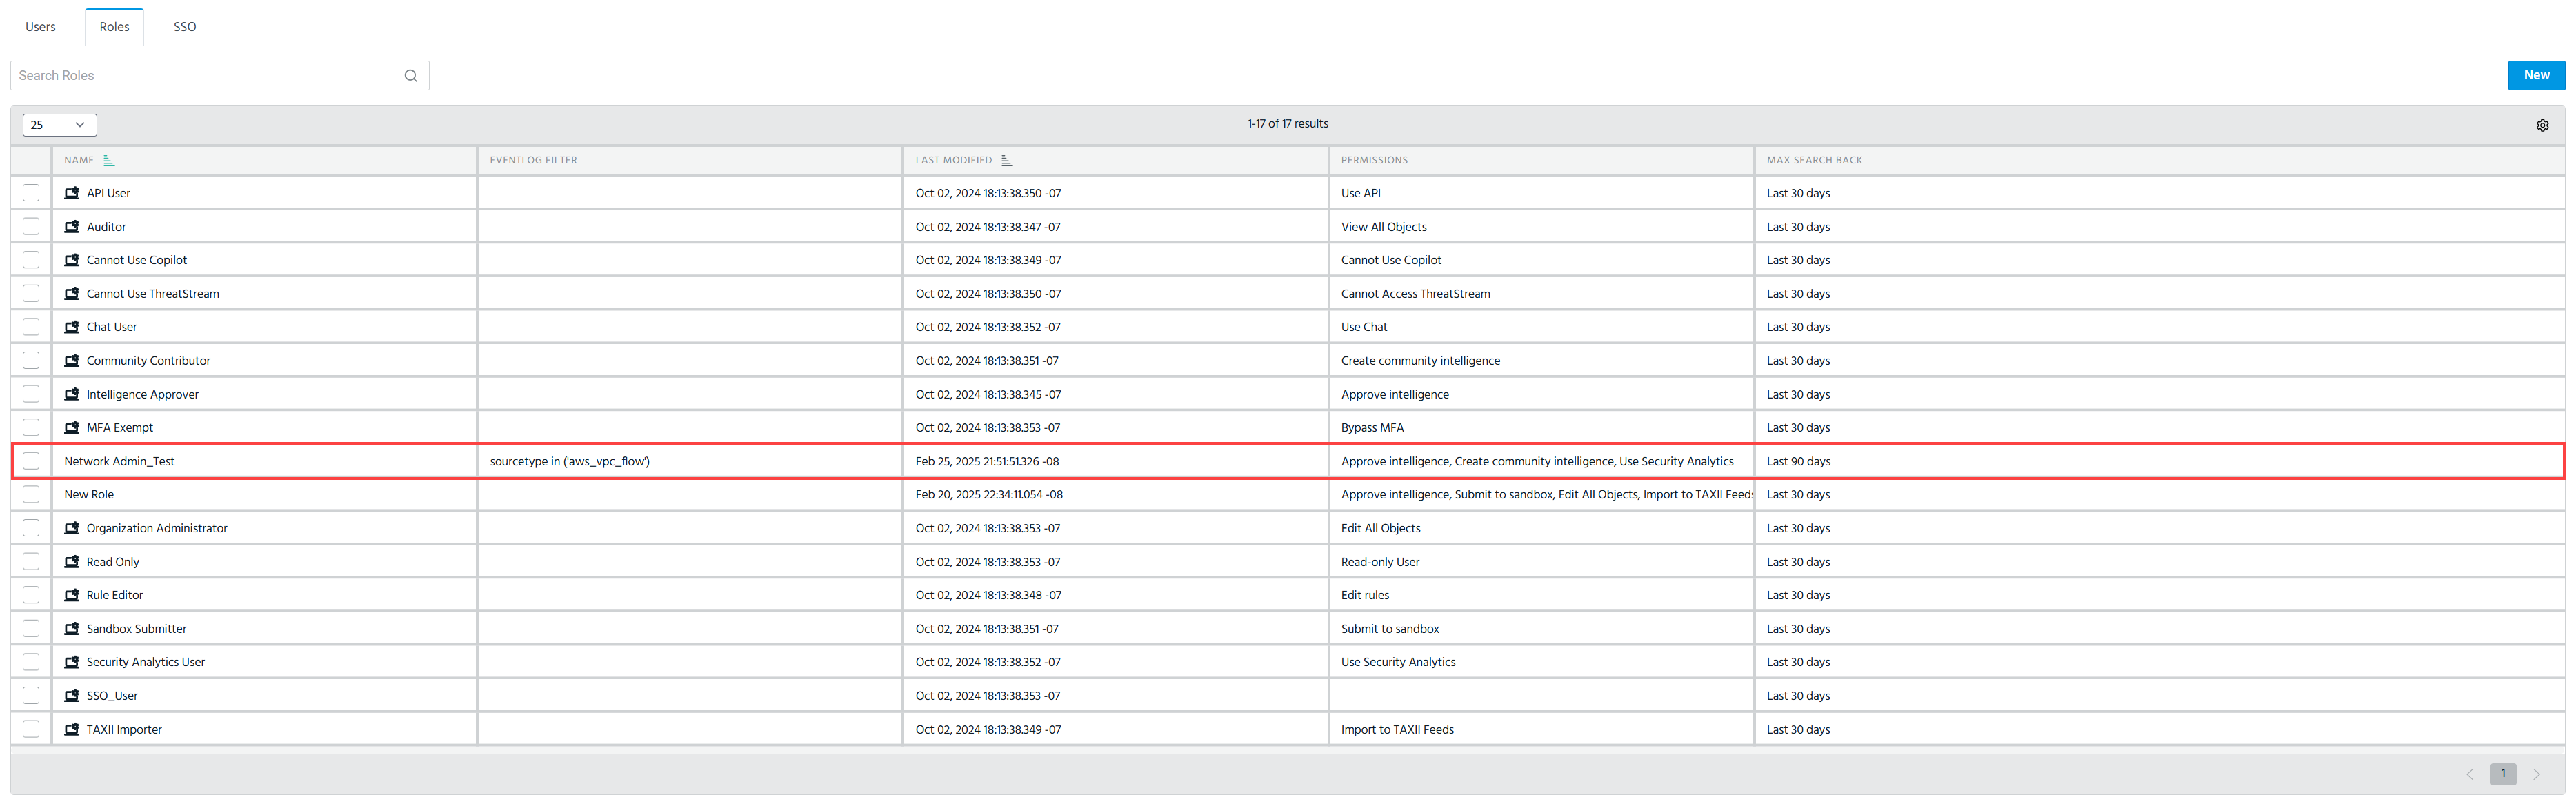
sourcetype,event_tags,ext_source, andext_sourcetype. For example, to create a filter that gives access to AWS VPC Flow logs, create a filter with the following syntax:sourcetype in ('aws_vpc_flow'). -
OCSF—to specify an OCSF filter that restricts access to specific OCSF event categories using a
category_nameconstraint. For example:category_name = 'Network Activity'. See OCSF Support for Role-Based Access Control for more information.The table below includes examples of eventlog and OCSF filters.
Role Log Sources Eventlog Filter OCSF Filter Network Admin AWS, VPC, Cisco, Fortinet sourcetype in ('aws_vpc_dns', aws_vpc_flow')category_name = 'Network Activity'SecOps Defender, Netscope, JumpCloud sourcetype in ('aws_vpc_ dns', 'aws_vpc_flow', 'defender_atp', 'netskope:application', 'jumpcloud')category_name in ('Network Activity', 'System Activity')HR Paylocity, Sapling event_tags in ('paylocity', 'sapling')category_name = 'Identity & Access Management Activity'Finance Coupa event_tags in ('coupa')category_name = 'Application Activity'Anomali Platform Administrator All sourcetype !=""All categories (no filter required) Notes:-
An active Security Analytics subscription is required to use the eventlog and OCSF schema fields.
-
Schema-based RBAC filtering is a limited-availability feature.
-
If the eventlog filter is not specified, the eventlog searching is not restricted by this role. If it is specified, then the eventlog searching is restricted to what is specified in the eventlog filter.
-
If a role does not have an eventlog filter, no restrictions are applied. If a user is assigned a role with an eventlog filter, the user can access only the data permitted by that filter.
-
If a user has more than one role assigned, their eventlog filters are OR'ed. Therefore, the user can view the eventlogs specified by any of the filters specified in the roles assigned.
-
A role supports only one filter type. Selecting a schema type clears any filter previously entered for the other schema. To grant a user access to both schemas, assign two roles: one with an eventlog filter and one with an OCSF filter. For details on how OCSF and eventlog filters affect search results under different role configurations, see OCSF Support for Role-Based Access Control in the Anomali Search documentation.
-
-
-
(Optional) Select the maximum search back range. This configuration controls how far back in time a user who is assigned this role can search the eventlog data. By default, the time range is last 90 days. You can choose one of the following values:
-
Last 1 day
-
Last 7 days
-
Last 30 days
-
Last 90 days
-
Last 6 months
-
Last 1 year
-
Last 2 years
-
Last 5 years
Notes:-
An active Security Analytics subscription is required to use the Max Search Back field.
-
The Max Search Back setting applies to all searches a user can run in the Search interface. It is not tied to the eventlog or OCSF filters applied to the role. If the user has more than one role assigned and some of those roles have different time ranges specified, then the longer of the time ranges is selected. If a role does not have a time range specified, then the search time range is not restricted for the role.
-
-
-
(Optional) Select the permissions granted by this role.
Refer to the table below for the description of permissions.
Permission Description Approve Case Closure Enables a user to approve or return a case that has been submitted for review. When the case closer also holds this permission, they can approve their own closure without a separate approver.
Note: This permission is only applicable to organizations that use ThreatStream Next Gen.
Approve intelligence Enables a user to approve imported intelligence.
Bypass MFA Makes a user exempt from multi-factor authentication. Close Alerts Enables a user to close an alert directly, without promoting it to an incident.
Note: This permission is only applicable to organizations that use ThreatStream Next Gen.
Create Cases Enables a user to create a new case and add incidents to it.
Note: This permission is only applicable to organizations that use ThreatStream Next Gen.
Create community intelligence Enables a user to create intelligence shared with the Anomali Community. This includes importing observables, creating Sandbox reports, as well as modifying tags and commenting on observables and Sandbox reports shared with the Anomali Community.
Create Incidents Enables a user to create a new incident, including from an alert.
Note: This permission is only applicable to organizations that use ThreatStream Next Gen.
Create PIR Configurations Enables a user to create new Priority Intelligence Requirements.
Note: This role is only applicable to organizations that use ThreatStream Next Gen.
Delete PIR Configurations Enables a user to delete Priority Intelligence Requirements.
Note: This role is only applicable to organizations that use ThreatStream Next Gen.
Edit All Objects Enables a user to edit all organization settings and most system objects. Actions such as managing rules, submitting to sandboxes, or using Security Analytics require additional permissions. Edit Rules Enables a user to edit rules.
Note: This is a legacy permission, retained for backward compatibility. It is mapped to both View/Manage Detection Rules and View/Manage Alert Rules below.
Export Case Evidence Enables a user to export Case Locker evidence as a structured bundle for auditors, legal teams, or law enforcement.
Note: This permission is only applicable to organizations that use ThreatStream Next Gen.
Export Cases Enables a user to export a formatted case summary report.
Note: This permission is only applicable to organizations that use ThreatStream Next Gen.
Import to TAXII Feeds Enables a user to push data from TAXII clients to your ThreatStream TAXII server.
Manage Alert Rules Enables a user to create, edit, delete, and enable/disable alert rules. Includes the ability to view alert rules.
Note: This permission is only applicable to organizations that use ThreatStream Next Gen. Access to a specific alert rule additionally depends on that rule's sharing settings. For details, see Managing Access to Alert Rules.
Manage Cases Enables a user to update case fields, assign analysts, add incidents to a case, and add items to the Case Locker. Includes the ability to view cases.
Note: This permission is only applicable to organizations that use ThreatStream Next Gen.
Manage Detection Rules Enables a user to create, edit, delete, and enable/disable detection rules. Includes the ability to view detection rules.
Note: This permission is only applicable to organizations that use ThreatStream Next Gen. Access to a specific detection rule additionally depends on that rule's sharing settings. For details, see Managing Access to Detection Rules.
Manage Detections Enables a user to mark a detection as a false positive. Includes the ability to view detections.
Note: This permission is only applicable to organizations that use ThreatStream Next Gen.
Manage Entities Enables a user to create, edit, and merge identities and assets; import entities from a CSV file; configure risk overrides and peer group multipliers; create custom peer groups; and configure connectors. Includes the ability to view entities.
Note: This permission is only applicable to organizations that use ThreatStream Next Gen.
Manage Incidents Enables a user to assign, update, and escalate an incident. Includes the ability to view incidents.
Note: This permission is only applicable to organizations that use ThreatStream Next Gen.
Pause/Resume PIR Configurations Enables a user to transition PIR status between Active and Paused.
Note: This permission is only applicable to organizations that use ThreatStream Next Gen.
Resolve Cases Enables a user to submit a case for approver review, initiating the closure workflow. Includes the ability to view cases.
Note: This permission is only applicable to organizations that use ThreatStream Next Gen.
Resolve Incidents Enables a user to record a resolution determination and close an incident. Includes the ability to view incidents.
Note: This permission is only applicable to organizations that use ThreatStream Next Gen.
Run PIR Configurations Enables a user to trigger an on-demand PIR run.
Note: This permission is only applicable to organizations that use ThreatStream Next Gen.
Submit to Sandbox Enables a user to submit malware to a sandbox for detonation. This privilege also applies to sandbox submissions made through phishing mailboxes. See Analyzing Malware with the ThreatStream Sandbox for more information.
Suppress Alert Rules Enables a user to apply or remove temporary suppression on an alert rule. Does not grant the ability to edit or delete the rule.
Note: This permission is only applicable to organizations that use ThreatStream Next Gen.
Triage Alerts Enables a user to assign alerts, record a triage verdict, and mark an alert as a false positive. Includes the ability to view alerts.
Note: This permission is only applicable to organizations that use ThreatStream Next Gen.
Use OAuth 2.0 API Credentials Enables a user to create and manage OAuth 2.0 API credentials. When this permission is enabled, a user can generate a client ID and a Secret Key which can be used to obtain access tokens for integrating ThreatStream with third-party applications in a secure, standards-based manner. For details, see Managing OAuth 2.0 API Credentials .
Note: This is a limited-availability feature.
Use Security Analytics Enables a user to access Anomali Security Analytics. Read Only users can also be assigned the Security Analytics User system role, thus enabling Read Only users to access the Anomali Security Analytics user interface. For details on system roles, see Using System Roles.
Note: An active Security Analytics subscription is required to apply this permission to a role.
View Alert Rules Enables a user to see the alert rules list, rule configuration, and alert volumes.
Note: This permission is only applicable to organizations that use ThreatStream Next Gen. Access to a specific alert rule additionally depends on that rule's sharing settings. For details, see Managing Access to Alert Rules.
View Alerts Enables a user to see alert records and triage history, and to add comments.
Note: This permission is only applicable to organizations that use ThreatStream Next Gen.
View All Objects Enables a user to view all ThreatStream pages and settings. When used with the system Auditor role, the user is limited to read-only regardless of other assigned permissions. For details on the Auditor system role, see Using System Roles.
View Cases Enables a user to see the cases list and case details.
Note: This permission is only applicable to organizations that use ThreatStream Next Gen.
View Detection Rules Enables a user to see the detection rules list, rule configuration, and rule performance metrics.
Note: This permission is only applicable to organizations that use ThreatStream Next Gen. Access to a specific detection rule additionally depends on that rule's sharing settings. For details, see Managing Access to Detection Rules.
View Detections Enables a user to see detection records and enrichment data, and to add annotations.
Note: This permission is only applicable to organizations that use ThreatStream Next Gen.
View Entities Enables a user to see identities, assets, peer groups, connectors, and their audit history, and to export entity data.
Note: This permission is only applicable to organizations that use ThreatStream Next Gen.
View Incidents Enables a user to see incident records and linked alerts, and to add annotations.
Note: This permission is only applicable to organizations that use ThreatStream Next Gen.
View PIR Configurations Enables a user to see PIRs and their outputs.
Note: This permission is only applicable to organizations that use ThreatStream Next Gen.
Note: Permissions, such as Use API, Can Use Chat, SSO_User, and Read Only Account, cannot be added to custom roles. These permissions have their corresponding system roles which can be assigned to users along with custom created roles on the Users tab of the User & Role Management page. For details on user management, refer to Managing Users. For details on system roles, refer to Using System Roles.
-
Click Save.
The new role has been created and added to the list of organization roles.
Editing a Role
Organization Administrators can edit any role created within their organization.
To edit a role:
-
In the bottom-left corner of the side navigation panel, click Settings (
) > User & Role Management. -
Click the Roles tab.
-
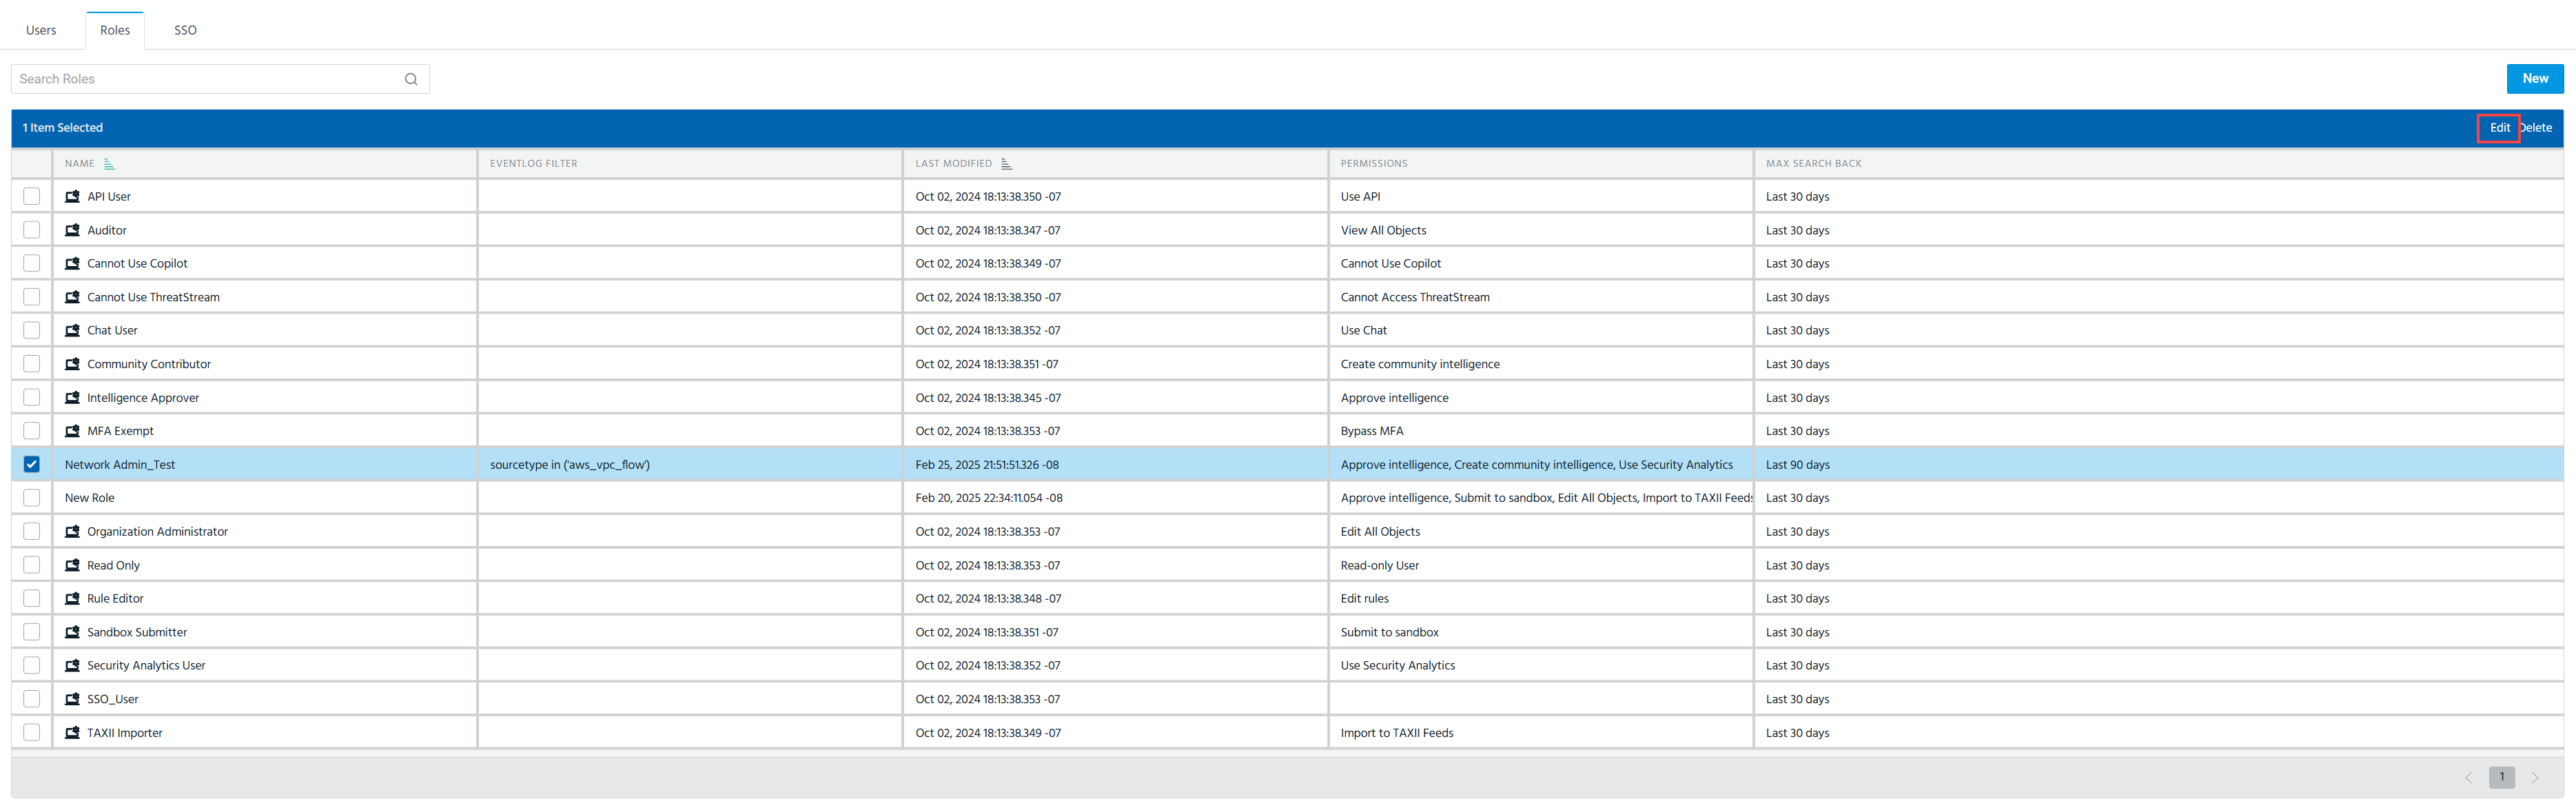
Select a role you want to edit.
-
Click Edit.
-
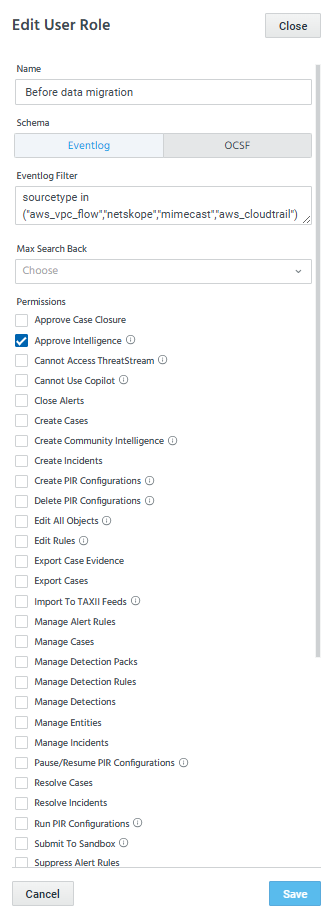
In the Edit User Role dialog box, make the necessary changes. Note that if you update the search time range, the update will impact the search time range and search results of all users that are assigned this role.
-
Click Save.
The role is updated.
Deleting a Role
Organization Administrators can delete the roles that are not assigned to any active user or SSO group. System roles that have the  icon next to them cannot be deleted.
To delete a role:
-
In the bottom-left corner of the side navigation panel, click Settings (
) > User & Role Management. -
Click the Roles tab.
-
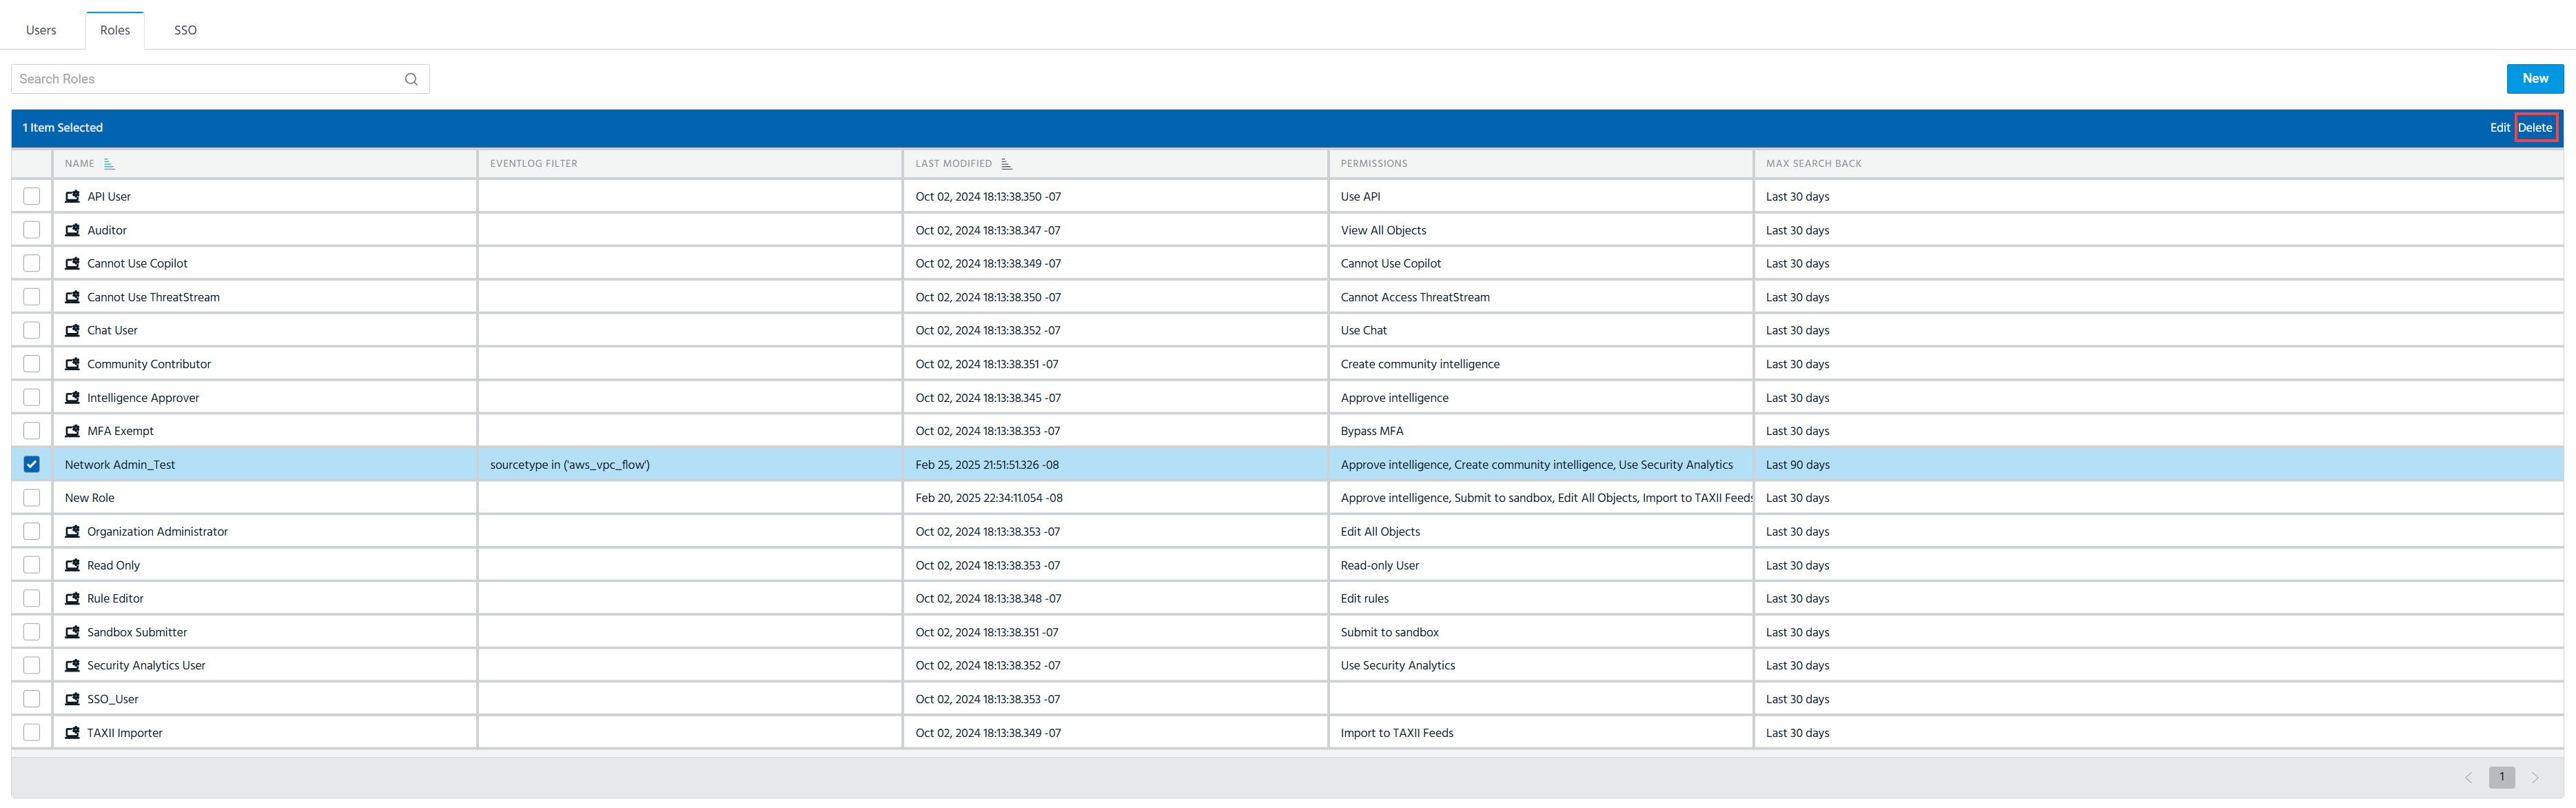
Select the role you want to delete.
-
Click Delete.
The selected role is deleted.