Microsoft Entra ID
To sync Microsoft Entra ID users and groups with the Anomali Agentic SOC Operations for identity management, you must first configure the Microsoft Entra ID integration on the Integrations Marketplace page. For details on identity management within the Anomali Agentic SOC Operations, see Identities.
Before You Begin
To configure the Microsoft Entra ID integration, you must register an app for integration with Anomali Agentic SOC Operations through the Microsoft Entra admin center and obtain the Client ID, Tenant ID, and a Client Secret for it.
To find your Tenant ID:
-
Sign in to https://portal.azure.com.
-
Select Microsoft Entra ID.
-
On the Overview page, copy the Tenant ID.
To register an application and obtain your Client ID:
-
In the left menu, select App Registrations > New Registration to register the Anomali Agentic SOC platform as a new application.
-
Enter a name for the application. For example, Anomali Agentic SOC.
-
Under Supported account types, select Accounts in this organizational directory only (Single tenant).
-
Select Register.
-
Go back to the App Registrations page, and select your newly registered app.
-
In the menu, select API Permissions > Add a permission.
-
Enable the following Microsoft Graph API permissions:
Permission Purpose User.Read.All Read user profiles and sign-in activity.
GroupMember.Read.All Read group memberships. AuditLog.Read.All Read sign-in logs such as MFA status, authentication methods, and risk signals.
-
Select Grant admin consent for <your organization>, and then confirm by selecting Yes.
To create a Client Secret:
-
Go back to the main page and select App Registrations.
-
Select your newly registered app.
-
In the menu, select Certificates & secrets.
-
Select New client secret.
-
Add Client Secret description and expiration time, and then select Add.
-
Copy the value of the Client Secret before leaving the page because you will not be able to retrieve it again.
Configuring the Microsoft Entra ID Integration
To configure the Microsoft Entra ID integration:
-
Navigate to ThreatStream Next Gen > Integrations Marketplace > Entity Sources.
-
Click the three-dot vertical menu on the Microsoft Entra ID tile and then click Configure.
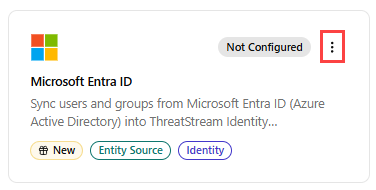
Alternatively, click the Microsoft Entra ID tile and then click Connect.
-
On the Configure Microsoft Entra ID page that opens, enter the following details:
Field Name Description Name Name of the integration. Description (Optional) Description for the integration. Credentials Client ID Client ID of the app registered in the Azure portal. Client Secret Client Secret of the app registered in the Azure portal. Tenant ID Tenant ID of the app registered in the Azure portal. Sync Configuration Batch Size Number of identity records written to the database in a single operation. Default: 500. Note: Anomali recommends keeping the default batch size value unless you experience memory issues. Large values reduce database round trips but consume more memory.Sign-in Activity Window (days) Number of past days of sign-in logs to fetch per sync. Affects MFA status, authentication method enrichment, and risk signal detection. Default: 30. Users Per Page Number of users fetched per paginated Graph API request. Default: 100. Maximum users allowed by the API is 999. Field Mapping Field mappings let you override which source attribute is used for each canonical identity field. This is useful when your directory uses non-standard attribute names or you wnat to prefer a specific field over the default. Display Name Source attribute to use as the user's display name. Email/Hostname Source attribute to use as the primary identity key. For example, use "mail" instead of UPN for Azure. Department Source attribute for department. Job Title Source attribute for job title. Manager Source attribute for the manager reference. Status Source attribute that determines active/disabled state. Source ID Source attribute to use as the stable internal identity ID. Sync Settings Sync Frequency Interval for incremental syncs. Default: Hourly. -
Click Create.
The Microsoft Entra ID integration is activated. Confirm that the integration status shows Active and health shows Healthy.
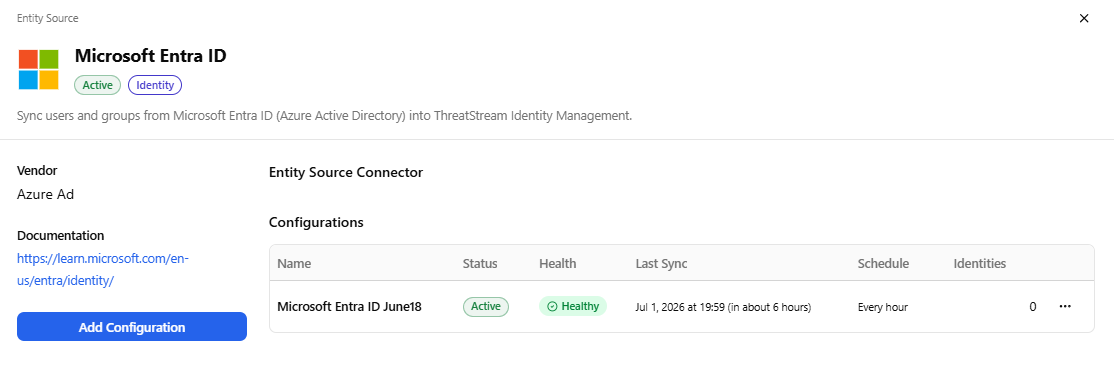
On the integration details page, you can view the integration status, health, the date and time of the last synchronization with the source, the synchronization schedule, and the number of identities available in the configuration. From this page, you can also force a synchronization, edit, deactivate, or delete the integration configuration. For details, see Managing Integrations.