Adding New Threat Model Entities
ThreatStream enables you to create your own threat model entities.
Like all other data types in ThreatStream—such as observables, investigations, or sandbox reports—threat model entities can be kept private to your organization, shared with specific trusted circles of which you are a member, or made visible to the Anomali community as a whole. You can select one of the three visibility settings when you publish the entity. Unpublished entities are only visible to users within your organization.
You can create threat model entities from the Threat Model tab of the Import Assistant, or from the Threat Model list page.
To add a new threat model entity from the import assistant:
-
Click the import icon
 to open the import assistant and then click Threat Model.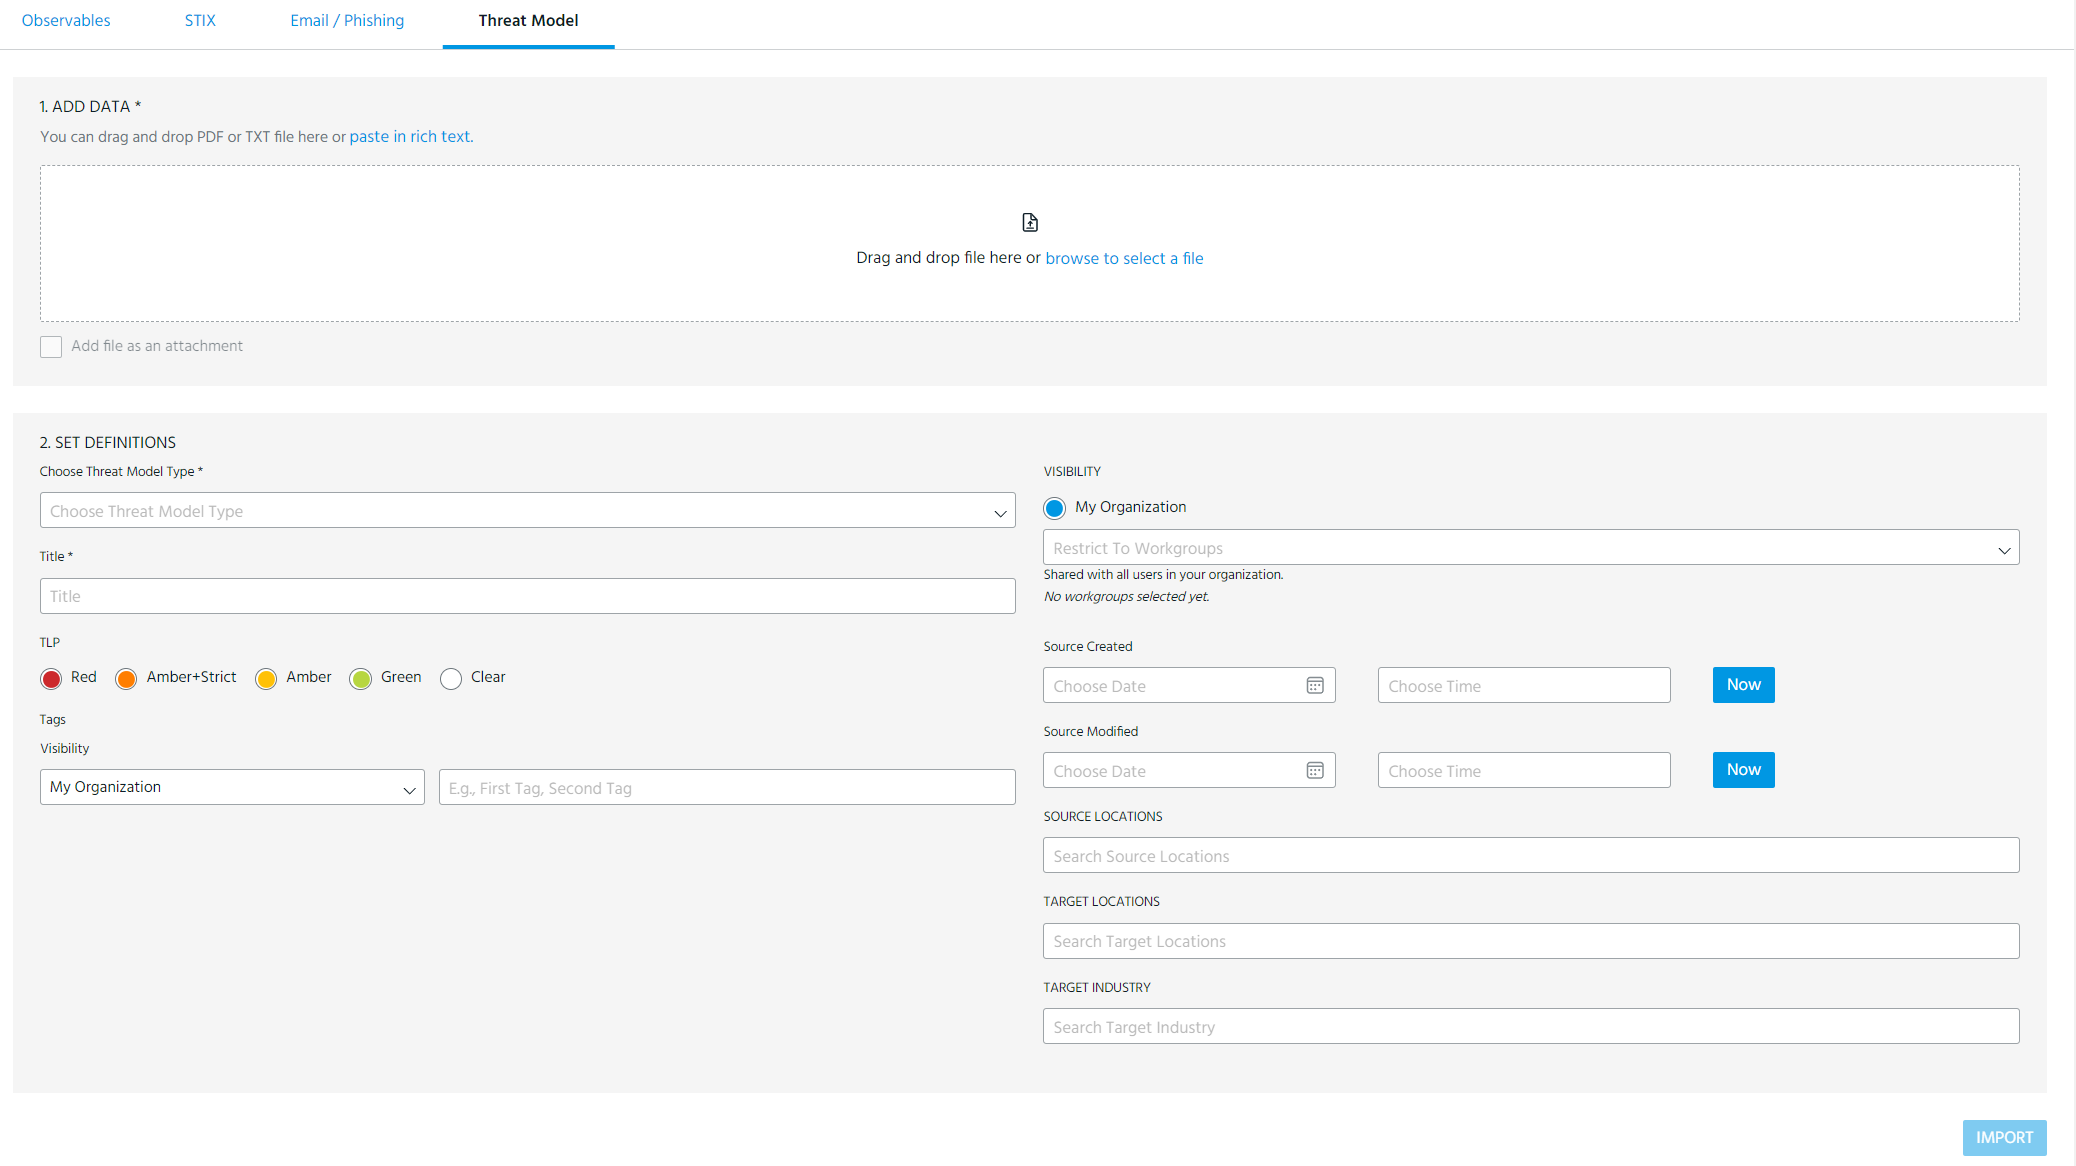
-
Enter the following information:
Field Description Add Data (Optional) For all entity types besides Signatures, you can paste in rich text or upload an existing PDF or TXT file to use as the basis for the threat model entity under Add Data.
When you paste in rich text, the formatting of the content is preserved in the description of the new entity, including any images.
Tip:
-
Cutting and pasting content from third party sources may not be completely transparent. If formatting issues occur, Anomali recommends pasting content into a text editor to remove formatting before pasting into ThreatStream.
-
To ensure all sizing and placement and enhancement features are available when editing the threat model entity in the future, Anomali recommends saving images locally and using the Insert Image function within the rich text editor.
When you upload PDF files, descriptions become read only and cannot be edited. Uploaded content is displayed in a PDF viewer within the description. If the entity is downloaded to a downstream integration, only the text from the PDF is included in the push.
When you upload TXT files, you will use the rich text editor exclusively when editing the description in the future. The markdown editor will not be available.
ThreatStream will parse the data you add for observable values. If observables are found, ThreatStream automatically triggers an import session and associates it with the threat model entity. An import session window is displayed to you immediately when you create the threat model entity. You can review the import session before you continue to edit the entity. For all entity types besides Threat Bulletins, associations between extracted observables and the threat model entity will be deleted if you ever delete the associated import session.
Note: The maximum file size for uploads is 20 MB.
Add file as an attachment For Actors, Campaigns, Incidents, Signatures, Threat Bulletins, TTPs, and Vulnerabilities, you can select Add file as an attachment if you'd like to attach the uploaded file to the threat model entity.
Choose Threat Model Type Select the type of threat model entity you want to create.
Note: If you add a Signature entity with a name that matches an existing Signature entity created by your organization, ThreatStream throws an error. In this case, you can either edit the existing Signature entity or create a Signature entity with a different name.Title Enter a Title for the entity.
Note: Titles must be 255 characters or less.
TLP (Optional) Select a TLP (Traffic Light Protocol) color to associate with the entity.
The TLP color provides a mechanism to communicate to consumers of the information whether further dissemination of this information is allowed; if yes, how freely can this information be distributed.
To learn more about TLP, search for "Traffic Light Protocol" in your favorite search engine.
Tags (Optional) Enter a term that can be used to search this entity later using search. To add private tags that are only visible to your organization, assign them the My Organization visibility setting. Tags assigned the Anomali Community visibility setting are visible to any user with access to the entity.
Tagging is a quick and easy way to add metadata to threat intelligence. For example, you can add a tag to indicate the industry that the threat intelligence is associated with or a tag to indicate the Kill Chain phase stage.
As you type the first few characters of the tag, the 20 most used tags in your organization from the previous seven days are displayed. Enable the Preferred Tags Only toggle to display and search though only the list of preferred tags. Alternatively, enter * to display preferred tags.
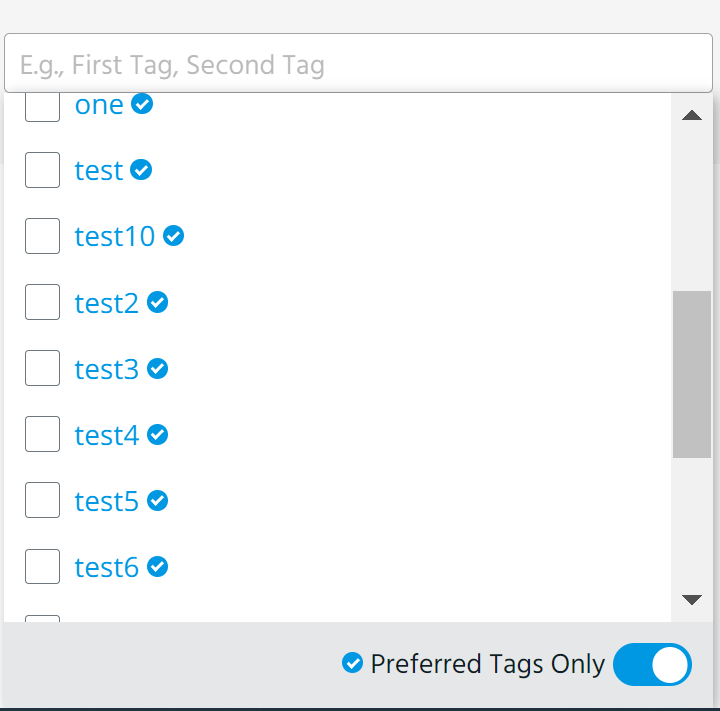
Note: Threat model entities can contain up to 200 tags per organization. Tags added by other organizations do not count toward this limit.
Visibility All threat model entities are private to your organization or specific workgroups in your organization until published.
If you select My Organization, you can further restrict the visibility to specific workgroups in your organization. To do so, click Restrict to Workgroups and select the workgroups to which you want to give exclusive access to the observables. You can only select workgroups you are a member of during import. At least one user in the workgroups you select must have the Approve Import privilege. For more information on workgroups, see Restricting Access to Intelligence with Workgroups .
You have the opportunity to share the entity with the Anomali Community or trusted circles when you publish a threat model entity.
See Reviewing Threat Model Entities for Publication for more information.
Source Created
(Optional)
Specify the date and time when the entity was created by its original source.
Click Now to use the current time.
Source Modified
(Optional)
Specify the date and time when the entity was last modified by its original source.
Click Now to use the current time.
Source Locations Select source locations. ThreatStream supports 325 locations (as defined by STIX 2.1) including 27 regions, 247 countries, 50 US States, and Washington DC. Target Locations Select target locations. ThreatStream supports 325 locations (as defined by STIX 2.1) including 27 regions, 247 countries, 50 US States, and Washington DC. Target Industry Select target industries. Target industries available for selection are defined by the STIX 2.1 Industry Sector vocabulary.
Note:
-
If creating an Identity entity, you must also select an Identity Class. See Editing Identities for more information on this field.
-
If creating a Malware entity, you must also specify the following required fields before proceeding: Malware Family. See Editing Malware for more information on this field.
-
If creating a Tool entity, you must select all applicable Tool Types. See Editing Tools for more information on this field.
-
-
Click Import.
The new entity has been created. You are redirected to the entity details page in edit view. The Import Details window is displayed.
-
(Optional) Create SROs between the new entity and other entities in the Anomali Threat Model. See Managing STIX Relationship Objects (SROs) for more information on SROs.
- Next to Associated With, click Edit
- On the Association tab, select the threat model entities or observables with which you want to create the association.
-
On the Details tab, select the SRO of interest under Type.
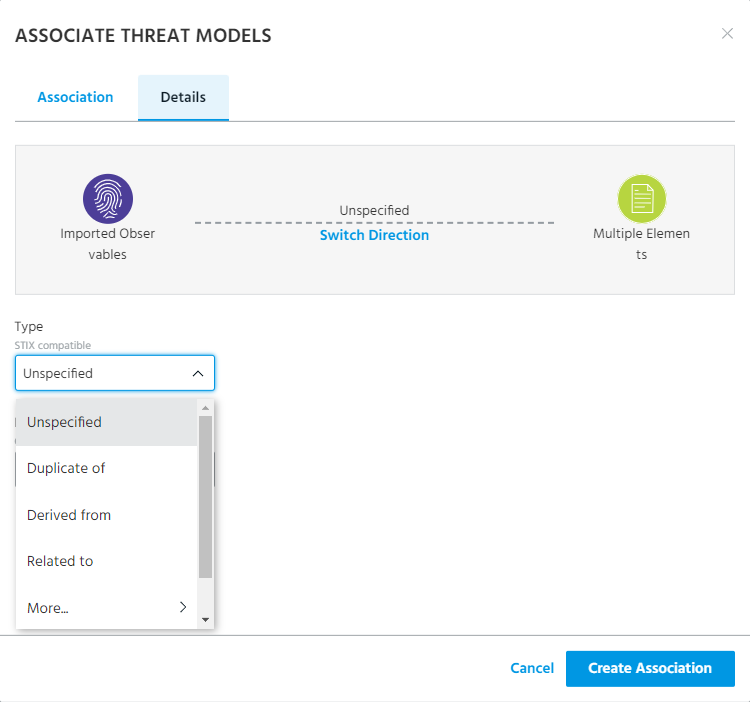
Hover over More... to view a full list of available SROs
To add a custom SRO, click Custom and enter the custom value under Custom Type.
- Click Switch Direction to select the desired SRO direction.
- (Optional) Add a Label to the SRO to provide additional contextual information for the association.
-
Click Create Association.
The SRO has been created.
-
Before closing the Import Details window, review the information and approve or reject the import session directly from the import session window.
After approving the import session or closing the window, you can continue building out the entity with specific details from the edit screen.
To add a new threat model entity from the Threat Model list page:
-
Navigate to Analyze > Threat Model.
-
Click New.
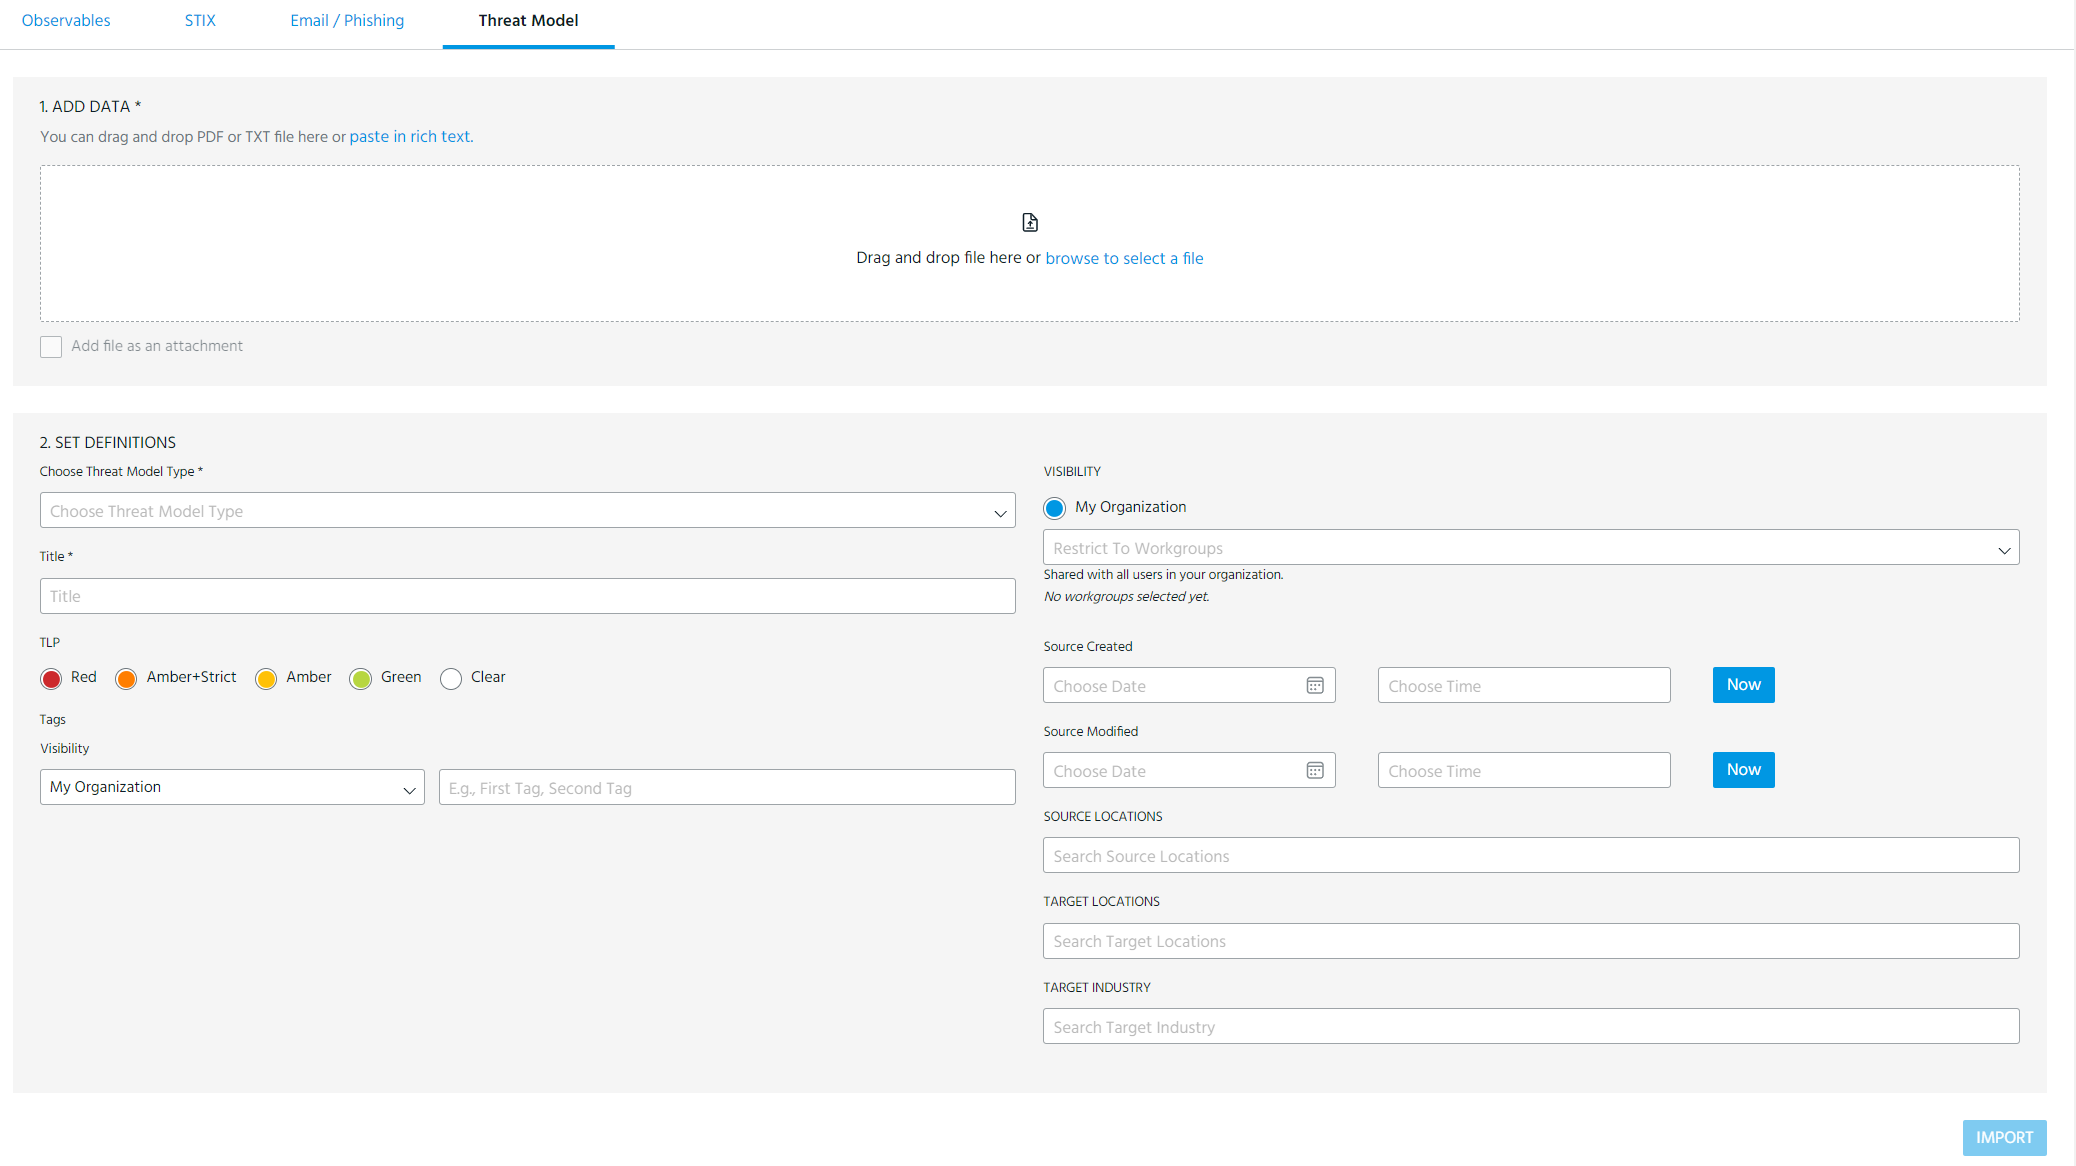
-
Enter the following information:
Field Description Choose Threat Model Type Select the type of threat model entity you want to create. Title Enter a Title for the entity.
Note: Titles must be 255 characters or less.
Visibility All threat model entities are private to your organization or specific workgroups in your organization until published.
To restrict visibility to specific workgroups, click Restrict To Workgroups and select the workgroups to which you want to give exclusive access to the entity. For more information on workgroups, see Restricting Access to Intelligence with Workgroups .
You have the opportunity to share the entity with the Anomali Community or trusted circles when you publish a threat model entity.
See Reviewing Threat Model Entities for Publication for more information.
TLP (Optional) Select a TLP (Traffic Light Protocol) color to associate with the entity.
The TLP color provides a mechanism to communicate to consumers of the information whether further dissemination of this information is allowed; if yes, how freely can this information be distributed.
To learn more about TLP, search for "Traffic Light Protocol" in your favorite search engine.
Tags (Optional) Enter a term that can be used to search this entity later using search. To add private tags that are only visible to your organization, assign them the My Organization visibility setting. Tags assigned the Anomali Community visibility setting are visible to any user with access to the entity.
Tagging is a quick and easy way to add metadata to threat intelligence. For example, you can add a tag to indicate the industry that the threat intelligence is associated with or a tag to indicate the Kill Chain phase stage.
As you type the first few characters of the tag, the 20 most used tags in your organization from the previous seven days are displayed. Enable the Preferred Tags Only toggle to display and search though only the list of preferred tags. Alternatively, enter * to display preferred tags.
Add Description (Optional) For all entity types besides Signatures, you can paste in rich text or upload an existing PDF or TXT file to use as the basis for the threat model entity under Add Description.
When you paste in rich text, the formatting of the content is preserved in the description of the new entity, including any images.
Tip:
-
Cutting and pasting content from third party sources may not be completely transparent. If formatting issues occur, Anomali recommends pasting content into a text editor to remove formatting before pasting into ThreatStream.
-
To ensure all sizing and placement and enhancement features are available when editing the threat model entity in the future, Anomali recommends saving images locally and using the Insert Image function within the rich text editor.
When you upload PDF files, descriptions become read only and cannot be edited. Uploaded content is displayed in a PDF viewer within the description. If the entity is downloaded to a downstream integration, only the text from the PDF is included in the push.
When you upload TXT files, you will use the rich text editor exclusively when editing the description in the future. The markdown editor will not be available.
Note: The maximum file size uploads is 20 MB.
Parse description for observables Select Parse description for observables if you want ThreatStream to extract observable values from the description you added. If observables are found, ThreatStream automatically triggers an import session and associates it with the threat model entity.
An import session window is displayed to you immediately when you create the threat model entity. You can review the import session before you continue to edit the entity.
For all entity types besides Threat Bulletins, associations between extracted observables and the threat model entity will be deleted if you ever delete the associated import session.
Add file as an attachment For Actors, Campaigns, Incidents, Signatures, Threat Bulletins, TTPs, and Vulnerabilities, you can select Add file as an attachment if you'd like to attach the uploaded file to the threat model entity.
Source Created
(Optional)
Specify the date and time of when the entity was created by its original source.
Click Now to use the current time.
Source Modified
(Optional)
Specify the date and time of when the entity was last modified by its original source.
Click Now to use the current time.
Source Locations Select source locations. ThreatStream supports 325 locations (as defined by STIX 2.1) including 27 regions, 247 countries, and 50 US States and Washington DC. Target Locations Select target locations. ThreatStream supports 325 locations (as defined by STIX 2.1) including 27 regions, 247 countries, and 50 US States and Washington DC.
Target Industry Select target industries. Target industries available for selection are defined by the STIX 2.1 Industry Sector vocabulary. Note:
-
If creating an Identity entity, you must also select an Identity Class. See Editing Identities for more information on this field.
-
If creating a Malware entity, you must also specify the following required fields before proceeding: Malware Family. See Editing Malware for more information on this field.
-
If creating a Tool entity, you must select all applicable Tool Types. See Editing Tools for more information on this field.
-
- Click Save.
The new entity has been created. You are redirected to the entity details page in edit view.