Integrating with ServiceNow SecOps
ThreatStream provides a bidirectional integration with ServiceNow SecOps, which enables you to:
-
Create or update ServiceNow security incidents with details and observables from ThreatStream investigations.
-
Create or update ThreatStream investigations from ServiceNow security incidents.
To integrate ThreatStream with ServiceNow SecOps, the following high-level steps must be taken:
-
Install the Anomali ServiceNow Integration on your ServiceNow system using the steps provided in the Anomali ThreatStream ServiceNow Integration Installation and Configuration Guide. To locate this guide and the Anomali ServiceNow App, search for "Anomali ThreatStream Integration" on the ServiceNow Store. Look for Installation Guide under Supporting Links and Docs.
Note: For ThreatStream Cloud users, observables sent from ServiceNow SecOps to ThreatStream are added to investigations as candidate observables and not automatically imported. For ThreatStream OnPrem users, observables from ServiceNow SecOps are auto-approved and imported into the ThreatStream database before being attached to the associated ThreatStream investigation.
-
Activate the ServiceNow SecOps integration on ThreatStream using the steps in Activating the ServiceNow SecOps Integration.
-
Grant the following permissions to the ServiceNow user whose username will be used when activating the ServiceNow SecOps integration on ThreatStream:
-
snc_platform_rest_api_access
-
sn_si.basic
-
sn_ti.read
-
Activating the ServiceNow SecOps Integration
To synchronize ServiceNow SecOps intelligence with ThreatStream, activate the ServiceNow SecOps integration. You can activate the integration using either ServiceNow credentials (username and password) or OAuth 2.0 credentials (Client ID and Client Secret).
To obtain your ServiceNow Client ID and Client Secret (OAuth 2.0):
-
Ensure that the OAuth plugin is installed and active on your ServiceNow instance.
-
In the All navigation menu, type
sys_properties.listand press Enter to view the table with system properties. -
Ensure the
com.snc.platform.security.oauth.is.activesystem property exists and is set to true. -
Ensure the
glide.oauth.inbound.client.credential.grant_typesystem property exists. If it does not exist, create it and configure the it the following way:-
Set the Application scope to Global.
-
Click New. The System Property New record dialog box opens.
-
In the Name field, enter
glide.oauth.inbound.client.credential.grant_type. -
From the Type drop-down list, select boolen.
-
Set the Value to true.
-
Click Submit.
-
-
Create an OAuth application registry entry:
Navigate to All > System OAuth > Application Registry, and then click New.
-
Configure the application registry record:
-
Give the record a unique name. For example, ThreatStream OAuth Client.
-
Set Client type to Integration as a User.
-
Assign OAuth Application User to the user account typically used for the ServiceNow integration.
-
-
Retrieve Client credentials.
After submitting the record, reopen the application registry entry and copy the Client ID and Client Secret. Copy the Client Secret and save it in a safe place.
These values are required for activating the ServiceNow integration in ThreatStream.
To activate the ServiceNow SecOps integration:
-
In the bottom-left corner of the side navigation panel, click
 > ThreatStream and then click Integrations.
 - Click Activate on the ServiceNow tile.
-
Under Instance ID, enter the hostname of your ServiceNow instance.
Example: Enter xyz if the full FQDN of your instance is xyz.example.com.
Note: Specify only the hostname of your instance. FQDNs are not accepted.
- Select your ServiceNow domain. The following domains are available for selection:
service-now.com(Enterprise)servicenowservices.com(Federal)
- Choose your authentication method:
To use your ServiceNow credentials, enter:
- Username
- Password
- To use your ServiceNow OAuth 2.0 credentials, enter:
Client ID
Client Secret
Use Oauth2 Authentication
- Select SecOps.
- Select your ServiceNow user interface:
- SIR Legacy UI
- SIR Workspace UI
- SIR Legacy UI
- Click Save.
The ServiceNow SecOps integration is now active.
Creating and Updating Security Incidents
After activating the ServiceNow SecOps integration, you can create a security incident in ServiceNow from an investigation details page.
To create a security incident in ServiceNow from an investigation details page:
-
Navigate to Research > Investigations.
-
Click the investigation of your interest.
-
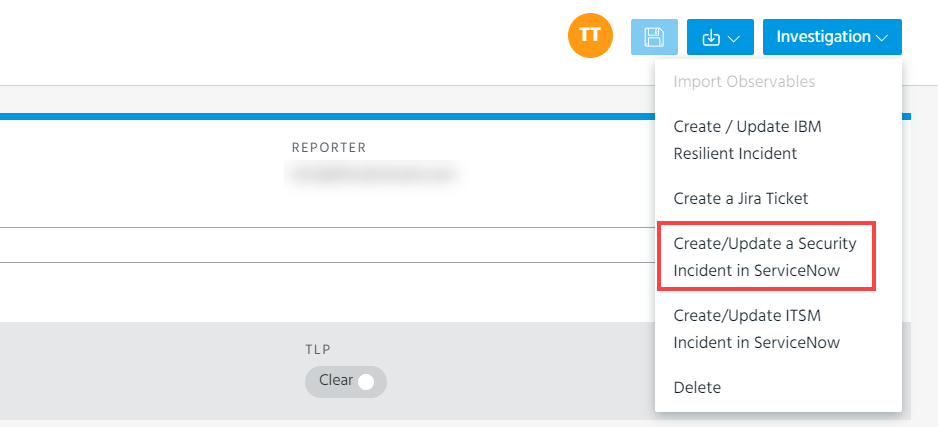
Click Investigation > Create/Update a Security Incident in ServiceNow on the investigations details page.
-
In the Create/Update ServiceNow Security Incident dialog box, select an Assignment Group and Incident Category for the security incident you are creating or updating.
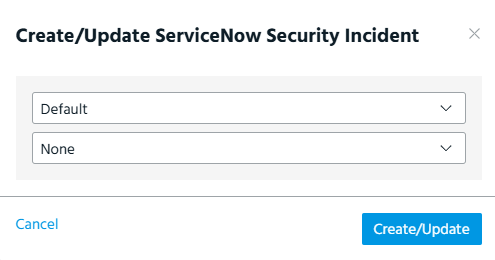
If no associated security incident exists, the drop-down lists display the preselected values—Default (Assignment Group) and None (Incident Category). If these values remain unchanged, the default Assignment Group (typically Security Incident Assignment) is used, as this is ServiceNow behavior when no group is specified, and no incident category is assigned to the security incident.
If a security incident already exists, the drop-down lists in the dialog box display the values that were previously assigned to it.
-
Click Create/Update.
When you take this action, the following tags are added to the investigation:
SNOW SIR ID: <Incident record ID>
Service Now <Incident ID>
These tags link the investigation to the created security incident, and are used to update the security incident after initial creation.
To update a security incident with the latest investigation information, click Create/Update a Security Incident in ServiceNow. If the tags on the investigation match a security incident in Service Now, the existing security incident is updated.