Enabling User Management with Active Directory and Active Directory Federation Services
ThreatStream provides the capability to integrate with Microsoft Active Directory Federation Services (ADFS), thus enabling single sign-on (SSO) and ThreatStream user administration from Microsoft Active Directory (AD) or Azure AD.
-
After you configure SSO and use an IDP for user management, user accounts are automatically created on ThreatStream when users authenticate to ThreatStream from your IDP for the first time.
Requirements
-
The integration supports the following platforms:
- Windows Server 2019 with an AD on Server 2019
-
Windows Server 2016 with an AD on Server 2016
Note: Windows Server platforms must have an active ADFS service configured. Windows Server 2012 is not supported. - Azure AD with an Azure AD Directory Services environment
- You must have an active SAML 2.0 configuration on ThreatStream. Contact Anomali Support for assistance.
Configuring Integration with ADFS and AD
Configuring the integration is a process, which consists of several steps. See the table below to learn about the steps required for the integration of ThreatStream with ADFS and AD.
Configuring the Integration on Microsoft AD
Configuring the integration on Microsoft AD involves creating groups corresponding to each permission in ThreatStream and one additional group which grants users access to ThreatStream. The table below lists all required permissions and the default group names recognized by ThreatStream. Groups can be given any name and mapped to their corresponding ThreatStream permission in a later step. However, if you use the default values, mapping is automatic.
| Default AD Group Name | ThreatStream Permission |
|---|---|
| SecGrp_TSAdminUser | Org Admin |
| SecGrp_TSAuditor | Can Audit |
| SecGrp_TSChangeRules | Can Use Rules |
| SecGrp_TSChatUser | Can Use Chat |
| SecGrp_TSCreateCommunityIntelUser | Create Anomali Community Intel |
| SecGrp_TSIntelApprover | Approve Intel |
| SecGrp_TSReadOnlyUser | Read Only Account |
| SecGrp_TSSubmitSandbox | Submit Sandbox |
| SecGrp_TSTaxiiUser | Import to TAXII Feeds |
|
SecGrp_TSUseMatch Note: You must configure the group for the Can use Security Analytics permission:
|
Can use Security Analytics |
|
SecGrp_TSUser Note: All users must be part of the SecGrp_TSUser group. |
ThreatStream User |
| SecGrp_TSViewAPIKeyUser | Show API Key for Users |
To create groups in Microsoft AD:
-
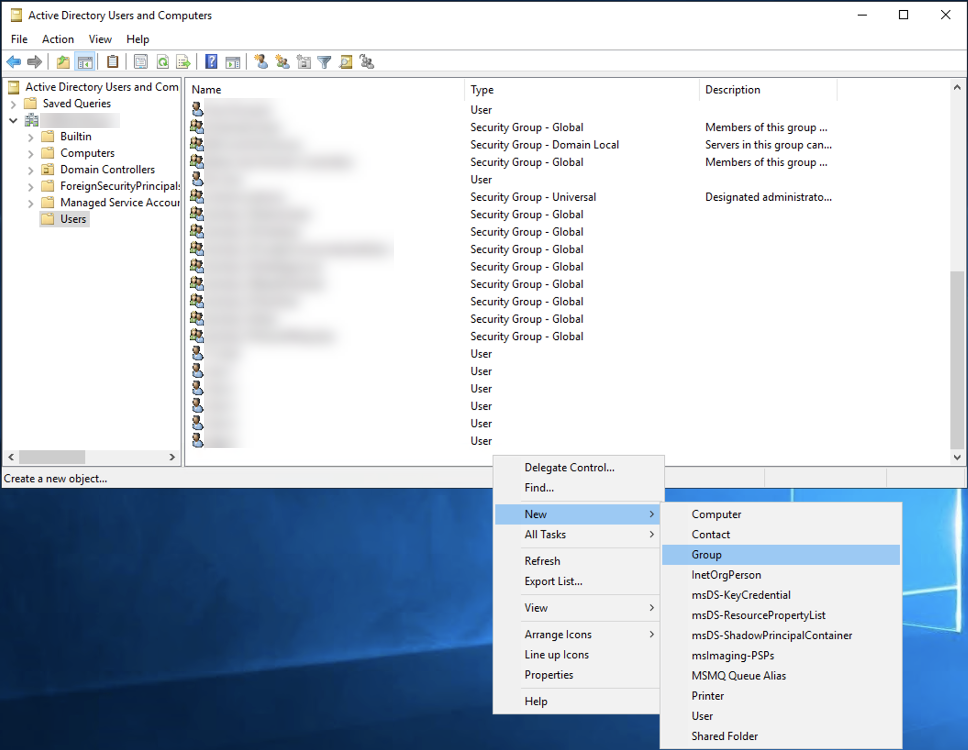
Right-click in the AD window and select New > Group.
-
Enter a Group name for the new group. Refer to the table above for the default group name values recognized by ThreatStream or enter a non-default value.
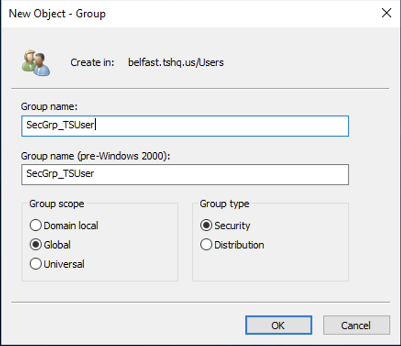
- Under Group Scope, select Global.
- Under Group Type, select Security.
- Click OK. The group is created.
Repeat this process for each permission listed in the table above. After creating each group, you can add desired permissions to each ThreatStream user in AD. These permissions will be synchronized with ThreatStream the next time the user logs in to ThreatStream.
When configuration on Microsoft AD is complete, proceed to Creating the Transform Claim Rules in ADFS to continue configuring the integration.
Creating the Transform Claim Rules in ADFS
To export groups from Microsoft AD to ThreatStream, you must configure a Transform Claim Rule for each ThreatStream related group you created in Microsoft AD.
To create transform claim rules in ADFS:
- From ADFS, open the Relying Party Trusts directory.
-
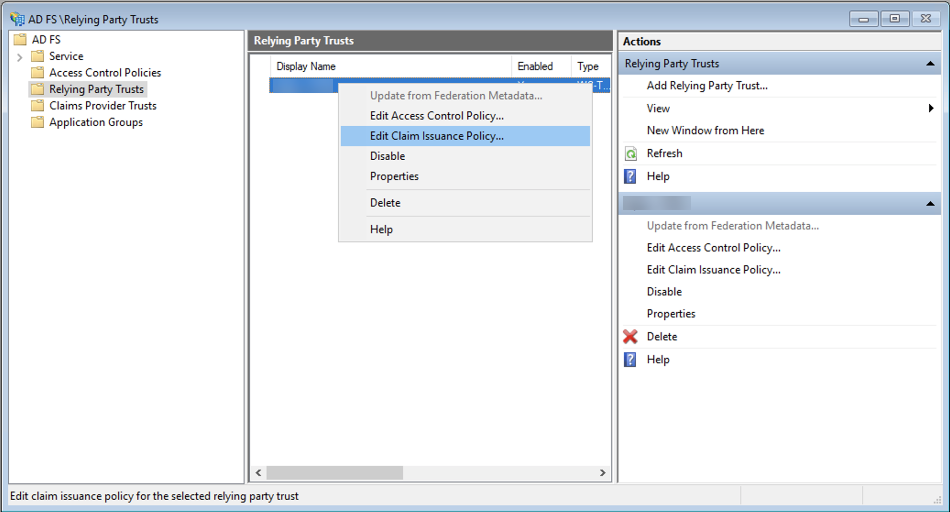
Right-click the Relying Party Trust associated with ThreatStream and select Edit Claim Issuance Policy.
-
If the following rules of the Send LDAP Attributes as Claims template type are configured on your system, proceed to step 4:
-
Get LDAP attributes as claims
-
Email to Name ID
Otherwise,
 Creating the rules with the Send LDAP Attributes as Claims template
To create the Get LDAP attributes as claims rule:
-
Click Add Rule, in the Edit Claim Issuance Policy dialog box
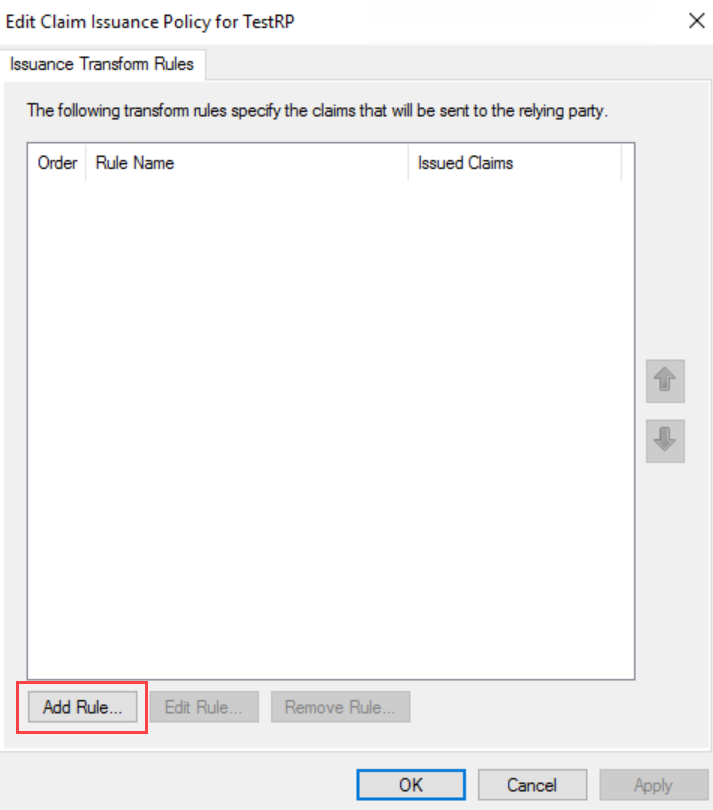
The Add Transform Claim Rule Wizard opens.
-
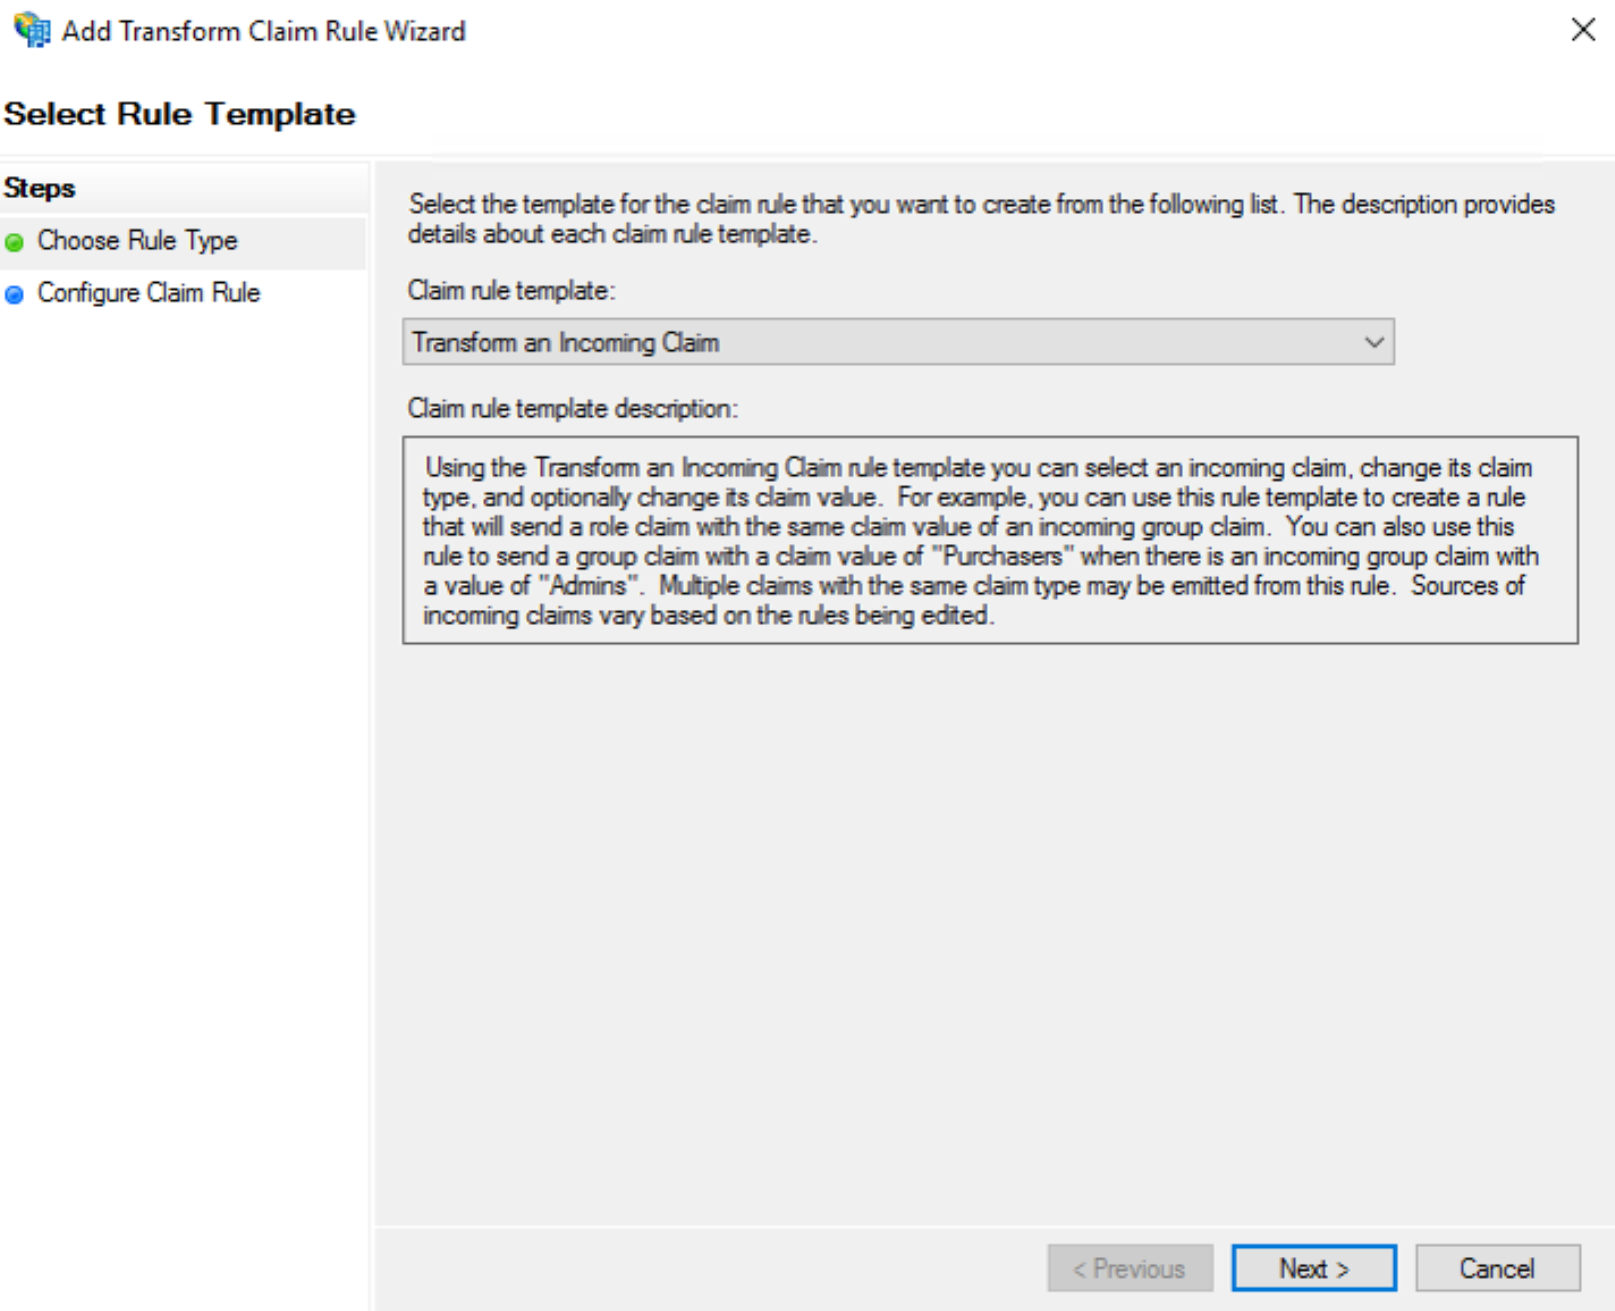
Select Send LDAP Attributes as Claims from the Claim rule template drop-down list and click Next.
-
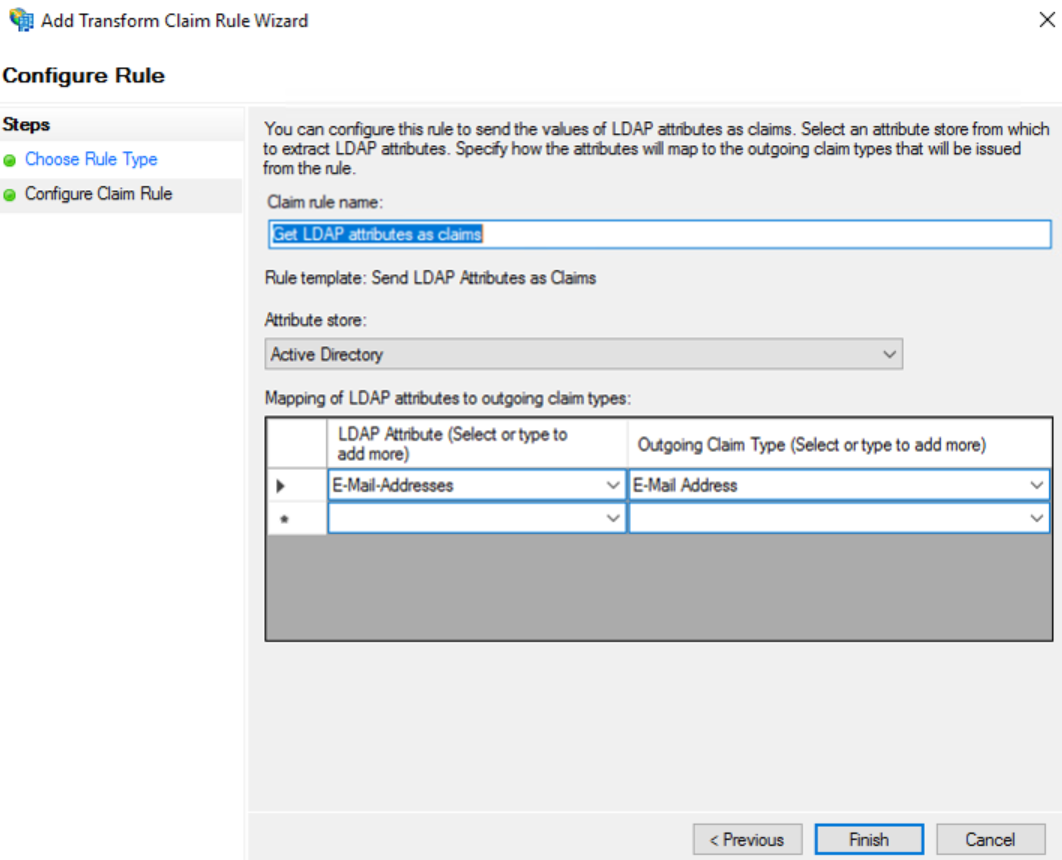
In the Configure Rule dialog box, enter "Get LDAP attributes as claims" in the Claim rule name field.
-
Select or type E-Mail Addresses in the LDAP Attribute column.
-
Select or type E-Mail Address in the Outgoing Claim Type column.
-
Click Finish.
-
In the Edit Claim Rules dialog box, click OK to save the rule.
To create the Email to Name ID rule:
-
In the Edit Claim Issuance Policy dialog box, click Add Rule. The Add Transform Claim Rule Wizard opens.
-
Select Send LDAP Attributes as Claims from the Claim rule template drop-down list and click Next.
-
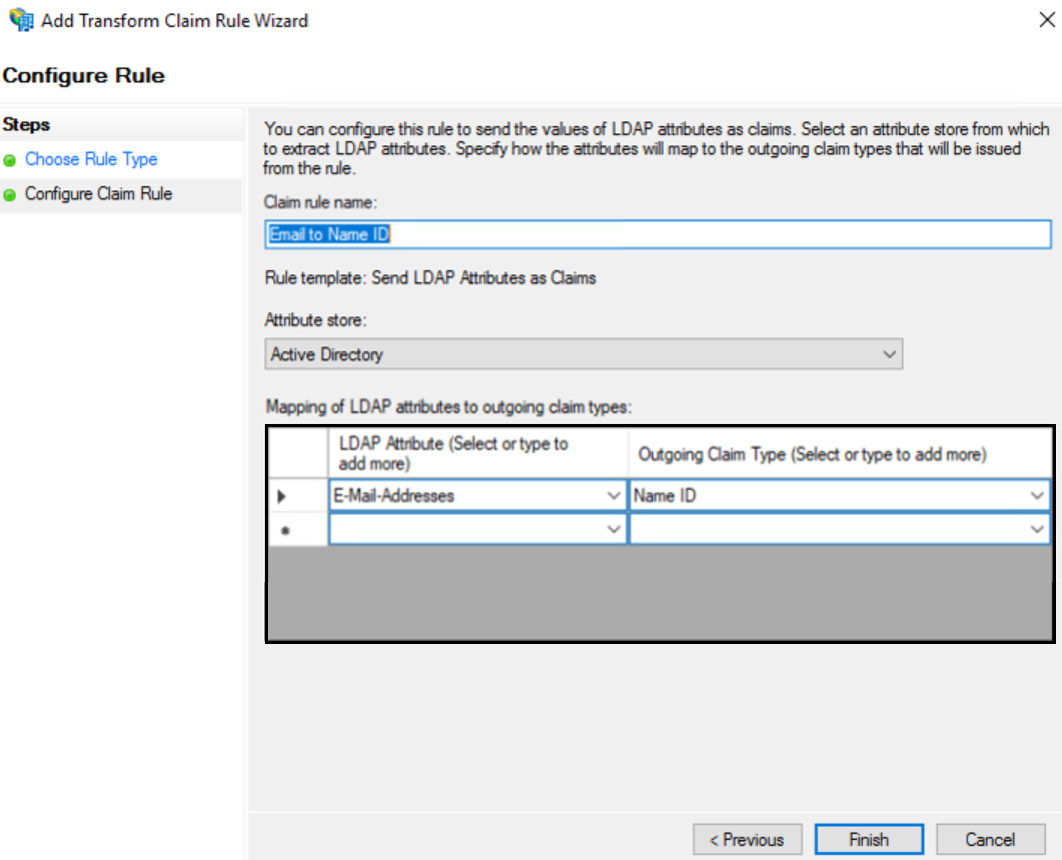
In the Configure Rule dialog box, enter "Email to Name ID" in the Claim rule name field.
-
Select or type E-Mail Addresses in the LDAP Attribute column.
-
Select or type Name ID in the Outgoing Claim Type column.
-
Click Finish.
-
In the Edit Claim Rules dialog box, click OK to save the rule.
-
-
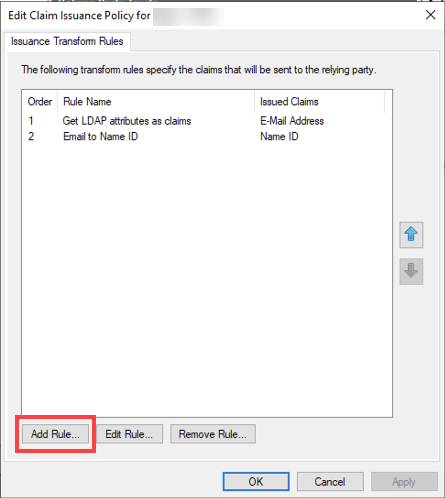
In the Edit Claim Issuance Policy dialog box, click Add Rule to create a rule for an AD group.
-
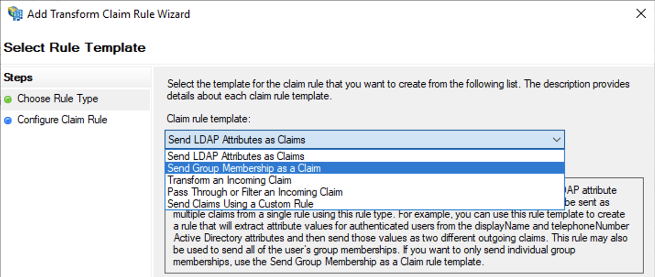
Select Send Group Membership as a Claim from the Claim rule template drop-down list.
-
In the corresponding field, enter a claim rule name for the rule. Anomali recommends using the name of the AD group for which you are creating the rule.
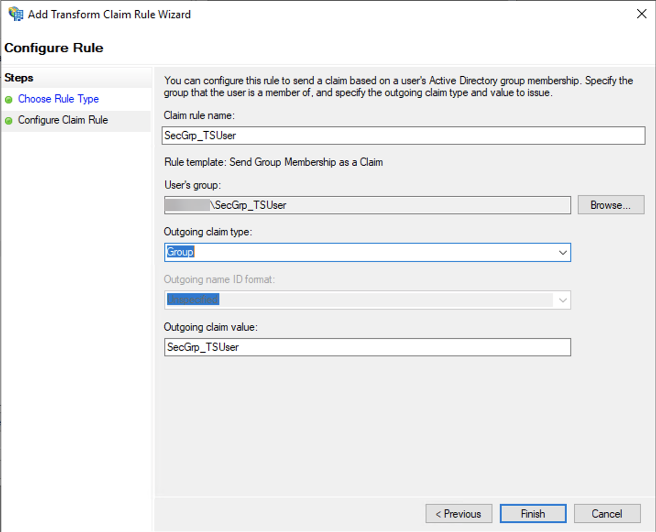
- Under User's group, click Browse and select the prior created AD group for which you are creating the rule.
- Under Outgoing claim value, enter the exact value of the AD group name for which you are creating the rule.
- Click Finish.
Repeat this process described for the Send Group Membership as a Claim template for each ThreatStream permission you created in AD. After adding rules for each group, proceed to Enabling the Integration on ThreatStream to complete configuration within ThreatStream.
Configuring the Integration on Azure AD
If you use Azure AD, you can use the instructions in this section to complete the Azure AD configuration steps. ThreatStream supports the mapping of permissions in ThreatStream to Azure AD Groups. You can use these groups in your Azure environment to manage user access or permissions inside the ThreatStream application.
To configure the integration on Azure AD:
-
Create a Non-Gallery Enterprise Application for ThreatStream.
- Within Azure AD, click Enterprise applications under Manage in the left menu.
- Click New Application.
- Under Add your own app, click Non-gallery application.
-
Enter a Name for the application.
Recommended value: ThreatStream
-
Set Assignment required? to No.
- Click Add. The application is created. You are directed to the Overview screen of the application.
-
Enable SAML for the application.
- From the Overview screen of the ThreatStream application, click 2. Set up single sign on.
- Under Select a single sign on method, click SAML.
- In the Basic SAML Configuration box, click Edit.
-
Under Identifier (Entity ID), enter an ID for the SAML configuration.
Anomali recommends using the ThreatStream API URL: https://optic.threatstream.com
-
Enter the following Reply URL:
https://optic.threatstream.com/api/v1/saml2/<idp-name>/acs/
where <idp-name> is the name of your identity provider (IDP). See Configuring an Identity Provider for SSO for more information.
- Click Save.
-
Add a Claim for the SAML configuration.
- In the User Attributes & Claims box, click Edit.
- Click Add new claim.
-
Enter a Name for the claim.
Required value: emailaddress
-
Enter the following Namespace value:
http://schemas.xmlsoap.org/ws/2005/05/identity/claims
- For Source, select Attribute.
- For Attribute, select user.mail.
- Click Save.
-
Add a Group Claim for the SAML configuration.
- On the User Attributes & Claims screen, click Add a group claim.
- Under Which groups associated with the user should be returned in the claim?, select Security Group.
- For Source attribute, select Group ID.
- Select Customize the name of the group claim.
- Select Emit groups as role claims.
- Click Save.
Anomali recommends adding a filter to the claim to only send ThreatStream groups. Alternatively, ensure that the ThreatStream groups are not dropped from the claim due to exceeding the maximum number of groups in a claim. -
Collect your SAML Signing Certificate, Login URL, and Azure AD identifier. You will use this information when configuring your identity provider in ThreatStream. To locate this information:
- From the SAML-based Sign-on screen for the application, locate the SAML Signing Certificate box. Next to Certificate (base 64), click Download.
- Locate the Set up <application name> box. Note the Login URL (also known as SAML Single Sign-On Service URL) and Azure AD Identifier (also known as SAML Entity ID) values.
-
Create a group in Azure AD corresponding to each permission in ThreatStream, as well as one additional group that grants users access to ThreatStream. The table below lists all required permissions and the default group names recognized by ThreatStream. Groups can be given any name and mapped to their corresponding ThreatStream permission in a later step. However, if you use the default values, the mapping is automatic.
Default AD Group Name ThreatStream Permission SecGrp_TSAdminUser Org Admin SecGrp_TSAuditor Can Audit SecGrp_TSChangeRules Can Use Rules SecGrp_TSChatUser Can Use Chat SecGrp_TSCreateCommunityIntelUser Create Anomali Community Intel SecGrp_TSIntelApprover Approve Intel SecGrp_TSReadOnlyUser Read Only Account SecGrp_TSSubmitSandbox Submit Sandbox SecGrp_TSTaxiiUser Import to TAXII Feeds SecGrp_TSUseMatch
Note:
You must configure the group for the Can use Security Analytics permission:
-
To control user access to Security Analytics, if your organization is subscribed to Anomali Security Analytics.
-
To control user access to AQL-based dashboards. For more information on AQL-based dashboards, visit the Anomali Dashboards Help Center.
Can use Security Analytics SecGrp_TSUser
Note: All users must be part of the SecGrp_TSUser group.
ThreatStream User
SecGrp_TSViewAPIKeyUser Show API Key for Users To add groups in Azure AD:
- From the Azure Active Directory Overview screen, click Groups under Manage in the left menu.
- Click New Group.
- Under Group type, select Security.
- Under Group name, enter the name of the permission.
-
Click Create. The group is created.
Repeat this process for each permission listed above.
Note: The newly created security groups must be assigned to the proper Enterprise application (ThreatStream) to be visible when the application calls for the permissions.After creating each group, you can add desired permissions to each ThreatStream user in AD. These permissions will be synchronized to ThreatStream the next time the user logs in to ThreatStream.
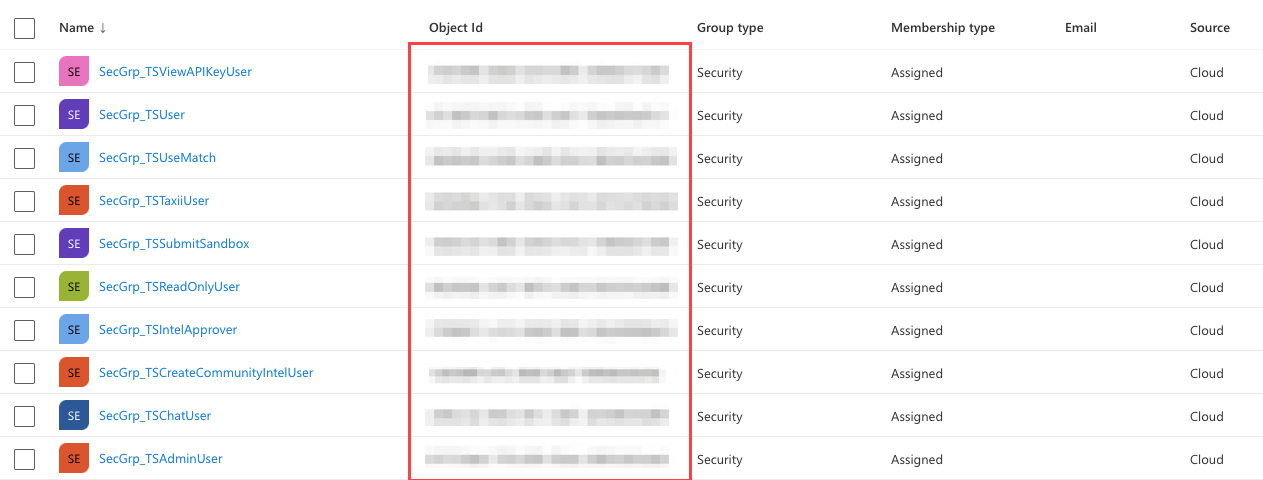
Note the Object ID values for each permission you created. You will use these IDs to finish configuring the integration within ThreatStream in a later step.
When configuration on Azure AD is complete, proceed to Enabling the Integration on ThreatStream to complete configuration within ThreatStream.
-
Enabling the Integration on ThreatStream
To finish configuring the integration, you must configure a Break Glass account and map the groups created in Microsoft or Azure AD onto their corresponding permissions in ThreatStream.
To enable the integration on ThreatStream:
-
In the bottom-left corner of the side navigation panel, click
 > ThreatStream and then click SSO.
 -
Select a user account that will serve as the Break Glass Account and click Update.
Notes:Only Org Admin users are available in the drop-down list.
The Break Glass Account should be an independent, local account on ThreatStream. Another account with the same configuration must not exist in the SSO IDP. Doing so will cause login failures. See Managing Organization Users to learn how to create a local account on ThreatStream.

- (Recommended) Enable the Use SSO for login exclusively if you want to prevent users from logging in through the ThreatStream login page.
- Add an identity provider, as described in Configuring an Identity Provider for SSO.
-
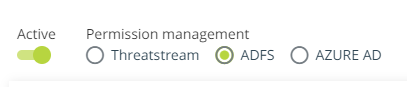
After the identity provider is configured, specify ADFS or Azure AD under Permission management.
-
If you selected ADFS, you must specify the Group Name corresponding to each permission. If you used the Default AD Group Name values, the Group Names are automatically mapped to the correct permission. If you used non-default names, click the first permission in the list. Specify the correct Group name in the Edit SSO Permission Mapping window and click Save.
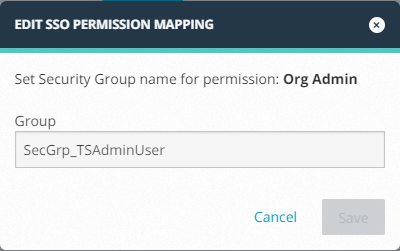
Repeat this process for each permission.
If you selected Azure AD, you must specify the Group IDs corresponding to each permission. You noted the Group IDs in the final step of the Azure AD configuration process. To do so, click the first permission in the list. Specify the correct Group ID in the Edit SSO Permission Mapping window and click Save.
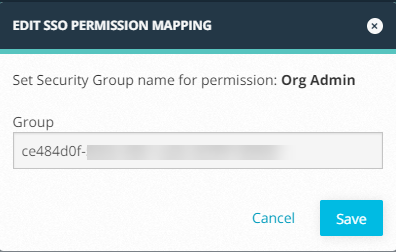
Repeat this process for each permission.
Configuration is complete and your integration is now active.